21/10/2021 - 5/12/2021 (Week 9 - Week 15)
Chung Yi Ki / 0345014 / BDCM
Illustration
and Visual Narrative
Task 3 and Final Project / Graphic novel (Webtoon)
and Motion Comic
LECTURE
Week 9 / How to make comics
Getting an idea when creating a comic
Comic is all about telling stories visually. Before the pictures comes the
story idea. One way to get an idea for a story is to extract from experience
and these type of stories are often what the audience likes the most as they
can relate to it. If you’re clueless, try starting out with a random word
and build the idea from there. After that, creating a mind map can help to
organize the ideas and also would help in creating the concept from it.
5 practices to help in getting ideas
- Watch cartoons/movies
- Play new games
- Read new comics/graphic novels
- Listen to different genres of music
- Try new dish to stimulate our senses
Avoid getting too stressed out when finding an idea or you’ll be stray
further away. Ideas and stories that are able to relate to the audience will
be more well-liked. Besides, using simple keywords when starting to write a
story will be able to help in developing it further too.
Week 10 / Transitions
Types of panel transitions

|
|
Fig 1.1 Types of panel transitions Source: https://slideplayer.com/slide/8250435/ |
Moment-to-moment
Done by having multiple frames showing a sequence of a movement. Can be used
when visualizing change of time, flow of time or action of the character.
Most commonly used in comics.
Action-to-action
Similar to moment-to-moment but with more action in each panels.
Subject-to-subject
Involves 2 or 3 characters. The subject changes in each panel to show how
the story is pass on between characters.
Scene-to-scene
Showcases a series of events from one location to another in one continuous
time.
Aspect-to-aspect
Focusing on showing key details to jump between location or different
scene.

|
|
Fig 1.2 Example of symbolic transition Source: http://makingcomics.spiltink.org/transitions/ |
Symbolic
Showing the passage of time or how the story evolves by using symbolism to
transition between story panels.

|
|
Fig 1.3 Example of rolling transition Source: http://makingcomics.spiltink.org/transitions/ |
Rolling transition
Similar to aspect-to-aspect but with the absence of gutters and panels.
Utilizes subject-to-subject or aspect-to-aspect to transition the
story.
Non sequitur
Telling the story with abstract visuals. This type of transition isn't
common outside of surreal abstract or gag comics. Readers are often left to
interpret the comic panels themselves.
In the end, there are no rules, as long as the readers know how the story
flows. It isn’t necessary to include all kinds of panel transitions when
creating a comic, choose the most suitable types that suits the style of
your comic.
Motion lines and onomatopoeia

|
|
Fig 1.4 Examples of onomatopoeia Source: https://issuu.com/niklasworisch/docs/booklet_loti_inside_inside_whole |
Onomatopoeia is a term that refers to words and letter mixtures that are
used to describe a specific sound. These kind of words can be visualized
more precisely by using different fonts, sizes, styles or by tweaking the
typography of the words.

|
|
Fig 1.5 Uses of motion lines Source: https://issuu.com/niklasworisch/docs/booklet_loti_inside_inside_whole |
Motion lines are lines that are drawn in a way to indicate a sense of
motion. Multiple straight lines can be drawn in a cluster to indicate a fast
motion moving forward, spiral lines can be used to indicate dizziness, zig
zag lines can be used to indicated sound waves or a kind of energy and so
on. It can also be used to indicate water, smoke or an impact of a
hit.
Gutters

|
|
Fig 1.4 Use of gutters Source: https://understandingcomics177.wordpress.com/about/1-2/2-2/ |
Gutters are the blank space between panels, they are used to show how the
story flows and changes with time. For example in Fig 1.4, the gutters fills
up the story happening between the two panels, giving it a sense of time
moving and it leaves the reader to interpret what happens between the two
panels.

|
|
Fig 1.5 Example use of gutter-crossing Source: https://understandingcomics177.wordpress.com/about/1-2/2-2/ |
Sometimes, a gutter-crossing transition can be used to highlight an
important scene taking place and draws reader's attention and involvement to
it.
INSTRUCTIONS
Task 3: Webtoon and Motion Comic
Idea development
Story plot (3 acts structure)
Before we begin thinking about the visual side of our comic, we are tasked to
write down our story following the 3 acts structure in 300 words. I wanted to
use the haunted house plot device in my horror story so I developed my story
based around that. I also wanted to include a black cloud monster which enters people's bodies and will either possess or kill the person by melting them. The monster idea is loosely inspired by "The Flayed" scene from Stranger Things where it shows people melting and Sylvie's magic power from Loki where she can control people remotely and the special effects of that magic looks like green cloud.
Story plot in 300 words (21/10/2021)
1- Setup
Once upon a time, a boy and his father had to move to a new neighbourhood.
The boy was sad because he had to leave his friends and his house, he begged
his father to stay but his father had no choice. So, he unwillingly
followed. The new neighbourhood turns out to be very friendly. The boy got
along with the local residents after a while but he still had trouble making
friends with the younger kids.
2- Rising action
One day, he was biking near a park while greeting the people he passed by.
He suddenly felt a strange sensation calling him to walk into the woods.
There, he saw an old wooden cabin. Realizing it was almost dinner time, he
went out from the woods and saw a man outside trimming the bushes. He asked
him about the cabin and the man suddenly dropped his tools, hold the boy up
while warning him to never go to the cabin again. That only grew the boy’s
curiosity and with that, he went back home.
3- Conflict and resolution
Later that night, he called his one and only friend and convinced him to go
to the cabin with him. They managed to snuck out and went into the woods.
His friend kept his guard up but the boy felt the strange call stronger. As
he got close to the cabin door, his friend tried to pull him back but he got
snatched by a black cloud into the cabin. After the boy knew what happened,
his friend came out and melted with the cloud emerging within him. The boy
tried to find a place to hide and when it seemed like the end, the cloud
sensed the boy’s sadness and made an offer. The boy accepted and the cloud
possessed him, then walks out from the woods.
Fig 1.1 Story dialogues and panel notes (3/11/2021)
Comic visuals (panels and illustrations)
Preliminary character designs
After getting feedbacks from Ms. Anis and Ms. Jennifer, I then started to
search for some reference for my characters' design and roughly sketch them
out for me to refer on when I'm sketching my panels.

|
| Fig 2.1 Matt's (the boy) character design (28/10/2021) |
The main character, Matt’s, design has a more roundish approach to him to make
him look innocent. A typical size boy with some hint of similarity with his
dad's hairstyle.
Reference #1: https://www.behance.net/gallery/25235905/Boys
Reference #2: https://www.behance.net/gallery/79958331/Little-Boy-and-Little-Girl-for-Zara-Kids?tracking_source=for_you_feed_recommended

|
| Fig 2.2 Matt's dad character design (28/10/2021) |
The idea I have for Matt’s dad is someone who has a kind of squarish face,
short beard, wears glasses and has a hairstyle that's similar to reference #2.
The collar shirt seems to always completes the look of a dad so that’s what
I’m planning to incorporate in my character.
Reference #1: https://www.pinterest.com/pin/985231154148852/
Reference #2: https://www.pinterest.com/pin/70437481163000/

|
| Fig 2.3 Mr. Johnson's (the gardener) character design (28/10/2021) |
Mr. Johnson, the man who is trimming the bushes in the story, has a long-shaped face and a short beard. He wears a straw hat to complete his gardener look and with first glance, you might think that he’s just a friendly man.

|
| Fig 2.4 Ron's (Matt's friend) character design (28/10/2021) |
Ron has a stockier look to his face and body, to contrast the smoother and roundish design of Matt. He has curly hair and wears glasses, to give him that nerdy look and a feeling that he’s a good friend.

|
| Fig 2.5 Black cloud monster design (28/10/2021) |
Designing the monster was trickier since I wanted it to look sinister but has a cloudy form. I then decided to give him jagged shaped eyes with a scar-like shape running across each of them, and an ever-smiling mouth with sharp and long teeth as the constants to its evil look. Its body shape though will stay freeform depending on the scene but it’ll keep that cloud/smoke texture look to it no matter what shape it takes.
Reference #2: https://www.deviantart.com/sterlingy/art/Umbriferous-Light-Creature-Design-400260517
Reference #3: https://www.deviantart.com/lancermoo/art/Gengar-v2-282533336
Since I wanted to include an old abandon looking wooden cabin in my story. I went to search up some related images and drawings which I could use to reference for the one in my comic.
Reference #3: https://www.deviantart.com/lancermoo/art/Gengar-v2-282533336
References for haunted house

|
|
Fig 2.6 Wooden cabin stock image reference (28/10/2021) Source: https://www.istockphoto.com/photo/abandoned-house-isolated-front-view-gm507705910-84793427 |

|
|
Fig 2.7 Wooden cabin from "The Owl House" reference (28/10/2021) Source: https://mobile.twitter.com/sbosma/status/1232761834043654144 |
Since I wanted to include an old abandon looking wooden cabin in my story. I went to search up some related images and drawings which I could use to reference for the one in my comic.
Comic panel sketches

|
| Fig 3.1 Sketches for page 1-3 (4/11/2021) |

|
| Fig 3.2 Sketches for page 4-6 (4/11/2021) |

|
| Fig 3.3 Sketches for page 7-9 (4/11/2021) |

|
| Fig 3.4 Sketches for page 10-12 (4/11/2021) |
I started sketching my comic panels based off of some thumbnail sketches that I did at the start. The characters are drawn based on their preliminary character designs with a few changes here and there. To keep the panel count within the 50 panels limit, I decided to tell the setup of the story in a rolling transition flashback in page 1 and having Matt says a greeting to an out-of-frame character in page 2 to indicate that the people in the neighbourhood are friendly. I did some rough line art for some of the panel sketches so that I can trace it more clearly in Adobe Illustrator later.
Digitizing sketches on Adobe Illustrator (Digital draft)

|
| Fig 4.1 Tracing the sketches on Adobe Illustrator (11/11/2021) |

|
| Fig 4.2 Applying greyscale colouring and clipping masks (11/11/2021) |
Then, I proceeded to make a digital draft of my sketches on Adobe Illustrator.
During this stage, I tried out which tools on Adobe Illustrator that’s the
most suitable for me to use for creating my comic. I started out with tracing
directly from my sketches using the pen and shape tool, and then colouring
them in greyscale as a base for me to plan out the light and dark areas of the
illustrations. The font that I'm planning to use for the words in my comic is
a free font called
"Boldly Missy".

|
| Fig 4.3 Cat's Tongue bristle brush for the stroke of the black cloud monster (11/11/2021) |

|
| Fig 4.4 Trying out applying texture image for wooden cabin (11/11/2021) |
For the black cloud monster, I used the default bristle brush in Illustrator called "Cat's Tongue" for the black stroke and fill it with different shades of grey depending on the scene. The path of the monster also had the zig zag effect applied to it so the strokes would look "cloudy". I also tried out using image masking to apply texture to the wooden cabin but I feel that the style doesn't match with the comic.
Further development from digital draft
|
|
Fig 5.1 Lineless and monochromatic colouring style reference
(18/11/2021) Source: https://www.deviantart.com/radsechrist/art/Comic-page-Explorer-271650049 |
After receiving feedbacks from Ms. Anis and Ms. Jennifer, I went to further
change and rework on my panel illustrations. Firstly, I’m planning to use a
lineless monochromatic colour art style for my comic so I went to find some
references on how I can make that work. I then found this comic page (Fig 4.1)
which fits the idea in my head, and I'll be using it as my main reference for
my comic.
|
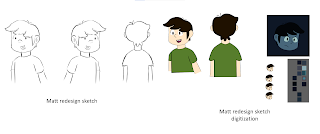
| Fig 5.2 Matt redesign sketches and Illustrator digitization (18/11/2021) |
 |
| Fig 5.3 Ron redesign sketch and Illustrator digitization (18/11/2021) |

|
| Fig 5.4 Matt's dad redesign sketch and Illustrator digitization (18/11/2021) |
I then reworked on the design for Matt, Matt’s dad and Ron so they’ll look
more polished and better. I made sure the sketches mirrors well so that when I
digitize it in Illustrator, I can keep reusing one head illustration
throughout the panels. I also tested out their design in a lineless style by
using the colour palette I had in
exercise 2
with some adjustments to make it suitable for this project. The stripe on
Ron's shirt in Fig 4.3 was later removed in the comic panels as I thought it
wasn't necessary to add it in.

|
|
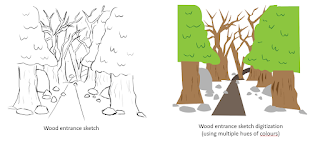
Fig 5.5 Reference for wood entrance resketch (Fig 5.6) (18/11/2021) Source: https://www.pinterest.com/pin/709668853761365919/ |
|
| Fig 5.6 Wood entrance resketch and Illustrator digitization (18/11/2021) |
|
|
| Fig 5.7 Changes on panels in page 10 and page 11 (18/11/2021) |
After that, I resketched the background for the long vertical panel on page 3 that shows the entrance to the dark wood and digitized it as well. I also changed the close-up panel of Matt’s legs in the climax of the story to a close up of his face tearing up messily and also added tears to the close up panel of his mouth. For the tears, I used brush tool to draw them out as it gives a more freeform and fluid shape than pen tool.

|
|
Fig 5.8 Adding colours and new redesigns to the panels (18/11/2021) (screenshot taken without clipping masks being applied yet) |
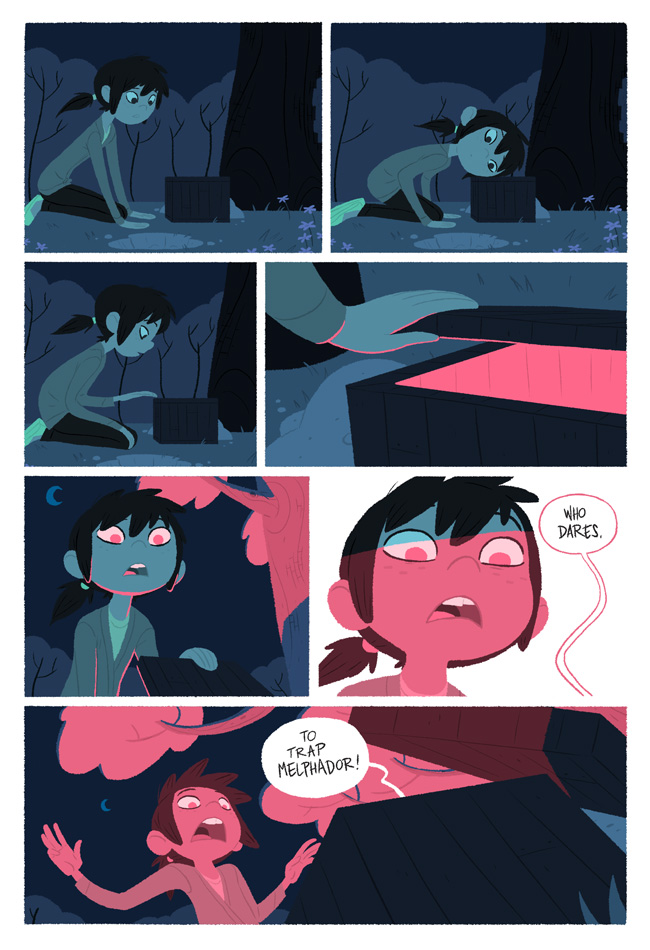
I then further worked on all the other panels by changing them to a
lineless style, incorporating the new character designs, and adding some
speech and thought bubbles. I chose the colours based on the mood I want
the panel to have. Orange for an outside and afternoon-ish mood, dark blue
for a dark and creepy mood, yellow-brown for an indoor feeling and
red/pink for a feeling of danger. I used the zig zag effect on the
rectangle to create the wavy thought bubble shape and also on the pointy
speech bubbles for when Matt and Ron are talking through their walkie
talkies. Other than that, I also moved the panel where the monster is possessing Matt to its own page and tried out a transition from the page
before to that panel.
Following Ms. Anis suggestion, I also added a nursey rhyme titled
“Goosey Goosey Gander”
in my comic when Matt first went into the wood and at the ending of the
story. Though, I couldn’t decide whether “Goosey Goosey Gander” or
“Ring around the rosie”
is better as they both have a dark meaning to it. I also took out the
panel where it shows Matt and Ron cycling to the dark wood because I went
pass the limit by 1 and that panel wasn't necessary.

|
| Fig 5.9 Screenshot of all the monster's paths selected (18/11/2021) |
I also illustrated the black cloud monster by layering multiple paths on top
of each other with the Cat's Tongue brush stroke to create that “smoke”
effect as I thought using fill colour like in my digital draft didn’t work
quite well. The same method was used for all the panels with the monster.
Glow effect was also applied on its eyes as well.
|
| Fig 5.10 Using pen tool to create wood texture (18/11/2021) |
I tried using pen tool to create the wooden texture for the wooden cabin so it matches the style of the comic better.

|
| Fig 5.11 Distortion effects used on words and black bubble (18/11/2021) |
I wanted to make the speech bubble and the words spoken by the monster to look
distorted so it gives a feeling of a creepy voice when read. So, I used tweak
and zig zag effect on a font called "Acumin Variable Concept" which is already
in Illustrator, and roughen and gaussian blur effects on a black oval shape
for the speech bubble.

|
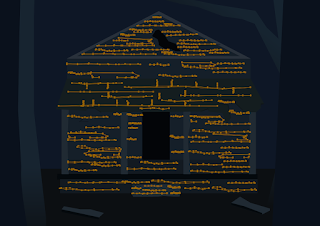
| Fig 5.12 Distortions applied to make the rhyme lyrics (18/11/2021) |
For the rhyme lyrics, the font "Chiller" (which is also already in
Illustrator) was distorted by applying a flag effect to create the wavy look.
The vertical noise effect (the "shredded" look) was done by using the tweak
effect.

|
| Fig 5.13 Added background colours, all the dialogues, motion lines and onomatopoeia (25/11/2021) |
After receiving feedback from Ms. Jennifer, I decided to go with “Ring
around the rosie” in my comic. I continued working on the panels with adding
all the dialogues, background colours and some minor colour adjustment in
the illustrations. I fixed the tears in the mouth close-up panel, the
monster’s teeth and the black cloud page transition.

|
|
Fig 5.14 Process of creating the thought bubble (25/11/2021) |

|
| Fig 5.15 Process of creating the connected spiky speech bubbles (25/11/2021) |
I thought the thought bubble and spiky speech bubbles in Fig 4.7 didn't look good so I retried in creating them using a different approach by following two tutorial videos I watched.
The tutorial videos on creating thought bubble and spiky speech bubbles:
1. Thought bubble: https://www.youtube.com/watch?v=iVlJ6zoWYKg
2. Spiky speech bubbles: https://www.youtube.com/watch?v=ErLkjfXdmE4
I then copied the layers from my still comic file to multiple new
Illustrator files (9 to be exact) with the HDV 720 preset chosen and separated them there. I separated the assets I'm
planning to animate in each panels, rearrange and resized them to fit the
new artboard size to prepare them for animation work in After
Effects.
I animated the first half of the comic first using position, scale, rotation keyframes and the camera tool for a panning motion (Fig 6.5). I also used the puppet tool to animate certain body parts of my character (Fig 6.2). And although I’m very tempted to use a plugin typing effect and transitions in my animation, I decided to try out in recreating them manually using masking (Fig 6.6) and keyframes (Fig 6.4). I use both linear wipe and masking for a word reveal transition, depending on the suitability of that particular scene. Following a tutorial video on YouTube, I animated the circular cycling motion of the leg in Fig 6.3 by using a null object.
1. Thought bubble: https://www.youtube.com/watch?v=iVlJ6zoWYKg
2. Spiky speech bubbles: https://www.youtube.com/watch?v=ErLkjfXdmE4
Motion comic animation
Fig 6.1 Short screen recording showing how the layers of some of the panels are
separated (25/11/2021)

|
| Fig 6.2 Using puppet tool to animate the hair (25/11/2021) |
 |
| Fig 6.3 Positioning a null object at the centre of a circle shape and parenting the shoe layer to the null, adding rotation keyframes to the null object to create a circular motion of the leg (25/11/2021) |

|
| Fig 6.4 Using position and opacity keyframes to create a float-in transition (25/11/2021) |

|
| Fig 6.5 Using camera tool to create a panning down motion and linear wipe to reveal the words (25/11/2021) |

|
| Fig 6.6 Using masking to create a typing reveal effect (25/11/2021) |
I animated the first half of the comic first using position, scale, rotation keyframes and the camera tool for a panning motion (Fig 6.5). I also used the puppet tool to animate certain body parts of my character (Fig 6.2). And although I’m very tempted to use a plugin typing effect and transitions in my animation, I decided to try out in recreating them manually using masking (Fig 6.6) and keyframes (Fig 6.4). I use both linear wipe and masking for a word reveal transition, depending on the suitability of that particular scene. Following a tutorial video on YouTube, I animated the circular cycling motion of the leg in Fig 6.3 by using a null object.
Fig 6.7 Using puppet tool and turbulence displace effect to animate the
black cloud (25/11/2021)
Link to view pictures in fullscreen: https://albumizr.com/a/6Ngn
Link to view pictures in fullscreen: https://albumizr.com/a/6Ngn
I also tried out animating the panel where the black cloud is possessing Matt.
Following a tutorial video I found, I moved the puppet pins forward in motion for each keyframes to animate
the cloud. I then added turbulence displace effect to give the cloud a
constant random wavy motion.

|
| Fig 6.8 Changing the thought bubble from squarish to oval (2/12/2021) |
After receiving feedbacks from Ms. Anis and Ms. Jennifer, I changed the
thought bubble in the first page from squarish to an oval shape so it’ll
look less stiff.
Fig 6.9 Some screenshots in After Effects (2/12/2021)
Link to view pictures in fullscreen: https://albumizr.com/a/N9SZ
Link to view pictures in fullscreen: https://albumizr.com/a/N9SZ

|
| Fig 6.10 Screenshot of Premiere Pro timeline (2/12/2021) |
I then continued with my animation with the changes made in the still comic. I animated the panels in individual compositions and then imported all of them in one new composition to combine all the panel animations together for a within 3 minutes video. I then added suitable music and sound effects in Adobe Premier Pro. For track
matte in After Effects, I used the background from the panels to track matte
for some scenes and solids in After Effects for others as I found out when
making changes to the Illustrator files I imported to After Effects, it'll
sometimes affect the other layers too or the file was unable to be saved at
all. I also want to note that I removed some motion lines and onomatopoeia
in the motion comic as I felt it wasn’t necessary since there’s already
animation and sound effects to indicate those actions.
For the list of music and sound effects sources, click
here or scroll to the the bottom of
this blog post. For some sound effects and music, I added effects (either bass or treble to change the tone) and
transitions (usually exponential fade to fade out the audio, sometimes constant gain or constant power to create a more subtle fade) on them in Premiere Pro when making the video.
Thumbnail creation

|
| Fig 7.1 Webtoon vertical thumbnail (3/12/2021) |

|
| Fig 7.2 Webtoon square thumbnail (3/12/2021) |
After that, I created the thumbnail of my comic to be used on Webtoon
website. I gave my comic the name "The Calling" as Matt was "summoned" by
the monster when he heard the nursery rhyme.
Final Webtoon and Motion Comic
Fig 8.1 Final Webtoon comic - PDF (4/12/2021)
Fig 8.2 Final motion comic animation (4/12/2021)
Feedback
Week 9
The story has a nice flow of creepiness and horror, and it feels like a nice
buildup to a chapter 2. Remember to introduce the main character's friend at
the start of the story.
Week 12
Put a song or a nursey rhyme when Matt first saw the house and when he walks
out again, he's singing the same song/nursery rhyme. Put a thought bubble when
he's flashbacking and arrange the rolling transition better. The panel that
shows a close up of his legs with tears dripping down isn't very effective,
maybe use back the same panel when he was first tearing up but make him close
his eyes and make the crying more exaggerated.
Week 13
The colours are nice and the panel arrangements are good too, they are both
good to go. But the colours of the trees further away in the Matt's silhouette
panel can be a bit lighter. Go for "Ring around the posie" for the nursery
rhyme addition as it actually has a dark meaning to it. The smoke effect of
the monster looks nice and is a good experimentation. The tears on the close
up panel of Matt's mouth can be drawn with droplets. The idea of using tails
to connect the speech bubbles in the walkie talkie panel is a good idea. The
full page illustration of the black cloud going into Matt may take more time
to animate, look for tutorials on how the black cloud can be animated if I
want to try it out.
Week 14
The rolling transition of the flashback is good but make the thought bubble in
a more circular shape or organic shape as a squarish shape makes it look
static. The animating and timing is looking good, and the black cloud
animation works. Keep progressing with what I'm currently doing.
Week 15
The timing, framing and animation is good. Excellent work.
Reflection
Experience
This project was fun in a time consuming and painstaking way. That being
said, I actually enjoyed doing it despite having to keep up with deadlines,
and finally seeing my comic and motion comic completed brings a lot of
satisfaction. I have myself to blame for coming up with a story that needed
50 panels of illustrations and daily progression for weeks haha, and needing
to create the comic on Adobe Illustrator just made the project harder. But
I’m glad I got to do it as it gave me a chance to explore and learn more
about Illustrator. Other than that, most of the times I tend to avoid watching or
reading anything that falls in the horror genre, so having to create a
horror comic did started off challenging but I’m glad it managed to work out
at the end.
Likewise in project 2, the animation is something I enjoyed doing the most
haha albeit it being tedious. This isn’t the first time I animated
characters in a motion comic style using After Effects, so I had some prior
experience to help me through when making my motion comic. Though, this is
the first time I try out the starch and advanced puppet pin tool, and the
first time I created an animation that transitions “panel-to-panel” instead
of “scene-to-scene”. So, it was fun getting to learn how to do that in this
project.
Observation
Through looking at my classmates’ work, I observed that there’s a lot of
ways and style that can be used in creating comic panels. There are also
different ways gutters can be used too, either it be to tell the passing of
time or to use it as part of the story. But no matter how we plan to use
them, it’s important to think of which approach suits the story best and not
just do it for the sake of having a nice visual.
Findings
I found that creating a big project such as making a webtoon comic takes a lot
of planning in order to create a compelling narrative. For example, the
overall plot of the story and the character designs have to be well thought
out in order for the narrative to make sense and flow smoothly. By doing
this, it also saves time by avoiding having to redo certain parts (which I
didn’t do and ended up having to resketch somethings). Other than that, I
also found stylization choice often depends on the kind of story that’s
being told. For example, a detailed art style would fit a story that
requires a lot of scary visuals, a simple art style although looks innocent,
but with the right amount of contrast between creepy elements and the
innocent looking style it can bring out a horrifying effect to it.
Music and sound effect sources used in the motion comic
(in the order of
appearance in the video)
-
Awe Struck June 17th 2021 by audiomirage
https://freesound.org/people/audiomirage/sounds/576974/ -
Cycling by 14FPanskaBubik_Lukas
https://freesound.org/people/14FPanskaBubik_Lukas/sounds/418531/ -
Birds in olive Grove In spain by Hasbrouck
https://freesound.org/people/hasbrouck/sounds/231261/ -
Breath of Doom by deleted_user_2906614
https://freesound.org/people/deleted_user_2906614/sounds/220347/ -
Heel down on floor hit thud by kyles
https://freesound.org/people/kyles/sounds/452504/ -
Suspense/Horror - (Drone 1) by Erokia
https://freesound.org/people/Erokia/sounds/418736/ -
Digital Watch Alarm by FunWithSound
https://freesound.org/people/FunWithSound/sounds/367500/ -
Running on ground by Disagree
https://freesound.org/people/Disagree/sounds/433725/ -
Scary Tension Buildup 02 by Magmi.Soundtracks
https://freesound.org/people/Magmi.Soundtracks/sounds/426759/ -
Weights by alexbandar
https://freesound.org/people/alexbandar/sounds/460589/ -
Dramatic Hit by qubodup
https://freesound.org/people/qubodup/sounds/222517/ -
Horror background by ShortRecord
https://freesound.org/people/ShortRecord/sounds/557810/ -
Body-fall-5 by CosmicEmbers
https://freesound.org/people/CosmicEmbers/sounds/160742/ -
Radio static by JovianSounds
https://freesound.org/people/JovianSounds/sounds/524204/ -
Radio Sign Off / Squelch by JovianSounds
https://freesound.org/people/JovianSounds/sounds/524205/ -
The Chase Begins by Erlend Flatin
https://www.youtube.com/watch?v=p9apz77AwvY -
Ambience03 by yewbic
https://freesound.org/people/yewbic/sounds/33796/ -
Dramatic Pulsating Ambiance by Audio_Dread
https://freesound.org/people/Audio_Dread/sounds/534574/ -
Horror hit 3 by Infinita08
https://freesound.org/people/Infinita08/sounds/571652/ -
Horror texture 4 by Infinita08
https://freesound.org/people/Infinita08/sounds/570608/ -
Dark Piano Tension by Werra
https://freesound.org/people/Werra/sounds/231562/ -
Horror sounds by GowlerMusic
https://freesound.org/people/GowlerMusic/sounds/262260/ -
Reverse-clang2 by BristolStories
https://freesound.org/people/BristolStories/sounds/65915/
Absolutely fantastic work! Loved the story, and also fantastic effort in meticulously composing each frame as aligned with the narrative and sequence! Well done!!!!
ReplyDeleteI can see how you can further your specialisation in this area! Looking forward to a full fledged feature! :))
ReplyDelete