4.4.2022 - 25.4.2022 (Week 1 - Week 4)
Chung Yi Ki / 0345014 / BDCM
Sonic
Design
Task 1: Audio Fundamentals
Quick links
Lecture
Week 1 / Module briefing
For week 1, we are given an introduction to the module and expectations on the
assignments throughout the semester. We are also advised to prepare a good
quality headphones for the projects and was given an introduction into a sound
recording room in campus and the equipment inside it. We learnt that soft
materials absorb sound and hard surface objects reflect sound.
Week 2 / Nature of sound
Sound is the vibration of air molecules that vibrates the eardrum. The
vibrating air molecules is called sound waves.

|
|
Fig 1.1 Sound waves travelling through the ear Source: https://www.soundproofingcompany.com/soundproofing_101/what-is-sound |
A bit of biology, sound waves would travel through our ear canal and then
reach our eardrums, which would vibrate it and the cochlea, the signal will
be transmitted to our brain and will be interpreted as different sound.
|
|
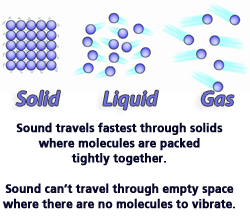
Fig 1.2 Diagrams of particles in different medium Source: https://www.solpass.org/science4-5/sound/sound-standards.html?section=study-8 |
Sound travels quicker in solid, slower in liquid, and slowest in gas due to
the difference of distances between particles.
The study of human perception of sound is called psychoacoustics. This
subject involve the perception of pitch, loudness, volume and timbre. It
studies how different people perceive sound differently, e.g: how some
people can study under loud music.
|
|
|
Fig 1.3 Amplitude and frequency Source: https://www.quora.com/What-is-the-amplitude-of-sound-waves |
The higher the amplitude of a sound wave, the louder the sound is. The
closer each wave is to each other, the higher the frequency.
Properties of sound
- Pitch (frequency of sound wave, the higher the frequency, the higher the pitch)
- Loudness
- Timbre
- Perceived duration (how speed of sound is perceived)
- Envelope (structure of particular sound, when does the sound get softer or louder etc.)
- spatialization (placement of sound in an environment)

|
|
Fig 1.4 Hearing and voicing frequency range of different animals Source: https://theory.labster.com/hearing-range-dbs/ |
Human can only hear frequency range of 20Hz to 20kHz.
Week 3 / Sound design tools
Digital audio workstation are any sound editing software and all of them
have a set of common tools that are useful for sound design.
The five most common tools and techniques used in sound design are
- Layering
- Time stretching
- Pitch shifting
- Reversing
- Mouth it
Layering
Layering is the technique of placing two or more sounds on top of each
other to blend and mix various sound into a new unique sound.
Time stretching/compressing
Time stretching is the action of slowing down a sound and time compressing
is the action of making a sound quicker. Both shouldn't change the pitch
of the original sound. When stretching a sound too much it might
sound alien. The rule of thumb is to not stretch is over 50% if you want
to keep the sound and not change it to sound like other things.
Pitch shifting
Pitch shifting is the action of changing the pitch of a sound without
changing its length. For example, high pitch would sound like a chipmunk
voice and usually they sound fast, while a lower pitch would sound like
zombies or monsters and usually they sound slower. Higher pitch also
usually coreleates with a tiny being while a lower pitch coreleates with a
bigger being.
Reversing
Reversing an audio is simply reversing it. It would create weird and
unnatural sound and would require layering.
Mouth it
Mouth it is making a sound using your mouth. This is done when nothing
else can be done to get the sound you want. But it should be the last
resort and it's best to avoid it.
When doing audio processing there's two types of editing: destructive and
non-destructive. Destructive editing means whatever changes you make, you
won't be able to undo it again once you exit the software. Non-destructive
editing is the opposite. A way to do non-destructive editing in Adobe
Audition is to select the file and right click and copy to new so that we
aren't editing on the original sound file.
In the reverb settings in Adobe Audition, there's two parameters called
"dry" and "wet". They work similar to how opacity works in Photoshop.
Increasing the dry level will lower the effect and increasing the wet
level will make the effect more prominent.
Week 4 / Volume and panning automation
Sustain - How long a sound stays loud
Decay - How long a sound goes silent
Normally the sound we hear from YouTube, videos etc., the bit depth is 16
bits, so when producing sound it's better to increase the bit depth, which
is 24 bits or more.
Playing with volume generally produces a sense of distance to the sound.
Loud volume usually equals to nearer distance. It will also give you
different perception of sound from its original source.
Automation

|
|
Fig 2.1 The lines on the audio clip represent clip automation,
while the lines below the audio clip in a grey area is track automation Source: https://helpx.adobe.com/audition/using/automating-mixes-envelopes1.html |
Clip automation - effects that affect on the clip only and will stay on
the clip no matter where the clip is arranged
Track automation - effects that affect a specific time at a track in the
multitrack window
Panning
Panning an audio means controlling the stereo balance of an audio, whether
it sounds louder at the left speaker output or the right speaker output.
To have better stereo imaging, utilize stereo balance on different parts
of a sound. Keep in mind the environment that we need to do sound design
to, if there's people is on your left or right, then the audio should
reflect that too, when you do things on your own then the sound should be
centered.
When simulating distance in voice clips, adjusting just the volume isn't
enough as the crisp and clear voice still gives the sense that the voice
is coming from the front of us. So, equalizer would need to be adjusted
too to make the sound more muffled. Equalizer settings can also be
included in track automation by clicking show envelopes in Adobe Audition
and choose the specific Eq band width.
Tasks
Exercise 1: Equalizing sound
For this exercise, we are given a flat sound file and 4 equalized sound file
to test our headphones. Our task is to re-equalize the equalized sound file to
sound as similar as possible to the flat sound file.
Fig 1.1 Given sound files
Equalizing process

|
| Fig 2.1 sound file eq-1 equalizer window |

|
| Fig 2.2 sound file eq-2 equalizer window |

|
| Fig 2.3 sound file eq-3 equalizer window |

|
| Fig 2.4 sound file eq-4 equalizer window |
For each eq sound file, I listened and compared them together with the flat
sound track in Adobe Audition using the solo function, and adjusted the curve
in the equalizer accordingly. For eq-1, the bass was too low so it needed to
be higher; for eq-2, the treble was too low so I adjusted it to be higher; for
eq-3, the mid-range frequency needed to be higher and for eq-4 the bass needed
to be lower. I also adjusted the size of the wave a bit to get a more accurate
edit of them.
Final re-equalized sound file
Fig 3.1 Final re-equalized sound files
Exercise 2: Sound shaping
For exercise 2, we are tasked to edit the given sound files using the
paramatic equalizer to match certain situations.
Fig 4.1 Given sound files
sample_voice file edit - Telephone call, cupboard voice, muffled voice
We first started with editing the sample_voice file to make it sound like a
telephone call, a voice from a cupboard and an even more muffled voice.

|
| Fig 5.1 Telephone effect equalizer graph |

|
| Fig 5.2 Cupboard muffled effect equalizer graph |

|
| Fig 5.3 Even more muffled effect equalizer graph |
For the telephone effect, I increased the mid-range and decreased the bass to
get that isolated kind of static effect, and decreased the treble a bit to
make the voice less sharper. For the cupboard effect, I decreased the treble
to make it a lot less sharper and increased the mid range to give it a bit
more nasal sound, then I increased the bass to give that muffled sound. As for
the even more muffled effect, I increase the bass way more and then decrease
the treble all the way down.
Fig 5.4 First attempt at telephone effect

|
| Fig 5.5 Further edited equalizer for telephone effect |
After receiving feedbacks from Mr. Razif, I edited the equalizer for the telephone effect again to decrease more treble to make the sound less sharper, and also adjusted the frequency for node 3 and 4 to increase more mid-range.

|
| Fig 5.6 Walkie talkie effect equalizer graph |
I then used the telephone effect eq graph and adjusted it to make it sound
like a walkie talkie by increasing the volume to create distortion, increasing
the mid range again and decreasing the bass.
sample_voice edit - stadium, bathroom, airport announcement
After that, we are tasked to edit the sound file again to make it sound like
it's coming from a stadium, bathroom and from the airport announcement
system.

|
| Fig 6.1 Stadium and bathroom effect equalizer and reverb setting |
For both stadium and bathroom effect, I used the same equalizer setting to
create a muffled sound. For stadium, I added more echo to the sound by mainly
focusing on adjusting the decay time, diffusion, dimension and early
reflection sliders. For the bathroom effect, I wanted to get a more clearer
sound with a bit of echo, so I mainly focused on adjusting the early
reflections, diffusion, perception and dry level.
Fig 6.2 Malaysia airlines airport announcement video

|
| Fig 6.3 Airport effect equalizer and reverb settings |
For the airport sound, I referenced an airport announcement video to listen
how the voice sounds like. In the equalizer, I increased the mid range
frequency and decreased the low and high to create a telephone-like sound.
Then, in the reverb settings, I mainly focused on adjusting the decay time,
dry level, diffusion, dimension and early reflection to create the clear but
echoey sound coming from the announcement speaker.
Fig 6.4 First attempt at bathroom voice effect

|
| Fig 6.5 Second attempt at bathroom effect reverb settings |
After receiving feedbacks from Mr. Razif, I increased the decay time to create more echo in the voice.
Final sound shaping for sample_voice
Fig 6.1 Final edited sound files
Exercise 3: Sound layering and effects
For this exercise, we are tasked to edit a given explosion sound file and
punch sound file with various effects in Adobe Audition and layer them. For
the explosion sound, we are to elevate it by editing it with different audio
effects as well as equalizer and layer them, while for the punch sound, we
need to make it sound like 3 consecutive punches where it gets more and more
impactful. The punch sound should be done with different effects and layering
as well.
Explosion sound
Fig 7.1 Given explosion sound

|
| Fig 7.2 Effects used to alter the explosion sound file |

|
| Fig 7.3 Multitrack window of audio tracks layout |

|
| Fig 7.4 Equalizer settings of multitrack tracks |
For the explosion sound, I wanted to make it more impactful and have some
anticipation before the explosion starts. I copied the original explosion
sound track to make different edited versions of it to layer it later as
shown in Fig 7.3. I first used a chorus effect to distort the explosion to
have it sound like multiple abrupt clear echoes, and then reversed it to
create a intense anticipating sci-fi like sound. Then for the other audio
tracks, I changed the pitch of the audio by using the pitch shifter and/or
equalizer, I also time stretched one to make the explosion sound last longer
instead of ending abruptly. Hard limiter is used where necessary to avoid
clipping.

|
| Fig 7.5 Full reverb effect on final explosion audio layering |
After layering the different edited explosion audio, I used a full reverb
effect in the multitrack mixer to give the final audio some echoes and make
it sound more believable.
Multiple punches sound
Fig 8.1 Given punch sound

|
| Fig 8.2 Audio effects applied on each track in the multitrack window |

|
| Fig 8.3 Equalizer window thumbnail for teach track in multitrack window |

|
| Fig 8.4 Effects used on creating the audio in track 6,2 and 4 in multitrack |
For the punch sound, as like with the explosion sound, I created copies of
the original track and edited in each of the copied track. I used the
chorus, reverb and stretch and pitch effect on one of the copied track to
create a sound with multiple impacts happening at once with some echoey
feeling. Then for the other tracks, I used pitch shifter to pitch down one
of the track and for the others, I changed the audio sound to have either
more or less bass or treble by using the equalizer in the multitrack
window.

|
| Fig 8.5 Echo effect settings for track 5 in multitrack |
I also used an echo effect for the audio track in track 5 of the multitrack
window. Because the original punch sound file isn't long enough for the echo
to finish decaying, I generated 4 seconds of silence after the punch by
going to edit > insert > silence to increase the length of the sound
track. Then in the multitrack, I added a pitch shifter effect to make its
pitch a bit higher and a reverb to have a bit more echoey atmosphere.
After that, I layer the tracks to make the final audio sound like a series
of fast punches where the final punch lands with echoes. The audio track
with echoes was faded out at the end to avoid the echo trailing on for too
long. Hard limiter was used where necessary to avoid clipping, and in the
multitrack mixer too.
Final layered and edited explosion and punches
Fig 9.1 Final explosion and and punches edited audio
Exercise 4: Environment soundscape
For this exercise, we are tasked to create a ambience sound mix based on two
given concept art images. We can search for suitable royalty free sound
effects online and layer and edit them in Adobe Audition.
First environment soundscape

|
| Fig 10.1 Given Environment #1 concept art image |
For Environment #1, I wanted to create a soundscape where it highlights the tree in the chamber with probably some sound akin to nature or fantasy, but still keeping the sci-fi theme as the major aspect of the soundscape. Because there's computer all around and soldiers in the image, to make it less monotonous, I wanted to create a kind of narrative where the soldiers would walk around typing on the computers to activate or close some kind of tube or chamber.
Fig 10.2 Source links of sound effects used in Environment #1
Fig 10.3 Screen recording of Adobe Audition multitrack timeline for
Environment #1
After I went to Freesound.org to search for the suitable sound effects
needed to create the soundscape, I layer them and edited them where
necessary to create a cohesive mix. I started with building the ambience of
the center tree chamber and developed on from there. To get the
nature/fantasy feeling in the sci-fi environment, I included very subtle
wind chimes sound throughout the mix to make it sound magical and
fantastical, similar to the music heard in soundtracks of fantasy
shows/films. Leaf rustling noises are also added to give sound to the tree,
but it is timed to get loud whenever an air pressure release sound is
played, and them slowly gets soft again. The air pressure release sound is
to give sound to the pipes. All the low humming sounds are to simulate the
sound of the tree chamber, and together with the computer beeping sound,
they enforce the sci-fi feeling in the soundscape.

|
| Fig 10.4 Pitch shifter settings of walking sound |

|
| Fig 10.5 Pitch shifter settings of laboratory bubbling ambient sound |
Panning is used throughout the mix to reduce monotony and give a feeling of distance, such as when the soldiers are walking and activating things on the computer. I used a chain rattling sound effect together with the walking sound to simulate the armour and weapon of the soldiers. Pitch shifter is used where necessary to edit the sound in order to make the mix more cohesive, such as lowering the pitch of the walking audio to make it sound heavier (Fig 10.4) and lowering the pitch of the laboratory bubbling audio to make it sound less cartoony (Fig 10.5). Equalizers are used in a way to either muffle a sound more or increase its bass and/or treble for the heavy or crisp sound. Track automation of equalizer is used for the picking up weapon sound effect to give it more variation, by increasing the treble gain from low to high.

|
| Fig 10.6 Hard limiter settings for Environment #1 soundscape |

|
| Fig 10.7 Full reverb settings for Environment #1 soundscape |
When layering the sounds, I added a full reverb in the master mix so that all tracks have a reverb effect. And after layering the sounds, I added a hard limiter in the master mix to avoid the sound mix from clipping. Hard limiter is also used in some of the tracks to boost the bass, but when increasing the bass isn't enough, like for the walking sound effect since the original audio volume is low, amplify is added to the track to increase the volume beyond the 15dB limit in the track mixer.
Second environment soundscape
For environment #2, I have a clearer idea on how the soundscape should be. I wanted to create a narrative where a person comes in to the factory and activates the laser one by one. Since there's two lasers in the concept art, two lasers will activate with a bit of space between the start of each other's audio. The overall feeling would be mechanical as there's big machineries, echoey and sparse water drippings since the floor is wet in the concept art.
After receiving feedbacks from Mr. Razif, I went and did some tweaking on some sounds in the soundscapes. For Environment #1, I increased the pitch of the deep bubbling sound effect by 2 semitones and also increased the volume by adjusting the track automation keyframes and by applying amplify to further add 3 more decibels. This is so that the bubbling sound would be more clearer but still retaining its deep, growling tone to match the massiveness of the chamber in the center.

|
| Fig 11.1 Given Environment #2 concept art image |
For environment #2, I have a clearer idea on how the soundscape should be. I wanted to create a narrative where a person comes in to the factory and activates the laser one by one. Since there's two lasers in the concept art, two lasers will activate with a bit of space between the start of each other's audio. The overall feeling would be mechanical as there's big machineries, echoey and sparse water drippings since the floor is wet in the concept art.
Fig 11.2 Source links of sound effects used in Environment #2
Fig 11.3 Screen recording of Adobe Audition multitrack timeline for
Environment #2
Same with Environment #1, I downloaded all the sound effects needed from
Freesound.org. Pitch shifters and equalizers were used for the same reason
in Environment #1, to make the audio more suitable for the soundscape in
Environment #2 and to boost bass and/or treble and muffle some audio. I used
clip automation more here because I experimented with moving the clips
around a lot during the layering process, so it's easier to just keep the
automation adjustment with the clips.

|
| Fig 11.4 Chorus effect settings for laser startup audio edit |

|
| Fig 11.3 Echo effect settings for laser firing audio edit |
Though for Environment #2, I edited the downloaded audios more compared to
the audios in Environment #1. To create the sound of the laser starting up,
I used a synthesized moving machine audio and added chorus effect to give it
that choppy repeating sci-fi sound. Then, I reversed the audio so that the
chorus effect starts first, giving it a machinery starting up feeling.
Another version of the laser startup audio is saved without reversing the
audio so that both of them can be layered to represent the two lasers in the
concept art without being monotonous. Other than that, I also added an echo
effect on the laser firing sound effect so that the sound would trial on
longer after it has been fired, giving it a huge and echoey feeling.
Fig 11.4 Toch screen beeping and its original source audio comparison
For the beeping sound when the person is operating on the holographic
interfaces, I couldn't find the exact sound that sounds right so, I
downloaded a synthesized beeping sound of a crystal clock generator and
edited the pitch of each beep to better simulate the variety of keying
something on a computer, and manually adjusted the space between beeps so
that there's a variety of fast and slow pauses. This was all done by
selecting a specific area in the Adobe Audition audio waveform window and
apply the needed pitch shift effect or delete excess silence.

|
| Fig 11.5 Full reverb settings for Environment #2 soundscape |

|
| Fig 11.6 Hard limiter settings for Environment #2 soundscape |
As like Environment #1, full reverb effect was added to the master mix of
the Environment #2 sound mix to give every track the echoey reverb effect.
The reverb settings here produces a more echoey effect compared to that of
Environment #1. Hard limiter was later used after all the audios were
layered to avoid audio clipping.
Fig 11.7 First attempt at Environment #1 and Environment #2 soundscape
Further refinement of soundscapes

|
| Fig 12.1 Increasing the pitch and adjusting the volume for the deep bubbling sound in Environment #1 |
After receiving feedbacks from Mr. Razif, I went and did some tweaking on some sounds in the soundscapes. For Environment #1, I increased the pitch of the deep bubbling sound effect by 2 semitones and also increased the volume by adjusting the track automation keyframes and by applying amplify to further add 3 more decibels. This is so that the bubbling sound would be more clearer but still retaining its deep, growling tone to match the massiveness of the chamber in the center.

|
| Fig 12.1 Addition of another laser firing sound at track 15,16,17 for Environment #2 |
As for Environment #2, I added a third laser firing sound by duplicating the
more silent laser sounds in the first attempt of the soundscape mix, and
rearrange them to start sooner than the other 2 lasers. I also adjusted the
volumes for the duplicated sounds so that it sounds further away, and
rearranged the other sounds so that the sequence is not compromised.
Final environment soundscape
Fig 13.1 Final Environment #1 and Environment #2 soundscape
Exercise 5: Radio commercial
For this exercise, we are divided intro groups and are tasked to choose and
record a script from a given document and enhance the recording by removing
noise, clicks, and unnecessary loudness, as well as adding suitable music
and/or sound effects. One person from the group will be the voice of the
script while all of us will edit the recording.
Fig 14.1 Recording of script

|
| Fig 14.2 Photo of my group in the recording studio, taken by Mr. Razif |
My group consisted of Adina, Yi Yun, Akari and me. We chose a wedding event
planning commercial script and spun the wheel to see who will voice act it.
Fate decided on Adlina and she agreed to record the script. We recorded the
script in the campus's audio recording studio, me, Yi Yun and Akari was
handling the ProTools software and recording equipment under the guidance of
Mr. Razif.
Audio editing

|
| Fig 15.1 Reducing noise in the recording |

|
| Fig 15.2 Amplifying a portion of the audio that got too soft after the noise reduction |

|
| Fig 15.3 Removing breathing and lip smacking sound by selecting and lowering the volume |

|
| Fig 15.4 Autogate settings |
In the editing process, I first started with removing any noise in the recording by using a silent section for the noise print and use the noise reduction (process) effect. Then I search for any clicks, pops and breathing sounds and remove them by selecting and lowering their volume. I also used the compressor settings in the dynamics effect to make the volume of each section consistent with one another, and added some autogate effect as a touch up in removing any subtle clicks and pops.
Layering with music and sound effects

|
| Fig 16.1 Multitrack window |
Fig 16.2 Version 1 of the audio layering
Fig 16.3 Version 2 of the audio layering
After finishing with cleaning up the recording, I went to search for
suitable music and sound effects. I searched for the sound effects based on
what was written in the script and chose two options for the music, one is
the classical wedding march music while the other is more sentimental piano
music.
Music and sound effects sources:
-
A Midsummer Night's Dream, Op. 61 - Wedding March by Mendelssohn
(used in version 1)
https://musopen.org/music/317-a-midsummer-nights-dream-op-61/ -
Magic Wedding by ArtIss22 (used in version 2)
https://pixabay.com/music/wedding-magic-wedding-120021/ -
WEDDING-BELLS by Maurice_J_K (used in version 2)
https://freesound.org/people/Maurice_J_K/sounds/346941/ -
wedding glasses.wav by shawshank73
https://freesound.org/people/shawshank73/sounds/127252/ -
Champagne cork pop by Ruben_Uitenweerde
https://freesound.org/people/Ruben_Uitenweerde/sounds/486161/ -
Wedding Applause Cheerfully.aif by giovannapaludetto
https://freesound.org/people/giovannapaludetto/sounds/414292/ -
Royal sparkle whoosh centre.wav by alexkandrell
https://freesound.org/people/alexkandrell/sounds/170523/
After comparing the two versions, I think version 1 works better since the
music is able to match the giddiness and upbeat vibes of the script
recording. So, I chose that to be as my final.

|
| Fig 16.4 Paramatic equalizer settings for Wedding March music |

|
| Fig 16.5 Denoiser settings for Wedding March music |
When editing for version 1, I had to edit the Wedding March music as well
because there was some noise in the music file. Since the music file doesn't
have a pause long enough for me to get a noise print, I used the denoiser
effect instead to decrease the noise without altering the audio, and then
used the paramatic equalizer to decrease the muddiness of the sound and make
it sound crispier.
Final Radio Commercial
Fig 17.1 Final wedding event planning radio commercial
Feedbacks
Week 2 - Exercise 2
The telephone effect should have less treble since telephone voices aren't
that crispy and clear. The bathroom effect should have more decay to give it
a bit more echo.
Week 3 - Exercise 3
The bass sounds prominent on my headphones for the edited explosion audio.
Week 5 - Exercise 4
For Environment #1, the inclusion of reverb is nice, it gives the ambient
feeling that it's in a huge room. The subtle footsteps and the subtle
computer sound also sounds nice. Though, if the bubbling sound is too
slow, the volume might need to be louder to make the centerpiece more
prominent.
For Environment #2, the way the sound arranged is good, as it doesn't
sound chaotic and sound like it has a narrative. The inclusion of reverb
is good, makes the soundscape feels like it's in a big room. The water
dripping sound effect is good because it fits the ambience of the picture.
The laser beam sound is nice. Try and add 3 laser firing sound there with
them firing alternatingly.
Reflection
These exercises were really useful in getting me more familiar with the tools and layout in Adobe Audition. Although I did use Adobe Audition before back in Video and Sound Production module in Sem 2 and did the same exercise 2 and 3, doing them again did help me in refreshing my memory on using Adobe Audition since it's been a while after that module, and I mostly audio edit with video in Adobe Premiere Pro. Exercise 4 for me was the most fun and interesting one since it's my first time creating an environmental soundscape by basing on just an image, so I got to learn a lot on how to use the Multitrack and audio effects when doing those exercise. Plus, it's also a great introduction to Project 1.
Comments
Post a Comment