15.6.2023 - 15.7.2023 (Week 11 - Week 15)
Chung Yi Ki / 0345014 / BDCM
Motion
Graphics and Compositing
Task 4: Abstract Motion
Lecture
Week 10 / Motion tracking
Fig 1.1 How to attach objects to walls and grounds in After Effects tutorial
Source: https://youtu.be/0ToPGhr_muI
Adding things on walls in a video
- Add a track plane in after effects to track the object
- Then create solid from camera to create points on the position of the item on the wall
- Then double click on the solid and make a composition from it to put the video or image file you want to put.
- Delete the solid and replace the solid with the new composition
Tasks
For this project, we are tasked to create an abstract motion graphic video
with mixed media, though we are encouraged to explore the VFX route. It is
expected to see live footage in the video and some motion tracking work. The
video should last 30 seconds to 1 minute with good audio editing and can be
any theme.
Visual references and rough ideas
Idea 1: First person video game
Fig 1.1 Idea 1 visual references
Fig 1.2 Rough ideation of Idea 1
For my first idea, I wanted to do something sci-fi video game based. My idea
is to show what it would be like if we could have video games features in
real life. Including an interface that pops up in your face to wake you up
for a reminder, a quick wardrobe change with just one touch of a button, and
a fast travel feature to teleport you to anywhere instantly.
But you don’t always win in video games. So, a failure is added where the
character teleports to the wrong place, and it’s a completely different
place from where the character resides (maybe perhaps a snowy place, a place
with UFO or dragons etc.). A drastic difference compared to what happens
when we fail in real life, and in my opinion, somewhat hilarious.
Idea 2: Video game elements in real life
Fig 1.3 Video game effects from Scott Pilgrim vs The World
Source: https://youtu.be/IpxsTduADRM
Fig 1.4 Example of 3D objects turning into blocks
Source: https://youtu.be/2sGCdjDk_1Y
Fig 1.5 Rough ideation of idea 2
For idea 2, it is similar to idea 1 which also has a video game theme, but
it focuses on retro game more and the character doesn’t know she’s in a
video game. This is to depict what will it be like if you suddenly saw
random words popping out somewhere and you can actually interact with them.
Then you find out your life is a game, and if you quit, it’s game over and
you have to restart your whole life from the very beginning. Thus, this idea
is kind of the opposite of idea 1, showing that making life like a video
game sometimes isn’t all that fun.
This idea is inspired by the VFX used in the movie Scott Pilgrim vs The
World, with arcade elements popping up and characters in the movie can
interact with them.
Idea 3: Interacting with an animated object
|
|
Fig 1.6 Screenshot from the Disney short "Downtown" Source: https://d23.com/a-to-z/downtown-film/ |
Fig 1.7 Clip from Disney short "Downtown"
Source: https://youtu.be/pDGkoUe8tZQ

|
|
Fig 1.7 Example of bold and colourful graffitti style illustrations Source: https://www.pinterest.com/pin/813814595187834338/ |
Fig 1.8 Pencil sketch effect in After Effects
Source: https://youtu.be/ncik0D5b7Pk
Fig 1.9 Rough ideation of idea 3
As for idea 3, it’s about an animated object (that isn’t supposed to exist
in real life), coming out from nowhere and the character interacts with it
to see what happens. Little did she know, her whole world suddenly becomes
all sketchy until it eventually dissolves into nothing. Could it be the work
of that animated object? Perhaps. Because it isn’t supposed to belong to
this world so back to the drawing board for her.
The rough ideation video uses a colour blob as the animated object as a
placeholder since it has a reason to stick on walls, so projection mapping
can be used.
|
|
Fig 2.1 8-bit arcade font family Source: https://www.dafont.com/8-bit-arcade.font |
Fig 2.2 3D text in Blender tutorial

|
| Fig 2.3 3D text in Blender using the 8-bit font |
After receiving feedback from Mr. Fauzi, I decided to further develop idea
2 since I think it’s the more feasible one given the timeframe and limited
VFX knowledge we have. I decided to start by creating the important asset
first, which is the pixel text turning into bits/breaking. I downloaded a
free-to-use 8-bit typeface and used that to create a 3D text in Blender by
following a tutorial (Fig 2.2). I made the white text to have black
strokes so that it resembles the text in retro games more, and extruded it
to make it look 3D enough but not too thick or flat.
Fig 2.4 Blender cell fracture tutorial
Fig 2.5 8-bit text shatter test
By following the tutorial in Fig 2.4, I used the cell fracture add on
and rigid body tool in Blender to make an automated animation of the
text falling and breaks into smaller pieces upon contact with the
ground.

|
| Fig 2.6 Visor HUD vector illustration in Illustrator |
In the midst of developing the idea, I have a thought to combine some
concepts from idea 1 together with idea 2. I wanted the character to wake
up somewhere and then have the sci-fi visor HUD appear to “scan” the area
for information. But the visor glitches and can’t perform its operation
smoothly and that’s when the retro text would appear. So, I then made the
vector for the visor HUD in illustrator for use in After Effects later
on.
Fig 2.7 Big cube exploding/falling into smaller cubes

|
| Fig 2.8 Rigid body setting in Blender |

|
| Fig 2.9 Quit button model in Blender |

|
| Fig 2.10 Quit button model PNG export |
I wanted to try out if I can make the text explode into small cubes
rather than chipped pieces, so, by watching the tutorial again and
experimenting with the cell fracture settings in Blender, I found out
that to use cell fracture to break into smaller cubes, I would need to
use it on an unedited cube mesh. So, I decided to just try that out and
did the automated explosion animation, and plan it to be quickly cut in
at the time when the text is about to break so that the cut would be
almost unnoticeable to the audience’s eyes. Other than that, I also
modelled a retro quit button for the ending scene.
Filming progress
Fig 3.1 Video #1 - with hand placement
Fig 3.2 Video #1 - no hand placement
After that, I went to film the whole scene multiples times with
different story flow ideas that I had. Video #1 starts with the
character going to a bookshelf to pick out a book, which is then
revealed it’s a book called “Dreamland” (to tie in with the sudden
appearance of 8-bit text). The 8-bit text then appears and the
character interacts with it, eventually dropping the book and hitting
a quit button where the character is trying to undo by grabbing the
book. The video labelled with "with hand placement" is to show where
the hand position will be and practice the camera movement, and the
ones labelled with "no hand placement" is for the hand to be pasted
into it later on as I initially planned to film the hand in front of a
greenscreen.
Fig 3.3 Video #2 - with hand placement
Fig 3.4 Video #2 - no hand placement
Video #2 is a further development of Video #1 where there’s an added
opening showing the character woke up, looks at her phone, and then
her body is “shocked” where a glitching sci-fi screen will be
overlayed on the scene to explain why. The character then goes to the
bookshelf to pick out a book which was the order of the glitch just
now, and flow in Video #1 repeats. The phone screen is green since it
was planned to be chroma keyed with other visuals later.
Fig 3.5 Green screen book drop
Fig 3.6 Green screen hand movements
Fig 3.7 Green screen hand movements in brighter lighting

|
| Fig 3.8 Keying result from Fig 3.6 |

|
| Fig 3.9 Keying result from Fig 3.7 |

|
| Fig 3.10 Result from Fig 3.9 pasted into the video taken |
For both videos, I tried to film the part where the 3D text and
buttons need to be interact in front of a green screen so that I can
easily key my hand and any object in the video out later. But since I
was doing this at home and didn’t have a proper setup, the keying
wasn’t clean so I can’t use this method. Although the result in Fig
3.9 is clean, the lighting doesn't match the one in the videos taken
so it is not usable too.
I then did a few motion tracking tryouts for the videos in Blender
and After Effects to see if it would work or not. After a few failed
attempts, I found out that the videos that have fast camera
movements which made it hard for the software to track the movements
successfully. Also, the videos I filmed always ends with the camera
pointing to the ground, so there are not enough high contrast areas
for the software to put tracking points on.
Problem solving in the filming and video preparation process
Fig 4.1 Reshot video with re-planned action flow
So, I then film the shot again with much slower camera movement and
changed the flow of the actions to fit the shot requirement. The main
concept is still there, where the text is hit, breaks and a quit button is
accidentally pushes. But this time the character wakes up and grabs a
staff-like household item to hit instead, and then backs away until the
staff hits the wall, which is where the quit button will be. By doing
this, a reference object will always be in frame so the software has a
higher possibility to be able to camera track the scene. All the videos
were shot using a phone with a 0.5x wide angle lens.
Fig 4.2 blendartrack app showcase
I also found out that there’s a motion tracking app called “blendartrack”
where it is specifically made for use to capture camera tracking data for
Blender and stores the data as keyframes. So, aside from filming using my
phone’s camera, I also used blendartrack to help me get the motion
tracking data as backup if my manual camera tracking in Blender doesn’t
work out well.
Fig 4.3 Camera tracking tutorial
Source: https://youtu.be/YzUa-Kr2ntY

|
| Fig 4.4 Blender manual camera track |

|
| Fig 4.5 Camera tracking data by blendartrack, stored as keyframes |

|
| Fig 4.6 3D camera tracking in After Effects |
Later when I was trying out manually tracking the video, I found out
that this video was able to be successfully tracked in Blender but the
result wasn’t good since the camera will suddenly turn to another angle.
So, I used the data captured by blendartrack instead and clean up any
keyframes that made the camera tracking janky. I then referred to an
After Effects 3D camera tracking tutorial and found out After Effects is
able to camera track the scene as well (although I had to sperate the
video layer to track the ending scene on its own since it can’t be
tracked in one go).

|
| Fig 4.7 Matching the falling cubes with the tracking data by blendartrack |
So, I decided to match my 3D assets in Blender with the camera tracking
data by blendartrack, and then composite it with the camera tracking
done in After Effects. The 3D assets were also lighted to match the
lighting in the video.

|
| Fig 5.8 Rotoscoping in Mocha AE |

|
| Fig 5.9 Rotoscoping in Mocha AE |

|
| Fig 5.10 Rotoscoping result of Fig 5.9 |

|
| Fig 5.11 Rotoscoping result of Fig 5.8 |
Because we have a tight deadline, I didn’t want to spend time going to
campus’s Vortex lab to use the green screen there and figure out how to
match it with my video lighting, so I decided to do rotoscoping instead. I
first did the rotoscoping using the rotobrush tool in After Effects, but
found out it was too time consuming and not precise, so I did it in Mocha
AE instead since it has tools that allow a more precise and cleaner
rotoscoping workflow. For Fig 5.8, since I'm rotoscoping motion blur, the
rotoscoped layer is composited into the original video in 31% opacity to
hide the sharp edges and trick the audience's eyes it's a motion
blur.
Compositing process

|
| Fig 6.1 Compositing the 8-bit text |

|
| Fig 6.2 Compositing the falling cubes |

|
| Fig 6.3 PNG of the falling cubes composited into the scene |

|
| Fig 6.4 Compositing the quit button |
After all of that, I finally started the compositing process. I started
with compositing the 3D assets first. I found out the camera tracked 3D
8-bit text can’t be paired up nicely with the camera tracking data in
After Effects, so I changed to using only a PNG image of it to
composite. The exploding cubes were able to be composited with a lot of
keyframing on the position, but to save time and for accuracy, the
moment all the cubes land on the ground, the PNG sequence composition
layer of it is cut and then continued with a PNG image of the same angle
positioned in the same position as the video layer. But I couldn’t get a
perfect position so that transition would have to be covered up with a
blur later on. For the quit button, it was composited as the same way as
how the 3D text was composited too.
Fig 6.5 Pixel effect in After Effects tutorial
Source: https://youtu.be/yFMkGInNW9A

|
| Fig 6.6 Creating the reflection of the 8-bit text using masking and shape layer for shadow |

|
|
Fig 6.7 Using shape layer for shadow |

|
| Fig 6.8 Visor HUD animation in a separate composition |

|
| Fig 6.9 Visor HUD overlay on the video |
All the other elements were composited accordingly into the scene. The visor
HUD was animated in a separate composition first to avoid making the main
composition layers hard to navigate. For the glitching effect in the visor
HUD animation, it was done by using the glitch effect from the Universe
plugin by Red Giant. The 8-bit 3D text reflection is created in a separate
layer as well using masking and opacity, and inserted into the main layer
following the camera tracking data. Shape layers for shadows on the other
hand, were not linked to the camera tracking data and only had their
positions keyframed. Effects were used where glow, drop shadow or colour
correction were needed. I also followed a tutorial (Fig 6.5) to know how to
create a pixelated look in After Effects, and did that effect for the pixel
3D objects and at the end for the whole scene.

|
| Fig 6.10 Red colour matte overlay in Premiere Pro |

|
| Fig 6.11 Game over title scene |
Fig 6.12 First draft of Project 4 (before the visor HUD is created)
I imported the After Effects composition into Premiere Pro to add the red
colourisation effect at the end as well as the game over title screen. The
video is also edited to speed up certain parts and add a swish pan transition
to certain parts to cut unnecessarily long scenes and speed up the flow. I
then added in some sound effects and exported the edited video to see how it
looks. For me, the red colourisation needs a better transition or it does not
look immersive enough. So, I had to think of a way to achieve that.

|
| Fig 6.13 Using light layers and shape layer to create lighting in After Effects |

|
| Fig 6.14 Settings of the light layers |
Later on, I tried out using the light layers in After Effects to create the
lighting, and found out that spotlight creates the mood that I wanted. Since
the red colouration kind of muddles out the quit button, I created a white
shape layer in add blending mode and keyframes its position to stay on the
“QUIT” word, so that it looks like the word is emitting while light.
Further development of video

|
| Fig 7.1 Retro box 3D model |

|
| Fig 7.2 Retro coin 3D model |

|
| Fig 7.3 Box 3D model PNG export |
Fig 7.4 Rotation coin animation
After receiving feedback from Mr. Fauzi, I went to create a retro video game
looking 3D box model in Blender to replace the 8-bit text. A coin model was
also made to use as a visualisation for the 100pts achieved. The idea is to
let the characters hit the box instead of the word, and then the 100pts reward
pops out after.

|
| Fig 7.5 Compositing box into the scene |

|
| Fig 7.6 Repositioning the 8-bit text and compositing the coin into the scene |
Since I can’t think of a way to replace the exploding cubes into coins, I
decided to leave the cubes as is and make the 8-bit text and coin pop out
after the explosion. The coin rotation is also animated in Blender and
composited in After Effects camera tracked to the scene, parented with the
8-bit text. The 8-bit text reflection was also changed to the box
reflection.

|
| Fig 7.7 Recolouring the exploding/falling cubes into yellow |
Because the box has yellow edges, I used hue/saturation effect to colour
correct the exploding cubes into a similar shade of yellow and edited their
drop shadow settings to match with the floor better.
Fig 7.8 Week 14 progress of Project 4

|
| Fig 7.9 Sci fi themed title screen |

|
| Fig 7.10 Retro themed title screen |
Later on, I created a game title screen in Illustrator that will be revealed
at the end of the video, to indicate that what was seen before is a gameplay.
I used assets from the visor HUD to save time as well as make the design
consistent throughout. I gave it the title “Retrograde” since in the video, it
shows that what was seen as sci-fi in the beginning, turn pixelated at the
end. I also created a simple 8-bit retro version of the title screen to
glitched into later when animating.

|
| Fig 7.11 Animating the sci-themed title screen in After Effects |

|
| Fig 7.12 Editing the sci-themed and retro-themed title screen in Premiere Pro |
I animated the sci-fi title screen in another composition in After Effects,
using the bullet train and tracking text animation preset for the title. Light
sweep and dust and scratches effect is used for the background and over the
visor HUD to give the title screen more depth and texture. I then brought it
into Premiere Pro to edit in the glitch with the 8-bit retro version of the
title. The glitch effects used were the VR Digital Glitch effects that's
already in Premiere Pro and a glitch transition from the Universe plugin by
Red Giant. I also added a loading screen in Premiere Pro before the title
screen using the rotating orange ovals asset from the visor HUD in the
video.

|
| Fig 7.13 Whole timeline of Premiere Pro |

|
|
Fig 7.14 Camera shake transition to blur out the abrupt cut between the
falling cubes PNG sequence and the PNG image of the cubes |
Then, additional sound effects were searched for and edited in the Premiere
Pro timeline to match the updated video. All sound effects and music used are
sourced from Freesound.org, the full source links can be found at the end of this blog post. The abrupt cut mention before in Fig 6.3 on how
the falling cubes are composited using PNG sequence that cut to a PNG image,
it was blurred out using a camera shake transition from the Universe plugin to
hide the cut.
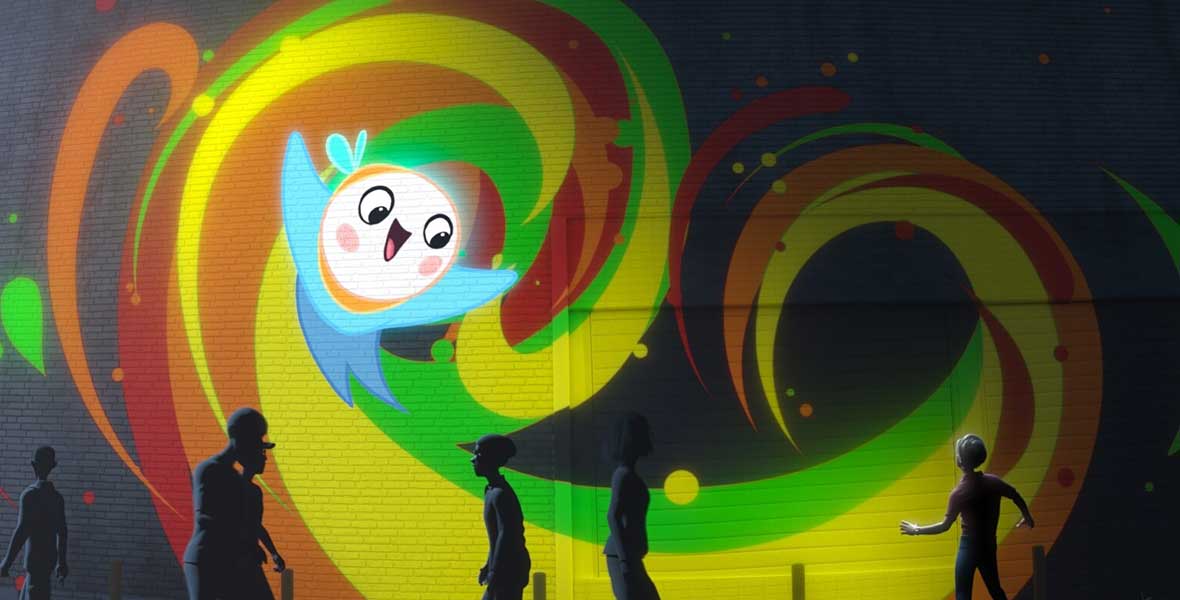
Final Abstract Motion
Fig 8.1 Final Project 4 Abstract Motion
Feedback
Week 12
The test shots in the idea proposals is good. You may refer to your reference
and implement it accordingly. You can proceed. You may just apply any of
the techniques that you can do based on the references or you can just remix
and develop it based on your concept and storyline.
Do the shooting first and video edit it to know the pacing and sound, then
after that do the VFX. Don't be afraid to cut out anything, you can use
sound effects as transition to the other scene instead. One trick to cover
up some jerks in camera tracking is by blurring the view, so it looks like
the person's eye is re-focusing. Consider adding insert shorts (like a few
moments later kind of shots) as transitions from one scene to another and to
make things interesting. Rotoscoping can be used in replacement of green
screen, but rotoscoping would need to take a lot of time. If you want to do
a pixelating effect on the environment like the depth scanner effect, then
you can try out duplicating the background video layer and pixelating it.
Then, move the layer beneath the original footage, delay the pixelated
footage a bit and use masking on the original footage to reveal the
pixelated video.
Week 14
Put a box or something (like a power up box) in place of the woke up word,
and then change it to hitting the box and when the box explodes, rewards
object explodes out (like coins or coffees exploding out, can 3d model it).
The words can still be there, but not the main thing. Put an ending scene
after the game over, like a loading screen or a start up screen of a game.
Make the frame like a game mockup screen. Turn the video into an
advertisement for a game of your creation.
Week 15
The refinement is a good improvement. The sound effects is really
emphasizing the whole video. Good job on the editing.
Reflection
This project was very challenging for me as I didn't try out anything related
to VFX before, so I have to learn it from scratch and hope that I'm able to
complete this project within the given time frame. It was also hard for me to
think about ideas to do since the VFX ideas I have would require some
intermediate to advanced knowledge, so I had to find one that is feasible
enough for me to carry out. Although I did manage to complete this project,
frankly I am not completely satisfied with it since the VFX doesn't look
polished. That is majorly because I couldn't find a way to make them look
better and I didn't have enough time to solve the technical difficulties in
the camera tracking part so I had to find an alternative route to execute my
idea. Though I could've chosen a more simple idea, but part of me just thought
I can't be too simple and I have to focus on showcasing compositing work, so I
just ended up proposing some challenging ideas.
But with all that said, I did learn from this project and the basic VFX
knowledge gained will be useful in the future, and I see it as an introduction
to the VFX field which I find it interesting and have a lot of respect for,
but also frustrating for me to do (haha). Also, I got to practice more on my
Blender skill and got to learn on how to use Mocha AE which I think is nice.
Plus, I did like the title screen animation which I think is the best part in
the video lol. All in all, with all the frustrations, late nights, and my
computer RAM reaching its limit, I think this was a good learning opportunity
for me, though I wish there were more VFX related practice in class so I could
have a clearer direction on how I want to do my project.
Sound effects and music source links
(in no particular order)
- sci-fi - ambient 03.wav by AniCator
https://freesound.org/people/AniCator/sounds/100482/ - cyberpunk_drones.flac by Bertsz
https://freesound.org/people/Bertsz/sounds/672905/ - 8-Bit Coin Or Power Up FX For Retro Video Games by Cloud-10
https://freesound.org/people/Cloud-10/sounds/647977/ - KB_Heartbeat.wav by KaBlazik_Samples
https://freesound.org/people/KaBlazik_Samples/sounds/588575/ - Male_Breath_Fast_Loop_Stereo.wav by Nox_Sound
https://freesound.org/people/Nox_Sound/sounds/554907/ - Footsteps_MountainBoots_Tile_Mono.wav by Nox_Sound
https://freesound.org/people/Nox_Sound/sounds/555868/ - Bit Forest Intro music by Bertsz
https://freesound.org/people/Bertsz/sounds/545457/ - Sci-Fi Two-Part Click by Jofae
https://freesound.org/people/Jofae/sounds/382574/ - Glitching, Vinyl Record Player, A.wav by InspectorJ
https://freesound.org/people/InspectorJ/sounds/427848/ - Picking_Up_TackleBox.wav by Krisboruff
https://freesound.org/people/Krisboruff/sounds/17750/ - 8-Bit - Time's up! by Breviceps
https://freesound.org/people/Breviceps/sounds/450617/ - Game (of life) Over! by adh.dreaming
https://freesound.org/people/adh.dreaming/sounds/634692/ - 8-bit "failure" sound by ProjectsU012
https://freesound.org/people/ProjectsU012/sounds/333785/ - Sci-Fi Survival Dreamscape by onderwish
https://freesound.org/people/onderwish/sounds/468407/ - Digital Glitch_v1.wav by tadaizm
https://freesound.org/people/tadaizm/sounds/458065/ - 8-Bit - Incoming enemy by Breviceps
https://freesound.org/people/Breviceps/sounds/450615/ - 8bit_hit_14.wav by Soundholder
https://freesound.org/people/Soundholder/sounds/425347/ - 8-bit damage-impact-break sounds.wav by EVRetro
https://freesound.org/people/EVRetro/sounds/519072/ - 8-bit low rumbling noise.wav by EVRetro
https://freesound.org/people/EVRetro/sounds/501109/ - Ping! by unfa
https://freesound.org/people/unfa/sounds/215415/ - 8-bit explosion.wav by EVRetro
https://freesound.org/people/EVRetro/sounds/501103/ - 8-Bit - Error by Breviceps
https://freesound.org/people/Breviceps/sounds/450616/ - LoadingScreen.mp3 by Forum_Yoshi
https://freesound.org/people/Forum_Yoshi/sounds/223962/ - sci fi switch by hardwareshaba
https://freesound.org/people/hardwareshaba/sounds/514945/
Comments
Post a Comment