1.5.2023 - 15.5.2023 (Week 7 - Week 9)
Chung Yi Ki / 0345014 / BDCM
Advanced
Animation
Project 1 and 2: Walk Cycle and Jump Animation
Quick links
Lecture
Week 7 / Animation method
There's 2 animation methods, straight ahead and pose to pose. Pose to pose is
good for planning while straight ahead is good for flexibility, especially
overlapping action. For pose to pose, remember the 4 poses: key, extreme,
breakdown and inbetween. In 3D, the first 3 poses are only of concern, the
inbetweens are calculated by the software automatically.
Week 8 / Cartoony animation
There are too extremes in animation, one is cartoony and the other is
realistic. To create a cartoony animation, there needs to be more
exaggeration. This can be done by increasing the squash and stretch

|
|
Fig 1.1 Key poses for a jump Source: Lecture notes |
The key poses for actions are first a neutral pose (extreme), the anticipate
pose (extreme), the action pose (key pose, the pose that tells a story),
overshoot pose (extreme) and a repair or recovery pose (extreme). The
anticipate and overshoot poses are important in giving the animation
clarity.
Putting hold in an animation is also important to increase clarity in
animation. Though a complete hold is not recommended in 3D because it would
look like the motion is completely still, so this has to be done through the
use of graph editor.
Timing is important to give contrast between poses and actions, it works
like giving punctuations to sentences. Variety of timing gives the audiences
time to rest and understand the movement and time to lead the audience on
and keep them interested.
Ways to achieve variation in timing:
1. Asymmetry
Make sure that the timing of coming into a pose and coming out of the pose
is different. For example, there can be a slow slow-in when raising the hand
and a fast slow-out when dropping the hand
2. 3 speeds
Try to include 3 different speed in your animation, it can happen within one
action or different actions, have slow, fast and medium speeds
3. Creating and breaking patterns
You can create a pattern in your animation but also try to break them too to
give emphasis and anticipation
Tasks
Project 1: Walk cycle animation
For Project 1, we are required to animate a vanilla walk cycle and an attitude
walk cycle using the character rig we chose in the previous exercises.
The animations should be animated in 24fps, light and render in 1280px x
720px.
Visual references
Vanilla walk cycle
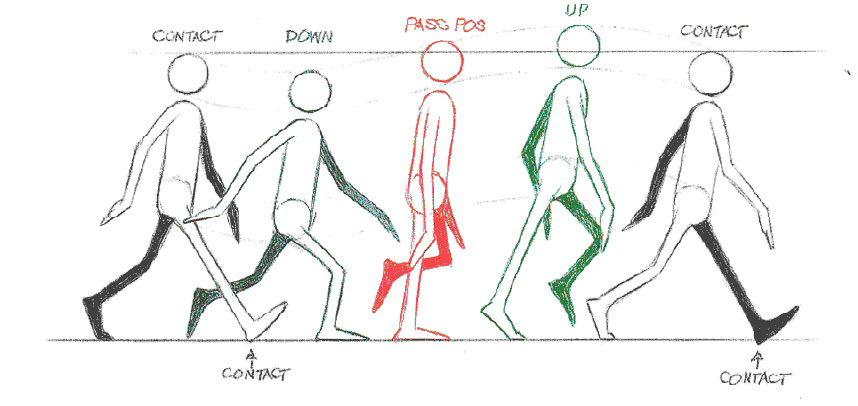
|
|
Fig 1.1 Vanilla walk cycle key poses Source: https://courses.cs.washington.edu/courses/cse459/12au/assignments/assignment_5/index.html |

|
|
Fig 1.2 Vanilla walk cycle key poses in 3D figure Source: https://utdkathytran.wordpress.com/2012/07/20/computer-animation-vanilla-walk-cycle/ |
For the vanilla walk cycle, I went to find references for the key poses online
to make sure I pose the character accurately in Blender. We also had Mr
Kamal's guidance in class while we're animating the walk cycle.
Attitude walk
Fig 1.3 Sneak walk reference
Fig 1.4 Sneak walk reference

|
| Fig 1.5 Key poses stills from video |

|
| Fig 1.6 Rough study sketches of key poses |

|
|
Fig 1.7 Timing reference Source: https://matthewhamill706.wordpress.com/2015/12/08/sneak-cycle/ |
Animation process
Vanilla walk cycle

|
| Fig 2.1 First attempt vanilla walk - front view (hip and chest curves) |

|
| Fig 2.2 First attempt vanilla walk - side view (leg curves) |
Fig 2.3 First attempt vanilla walk
I first did my vanilla walk cycle in class with Mr. Kamal. I started with
blocking out the contact, down, passing and up poses then deleting unnecessary
keyframes and adjusting the motion graphs. I deleted most of the inbetween
frames and let Blender generate it instead since it would make the movement
less choppier.

|
| Fig 2.4 Angling the foot downward in up pose |

|
| Fig 2.5 Posing the hand and motion curve of wrist |

|
| Fig 2.6 Keyframes of the thigh |
Fig 2.7 Second attempt vanilla walk
After receiving feedbacks from Mr. Kamal, I angled the raised foot to point
downwards in the up pose so it looks more natural. I also posed the hands to
curve inwards a bit instead of leaving them flat, and offset the wrist
keyframes by 2 frames so there's a dragging motion to the hands. I moved the
starting keyframes of all the other parts to 0 so that the animation would
loop smoothly. I also changed the interpolation of the leg to be linear when
the foot is on the ground so that the character won't look like he's
sliding.
Other than that, I encountered a problem with the character knees looking
jerky when they bend to the contact pose. After multiple tries of trying to
correct it, I found out it might be the torso problem. It seems that when
the torso y axis is at 0, the knee jerk will be more significant. So, I kept
the contact torso position to be slightly lower (-0.03m) so that the jerking
motion won't be large and further decreased it by manipulating the thighs on
1s at the problematic areas.

|
| Fig 3.1 Pose blocking for sneak walk |

|
| Fig 3.2 Leg and motion graph of sneak walk |

|
| Fig 3.3 Hip and chest motion graph of sneak walk |
For the attitude walk, I first started with blocking out the contact, down, passing and up pose, and later timed the keyframes where one step takes one second. I later deleted the leg keyframes for the down and up pose to make the action smoother, and adjust the action further by controlling the motion graphs. I adjusted the curve handle to be less snappy and more linear to get the slow movement. Though for some actions like the leg lifting up, I gave a a slightly snappier curve to the z-axis of the leg so that the leg would lift up quick and fall down gently. I also made the curve of the y-axis of the leg to be linear whenever the foot is on the ground so the character won't appear he's sliding. I later lessen the height of the torso in the up pose from the pose blocking so it would look more like sneaking than bouncing.

|
| Fig 3.4 Manipulating the facial expression |

|
| Fig 3.5 Palm curve motion graph of sneak walk |
I also posed the facial expression and hands of the character. For both of the facial expression and the hands, I added a subtle animation where the jaw would open a bit in the passing pose and clench back at contact poses, and the finger would curl more in the passing pose and back to a bit more straighter in contact poses. I used the pose library of the character rig file to help me pose the facial expression and adjusted further from there.
Layout and lighting

|
| Fig 4.1 Creating the backdrop for the walk cycles |

|
| Fig 4.2 Lighting setup for attitude walk cycle |

|
| Fig 4.3 Lighting setup for vanilla walk cycle |
Fig 4.4 First attempt of vanilla and attitude walk cycle animation
After finalising the animations, I then layout the walk cycles for rendering.
I created a studio backdrop as like in exercise 4 for the background and used
colours for the lighting to evoke the emotion of the walk cycle. For the
vanilla walk cycle, I lighted it as a sunset kind of atmosphere with blue
lights for the shadows or backlight to give contrast, while for the attitude
walk cycle, I used primarily green lights to give a haunted kind of feeling
and focusing them on the character's face. Blue lights were also used for the
shadow parts to complement the green.
Further refinement of animation

|
| Fig 5.1 Torso keyframes and graph |

|
| Fig 5.2 Hips keyframes and graph |

|
| Fig 5.3 Shoulders keyframes and graph |
After receiving feedback from Mr. Kamal, I made changes for both my vanilla and attitude walk animation. For vanilla walk, I reduced the y-axis location of the torso in the up position so that the torso isn't to high up until it stretches the leg too much, which then results into knee popping. I also gave some weight shift to the action by adjusting the x-axis location of the torso. Then, I adjusted the rotation of the hips, exaggerating it more and also as a way to control the legs bending to be somewhat straight during the up pose rather than only relying on the torso. After that, I added some up and down movement on the shoulders to make it more flexible. I also reduced the rotation of the shoulders a bit from my first attempt as I found that they were a bit too close to the character's body.

|
| Fig 5.4 Keyframing the toe roll controller for flexibility |

|
| Fig 5.5 Head rotation keyframes and graph |
As for the attitude walk, I adjusted the toe roll on both feet to give some
drag, so that the animation would look more flexible. Then, I rotated the head
more in each keyframes to make the head turns more noticeable.
Final Walk Cycle Animation
Fig 6.1 Final Walk Cycle Animation
Project 2: Cartoon jump animation
For Project 2, we are tasked to animate a cartoony jump animation with three
speeds (slow, medium, fast) in timing. As like Project 1, the animation should
be animated in 24fps, light and render in 1280px x 720px.
In-class demonstration

|
|
Fig 6.1 Jump key poses from The Animator's Survival Kit Source: https://natashawalshblog.wordpress.com/2016/01/04/body-mechanics/ |

|
| Fig 6.2 Blender workspace for jump animation demo |
Fig 6.3 Result of in-class jump animation
We first started Project 2 by animating our character according to the jump
key poses shown in the Animator’s Survival Kit book under Mr. Kamal’s guidance
in class. We used the viewport shading function to view the pose in silhouette
form to ensure a clear silhouette.
Visual reference
Fig 7.1 Jump animation reference
Fig 7.2 Parkour stunts reference

|
| Fig 7.3 Stills of key poses from jump animation reference video |
After class, I wanted to try out animating a jump that has a superhero kind of
landing to make it a bit more exciting. So, I went to YouTube to find suitable
reference videos for me to refer to in my animation. There’s no exact video
available with what I had in mind (the character would jump high up and cycles
his feet for a while before landing), so I referred to a video where the
landing is close to what I want, and a parkour video. Fig 7.1 is my main
reference while Fig 7.2 is just for me to get the feeling of the jump and
landing.
Animation process

|
| Fig 8.1 Blocking out the poses |
I first started with blocking out the poses needed for the animation,
referencing the video and adding in poses from my imagination to create the
action I wanted. I also acted out some action while blocking them out to get
the poses right. I also enabled motion paths to let me see the position of the
torso clearly to plan the distance of the jump.

|
| Fig 8.2 Keyframes and curves for left foot IK controller |

|
| Fig 8.3 Keyframes and curves for right upper arm FK controller |
Fig 8.4 First attempt at jump animation
I then removed the poses that are not needed and timed the keyframes to get
the feeling of what I have in mind. I wanted the character to stay in the air
for a longer while and for the overall jump to be more snappier, so I timed
the anticipation and recovery of the jump to be in medium speed, the poses in
mid-air to be in a slower speed and the contact for the jump to be in faster
speed. After that, I clean up my keyframes using the graph editor by
deleting unnecessary keyframes and adjusting the curves to get a smooth
motion. Though, I then realized the keyframes I have for the recovery pose
going back to a neutral pose isn’t smooth enough and doesn’t have the correct
timing for it. Adjusting the curves didn’t solve it and later I realized that
I was missing keyframes that pushes the body up when the character is getting
up.

|
| Fig 8.5 Torso keyframes and curves in second attempt, slight y-axis movement between keyframes in the recovery pose for push motion |

|
| Fig 8.6 Keyframes and curves of right wrist controller |
So, I deleted my previous recovery to neutral keyframes and made new ones. I
adjusted the torso to be the main controller for the push while the other
limbs are controlled for secondary actions. I also added some holds in the
action to give better clarity. Since I turned off IK switch for the arms, they
would move whenever the body moves and that made some complications in the
recovery pose. To make the arms stay still and avoid the hands to be clipped
through the plane, I keyframed each clipped action on 1s to at least minimize
it as much as I could. The same thing was done to other limbs as well to solve
some jerky motions.

|
| Fig 8.7 Keyframes and curve for toe roll of right foot |

|
| Fig 8.8 Keyframes and curve for hair controller |
I also exaggerated some poses more and used the toe roll to add some drag to
the feet to give it a more cartoony feel. The hair is also manipulated to add
some overlapping actions.
Layout and staging

|
| Fig 9.1 Backdrop, lighting and camera layout of the scene |
Fig 9.2 First attempt of cartoon jump animation
After I finished cleaning up the animation, I made a seamless edge backdrop as
in Project 1 and lighted the scene to give a feeling of a well-lit exterior
surrounding. The camera is positioned to get a low angle shot of the
character. Then, I rendered the scene using Cycles.
Further refinement on animation

|
| Fig 10.1 Torso keyframes |

|
|
Fig 10.4 Hips keyframes and graph |
After receiving feedback from Mr. Kamal, I went to change the landing contact pose to play quickly to the down recovery pose by mainly making the torso keyframes of that action closer to each other, with keyframes of other controllers following it. I also made the hips to move more forward when the character is getting up so that the movement would feel less robotic. The keyframes for the right foot during that recovery pose were also offset a bit as well as given a subtle "push down" motion when the character is getting up to give a more life-like movement.

|
| Fig 10.2 Foot rotation keyframes and graph |

|
| Fig 10.5 Right leg keyframes and graph |
Then, I added more flexibility to the animation by rotating the foot more when the character is in mid-air, and also dragged the right leg more when the character is about to jump.

|
| Fig 10.3 Root controller keyframes |
To increase the jump distance so that it would be more clearly that the
character is cycling in the air, I moved forward to torso controller with
other controllers following it, and then moved the root controller forward a
bit when the character is fully in mid air to give the distance a bit more
push. The timing is mostly kept the same, except for when the character is in
mid air which needed a bit longer timing.
Final Cartoon Jump Animation
Fig 11.1 Final Cartoon Jump Animation
Feedbacks
Week 7 - Project 1
Point the raised foot downward a bit more in the vanilla walk cycle up poses
so that it looks more natural, as our foot does the same as well.
Week 8 - Project 1
For the vanilla walk, make the shoulder more flexible and reduce the
height of the hip to reduce the knee popping. Add some more weight shift to
the torso by adjusting the x location, make it shift towards the leg that is
being put down. For the attitude walk, have some flexibility on the feet
to add some drag and the head needs to move left and right more to make
it less rigid.
Week 9 - Project 1
For the vanilla walk, make the shoulder more flexible. You can try reducing
the height of the hip to reduce knee popping. The arm flexibility looks ok.
Add some more weight shift by adjusting the x location axis of the torso and
shift it towards the leg that is being put down. The sneak walk is good but
have some flexibility on the feet to add some drag. The head also needs to
move left and right more to make it less rigid.
Week 12 - Project 2
There needs to be more moving hold for the anticipation (the squatting part). After the anticipation, drag the leg on the ground more , but avoid making it too stretchy, drag the x rotation of the foot too when it's in the air, rotate it backwards, though the rotation should be 0 once it's about to hit its peak in midair. You can also try deleting the right leg keyframes to catch up so there will be drag. Can switch between FK and IK between keyframes, if you find IK controls to be tricky in creating the pose you want. Move the landing distance forward more, so that the character can cycle in the air more and the audience can see that the character is moving forward in the air. In the landing part, can straight away from contact to bending down to the ground pose, also that part needs to be faster because when you're landing you want to support the front leg as fast as you can. When the character stands up from the ground, it feels a bit robotic, the right leg (the bent leg) needs to have a middle key pose more, the hip should move forward before the right leg moves forward.
Reflection
These two projects was enjoyable although frustrating at times. For me,
animating the attitude walk was the most enjoyable part as I got to try out
how to animate a walk with personality and something that's a lot different
from the vanilla walk. The most frustrating part is fixing the jerking knees
in the vanilla walk cycle because I did over 4 tries in fixing it by trying
different curves and positions to only end up realising the first attempt
doesn't have the problem and found out it's the torso affecting it from there.
So, I had to copy the leg keyframes from the first one to a new file (since I
already refined the movement for the other limbs) and readjust them again
without changing the torso position in the contact pose to 0 (which is what I
did for the 4 failed tries). But in the end, I'm glad that it's somewhat
fixed, although not perfect but the jerkiness isn't that obvious. The same
goes to the jump animation. I had to keyframe the motion on 1s to fix some
clipping and jerkiness. But trying out different timings in one animation was
an interesting process to learn.
I also found out other than technical difficulties like what was mentioned, 3D
allowing the ease of changing pose and keyframes quickly and without the
animator to generate the inbetweens poses are definitely a plus in creating
animations.
Comments
Post a Comment