10.4.2023 - 24.4.2023 (Week 2 - Week 4)
Chung Yi Ki / 0345014 / BDCM
Advanced
Animation
Exercises
Quick links
Lecture
Week 1 / Introduction to module
For the first week, we are given an overview and introductory brief to the
module. Mr. Kanan also gave us an introduction to 3D animation and its
industry positions.
3D industry positions
If you specialise in 3D modeling, you can be either a character modeler or a
prop or environment modeler. It can be in either the game, animation or VFX
industry, though the VFX industry requires realistic appearances. Other
positions include 3D lighter that takes care of lighting, shading artist
which focuses on shading/texture. The general position that is responsible
for model, texture and rigging is in the asset development or look and style
development. Another position that covers all aspects of 3D workflow is
called a generalist.
3D animation vs 2D animation
In 3D animation, the 12 principles of animation is also important to apply.
Though some differences is that in 2D animation, every frame needs to be
drawn while 3D animation is more similar to controlling a puppet. To create
spacings in 2D animation, each frame needs to be drawn with the determined
distance in mind, while in 3D animation, you need to only use graph editor
to create different spacings.
Specialisation in 3D animation include character animation, vehicle
animation, effect animation and props animation. Effect animation, also
known as simulation, includes things like cloth, fur and collision, though
it's more technical than the others.
In 3D animation, to simulate weight in a character, some hold keyframes
would be needed. Though, there can't be a complete hold in 3D as it would
look unnatural, there needs to be some very slight movement to the keyframe,
which makes it a moving hold keyframe.

|
|
Fig 1.1 Types of graph shapes in Blender Source: https://docs.blender.org/manual/en/latest/editors/graph_editor/fcurves/properties.html |
In the polishing stage, hold keyframes from the blocking stage will be
converted to a spline which is keyframe with handles (bezier curves).
Week 2 / Fluidity in animation

|
|
Fig 1.2 Types of graph handles in Blender graph editor Source: https://docs.blender.org/manual/en/latest/editors/graph_editor/fcurves/properties.html |
To have a good quality in animation, the 3 most important concept to grasp
are fluidity, flexibility and clarity. Fluidity concerns on timing, spacing
(slow in and slow out), and arcs. In 3D animation, to create spacings, graph
editor needs to be used.
Frame rate
For films, 24fps is generally used, while videos of broadcasting purposes
using 25fps for PAL format and 29fpd for NTSC format. Some people uses 60fps
if higher frame rate is needed such as creating slow motion videos.
Keyframes
In 3D, to create a drawing or a pose like in 2D animation, we set a
keyframe. The character's pose can be changed by adjusting and moving the
controllers on its rig and then set key to set the pose. Posing is crucial
in ensuring a good quality in 3D animation. The poses that we need to have
keyframes for are the key pose, extreme pose, breakdown pose and inbetween
pose.
It's useful to look at the transformation data when animating, it can be
accessed at the sidebar by pressing "N" on keyboard. The timeline menu can
be navigated by using the arrow keys to go to specific frames.
The keyboard shortcut to set keyframe is "I". It's better to choose the
purpose the keyframe is for (location, rotation, scale or custom properties
etc.) so that it would use lesser memory on the computer.
To see the spacings on the motion path of the object, go to object
properties in the property panel and in the motion paths drop down menu,
enter the number of end frame and click calculate. The function is in the
object data properties for rigged objects
Graph editor

|
| Fig 1.3 Graph shape of different speed |
The function of graph editor in creating 3D animation is to create slow in
slow out and also to create arcs, as the motion of the object would move in
a linear fashion by default.
If the graph is moving upwards, the value is positive and vice versa. If the
graph is flat then it has no motion.
Rendering
Blender can either render directly as video through render animation option
under render with the ffmpeg selected as the file format, or render as image
sequence with png selected as file format in output properties.
Week 3 / Elasticity & Flexibility in Animation
Flexibility
Elasticity of shape and appendage are two elements which are needed to
create flexibility. Squash and stretch is needed to create elasticity of
shape, while drag, follow through and overlapping is needed to create a
believable movement of an appendage.
To give a cartoony and characterized effect, give the object more squash
and stretch and more exaggeration. The lower these two properties are, the
more realistic it becomes.
When resizing the object to do squash and stretch in Blender, it's better
to use local mode for the scale/move controller than global.
Hold keyframes of an object position may be needed for squash and stretch,
and thus the other keyframes of the key poses would need to be moved
forward too. The number of hold keyframes needed depends on the acting of
the object and how the animation needs to look like.
Week 6 / Clarity in animation
To produce clarity in animation, staging, secondary action,
exaggeration, action and solid drawing needs to be taken note off. In
action, anticipation and follow through is included as well. In 2d
animation, the characters poses need to be drawn, but in 3D animation, a
rigged character is given so we just need to explore the rig controls to
try out the possibility of poses.
Staging in animation includes where to position the camera, the choice
of background and the position of the character.
Camera work
When working with the camera, we'd have to think about and decide on the
type of frame size we need, if it's an establish shot, full shot, medium
shot, close up shot, extra close up etc. Generally, full shot is good
for action sequences, middle shot is good for dialogues scenes while
close up is suitable for expressions. Extreme close up is good for
strong emotions to give extra information.
The type of camera angle has to be thought of too. Generally, a high
angle would convey a sense of weakness while a low angle would convey a
sense of strength. Camera work involves the movement of the camera, if
the camera is zooming in or out, tracking left, right, up or down,
panning or rotating. It's important to keep the screen direction
consistent in each scene. That means, if the camera in the first scene
is moving to the right, then the second scene should be the same as
well.
Character
In terms of action, solid drawing and timing is important. Solid drawing
involves line of action, silhouette and contrapposto. Timing dictates
how many frames an action need and how long a keyframe should be hold or
paused. Different timing convey different feeling. Remember to present
one idea at a time and not crowd the action with too many secondary
actions.
It is also important think about the personality of the character to
produce clarity in the animation. This would decide how to character
acts and their expressions.
In 3D animation, for a subtle anticipation, graph editor can be used to
produce it, but for a big anticipation, a new keyframe would be
needed.
Poses
When making poses, remember that the character's limb should be within
its centre of gravity. Make use of line of actions in the poses. Play
with the negative spaces around the poses to create a clear
silhouette.
Understanding character rig
There are two types of controllers in 3D, forward kinematic (FK) and
inversed kinematic (IK). FK controls one specific part while IK is the
master controller where other FK follows.
Tasks
Exercise 1: Bouncing ball animation
For this exercise, we are tasked to animate a soccer ball, a ping pong ball, a
bowling ball and a beach ball. We are given a
Blender file
to use for our animation, which contains a ball rig with the option to change
its appearance to different kinds of balls.
Reference videos
Fig 1.1 Soccer ball reference
Fig 1.2 Ping pong ball reference
Fig 1.3 Bowling ball reference
Fig 1.4 Beach ball reference
We are given reference videos to refer to when planning to animate our
animation. I heavily referenced them and studied them by replaying the video
at normal and the lowest speed to get the feel of the weight and the
height.
Animation process

|
| Fig 2.1 Soccer ball bounce motion path and curves |

|
| Fig 2.2 Soccer ball spin animation keyframes and curves |
I started with animating the soccer ball first. I animated it with height reference in Fig 1.1 and adjusted the Z curve to make sure the speed of the ball feels right. I didn't restrict myself on getting a perfect arc shape as I found that sometimes the arc need to be changed a little to get the slow-ins and slow-outs that I want, especially at lower heights. As for the spin, I rotated the rig globally but with the biggest change on the Y axis, then I added a keyframe to show the ball slowly stopping by doing a slight rotation after the last keyframe of the bounce. I also adjusted the curve to get a smoother slow-out for the Y-axis. The spacings between bounces started at 20 frames for the first bounce and then decreases by 4,3,2 etc. according to the height of the ball and distance to the next bounce. The lower the height and nearer it is to the next bounce, the smaller the decrease of number.

|
| Fig 2.3 Ping pong ball bounce motion path and curves |
For the ping pong ball, the height of each bounce are much more higher and the
timing is more rapid. According to the reference, ping pong balls have a
tendency to bounce multiple times at a single spot with a slight change of
direction until it stops after a few big forward bounce. So, I tried to
include that concept into my animation. I adjusted the curve where necessary
to give a faster timing, and for the spacings I started at 16 frames and
decreases by 2 for each bounce until it reaches 8 frames and maintained that
amount of spacing until it stops bouncing. I chose a plain ball for this ass
ping pong balls are generally plain.

|
| Fig 2.4 Bowling ball bounce motion path and curves |

|
| Fig 2.5 Bowling ball spin animation keyframes and curves |
For bowling ball, it's very heavy so it will fall in a faster speed and its
first bounce is at a vey low height, while its subsequent bounce will be much
more lower compared to the first bounce. It stops bouncing very quickly too
(about after 2-3 bounces) and doesn't roll too far. I adjusted the curves to
give it a faster bouncing back and falling motion. For the spacings, I started
at 12 frames and decrease by 4 until the last bounce. I also animated the
spinning motion and adjusted the Y axis curve to give a more rapid spinning as
it falls and a slow-out as it stops.

|
| Fig 2.6 Beach ball bounce motion path and curves |

|
| Fig 2.7 Beach ball spin animation keyframes and curves |
As for the beach ball, similar to soccer ball but it stays in the air more, so
it has a more floaty feeling to it. And, it doesn't bounce as much as the
soccer since it's not as elastic. I adjusted the Z axis curve to give it more
air time by slowing it down when it reaches the peak of the arcs, and also
lengthen the distances between keyframes to slow its general speed down, but
also made sure when it falls down it still delivers some impact. I started the
spacings between keyframes at 32 frames, then decrease it to 30, 22, 20, 16
and 11, following the same concept as the soccer ball. I also did a spinning
motion for the beach ball and also adjusted the Y axis curve to give a
smoother slow-out.
Layout for the animations

|
|
Fig 3.1 Beach background for beach ball layout Source: http://www.publicdomainfiles.com/show_file.php?id=13942756216637 |

|
|
Fig 3.2 Soccer field background for soccer ball Source: https://commons.wikimedia.org/wiki/File:Soccer_field_of_Inage_Seaside_Park.jpg |

|
| Fig 3.3 Ping pong table UV image |
Fig 3.1 Layout for the 4 different balls animation
After I finished animating, I created a new blender file for the stage to
composite the animation in and appended the animation files into their
respective stage files. I wanted to create the stage to match the different
kinds of balls so I used background image for the soccer ball and beach ball
while creating a separate ground texture; an image for the ground of the ping
pong ball and Blender's built-in brick texture in the material settings for
the ground of the bowling ball. The background walls for both the ping pong
ball and bowling ball are just plain solid colour with high roughness level.
The UV image for the ping pong table was done in Photoshop with the exported
UV layout from Blender.
I used sunlight as the primary light source for soccer and beach ball, while
area lights for ping pong and bowling ball. Spotlights are used to soften out
hard shadows or to give more directional lighting. The cameras are all at the
same angle so that there's cohesiveness in the final edit.
I composited the animations in Blender so that I can have shadows and lighting
that is automatically calculated and done by Blender, as compared to in After
Effects where I might need to manually animate the shadows or lighting.
Fig 3.2 Blender grass tutorial

|
| Fig 3.3 My particle properties and material settings for grass in soccer ball layout |
Fig 3.4 Blender sand tutorial

|
| Fig 3.5 My shader nodes for sand in beach ball layout |
I searched for tutorials on how to make grass and sand in Blender on YouTube
and followed them while making some adjustments in my own settings to match
the background I have.
Refinement of animation

|
| Fig 4.1 Motion path and curves of refined beach ball animation |

|
| Fig 4.2 Motion path and curves of refined ping pong ball animation |
When I was replaying the animation when compositing them in the layout, I found that the beach ball and ping pong ball animation seems to stop a bit abruptly. So, I went to add some more bounce to them and adjusted the keyframes and distance. I made a change on the ping pong ball keyframe to make it bounce backward once when it's almost stopping to stick closer to the reference.
Compiling and editing

|
| Fig 5.1 Premiere Pro workspace |
After that, I rendered each animation in MPEG-4 format in Blender and imported
them into Adobe Premiere Pro to compile and add captions. I rendered each
animation with 10 extra frames to give a while for the audience's eyes to
rest. Though, for the soccer ball animation, I didn't render the 10 extra
frames so I insert the still image of the last frame in Premiere Pro instead.
Further refinement of animation

|
| Fig 6.1 Slowed down rotation graph of soccer ball |
After receiving feedbacks from Mr. Kamal, I went and slowed down the rotation of the soccer ball a bit by editing the Y-axis on the rotation graph.

|
| Fig 6.2 Increased height, distance graph of ping pong ball |
I also increased the bounce height of the ping pong ball and added one more bounce because of the increased height. Since I resized the ping pong ball to be smaller, I also increased the distance of each bounce to match its smaller size and higher bounce.
Final bouncing ball animation
Fig 7.1 Final compiled bouncing ball animation
Exercise 2: Bouncing ball with squash and stretch & Pendulum
animation
For the second exercise, we are tasked to take the soccer ball animation we
did in exercise 1 and add squash and stretch to it, then we are given
3 Blender files
with 3 different pendulum rigged models and we are required to choose one to
animate it swinging when moving from left to right. Drags, overlapping and
follow through should be shown in the swinging pendulum.
Bouncing ball with squash and stretch
Reference videos
Fig 8.1 Reference video #1
Fig 8.2 Reference video #2
When I first tried to animate the ball with squash and stretch in class, the
ball turns out to look goopy than solid, so I went to YouTube to see how
people animate their solid balls with squash and stretch. I found out that
some animate it with subtle squash and stretch while some exaggerated more.
But I found out in Reference video #2, the ball seems to loose a bit of
elasticity. So, I plan to animate mine with a obvious squash and stretch but
maintain the elasticity of the ball without it looking like goop.
Animation process

|
| Fig 9.1 Keyframes and graph editor curves of the top part of the ball |

|
| Fig 9.2 Keyframes and graph editor curves of the bottom part of the ball |
I brought back the soccer ball animation I did in exercise 1 and used the top and bottom rig controller of the ball to animate the squash and stretch. I control the rig by changing its location in the Y and X axis, Y axis for stretching and squashing, and X axis for changing the direction of the ball when being stretched or squashed. I used hold keyframes for when the ball return to its original form when reaching the peak to prevent it from stretching too much, and when the ball is squashed on the ground to make the squash obvious and provide some weight to the ball.
Squash and stretch is done for every bounce though each once is less
exaggerated than the previous to transition smoothly when it stops and return
to its original form. The curves in the graph editor are edited in a way to
provide smooth easing and a bit more linear line where necessary.

|
| Fig 9.3 Squash and stretch ball layout |
I used back the same layout for the soccer ball in exercise 1, but I did a version for this squash and stretch ball where I removed the grass and replaced it with a solid green plane to see the squash and stretch better.
Pendulum animation

|
| Fig 10.1 Given pendulum models |
Fig 10.2 Pendulum animation tryout in class
For the pendulum animation, we did a tryout using the Pendulum 1 model in class in week 3 while following Mr. Kamal's demonstration. Of course the animation wasn't really smooth and and there's a lot of things to tweak, so I'm planning to redo the animation after class. Since we can choose whichever pendulum model we like to animate it, I chose the Pendulum 2 model because I'm in a medieval mood after watching the movie "Dungeons and Dragons: Honour among Thieves" recently.
Reference video
Fig 11.1 Pendulum swinging reference video
Animation process
Fig 12.1 Keyframes and curves of each section
I first animated the main body moving from left to right, and edited the curve
to make the movement more snappy. Then, I animated the pendulum swinging
rotations by controlling the first segment at its key poses. The rotation for
the second segment and the ball segment are then animated at the breakdown
poses between the key poses. Each of the curves are then adjusted to make the
movement more smoother, the first swing to the right and second swing to the
left is made to be more snappy to give the spiky metal ball some weight.
I later updated the curves for the first, second and the ball segment again
when creating a layout to stage the animation to give it a more flexible and
smoother movement, but with the metal ball weight in mind. I also moved
forward the ball segment keyframes by 2 frames and the second segment keyframe
by 1 frame so the overlapping motion is smoother.
Layout for the animation
Fig 13.1 Video tutorial showing how to import textures downloaded from
ambientCG
Source: https://youtu.be/It9rlbc4Kl4

|
| Fig 13.2 Wood texture assets downloaded from ambientCG |

|
| Fig 13.3 Shading nodes to import the texture |
After completing the animation, I wanted to stage it in a wooden cabin environment of sort. I watched a video showing how to make sand using textures downloaded from a website called ambientCG when I was doing exercise 1, it wasn't useful back then but the method is useful for the layout of this exercise. I first went to ambientCG website to look for suitable wood texture and found Planks 023 C and Planks 027 B. Then, I enabled the node wrangler add-on in the Blender preferences menu to import and auto connect the nodes from the ambientCG texture file as shown in Fig 11.3. I used Planks 023 C for the roof and Planks 027 B for the side wall (though the side wall can't be seen in the camera, it gives a subtle reflection to soften the shadows on the metal ball).

|
| Fig 13.4 Animation staging layout and lighting |
After that, I put lightings in the scene. I used two suns as the main lights
and three spotlights to brighten up some shadows. I used Bolean brush to
create rectangular holes in the roof and the side wall to let the sunlight
shine through, so it'll give more of a cabin feel. The pendulum is appended
into the stage file and positioned as well as scaled bigger to make the scene
look right. 10 empty frames are added to the start of the animation to give
the animation a starting point rather than starting it instantly. Then, the
bouncing ball squash and stretch and the pendulum animation are compiled in
Adobe Premiere Pro and exported for submission.
Final Bouncing ball with squash and stretch & Pendulum animation
Fig 14.1 Final bouncing ball with squash and stretch & pendulum swinging
animation
Exercise 3: Emotion Pose
For this exercise, we are required to find reference image of 4 emotions:
happy, sad, angry and scared. We are then required to study the poses based on
silhouette, line of action and contrapposto. After that, we are required to
download either the
Snow
or
Rain
character rig from Blender website and pose the rig according to our
reference. We have to compiled all of our studies and the final renders in a
presentation slide for submission.
Pose reference

|
|
Fig 15.1 Happy pose reference Source: https://images.app.goo.gl/YDpzqVjJzseeVm5a9 |
|
|
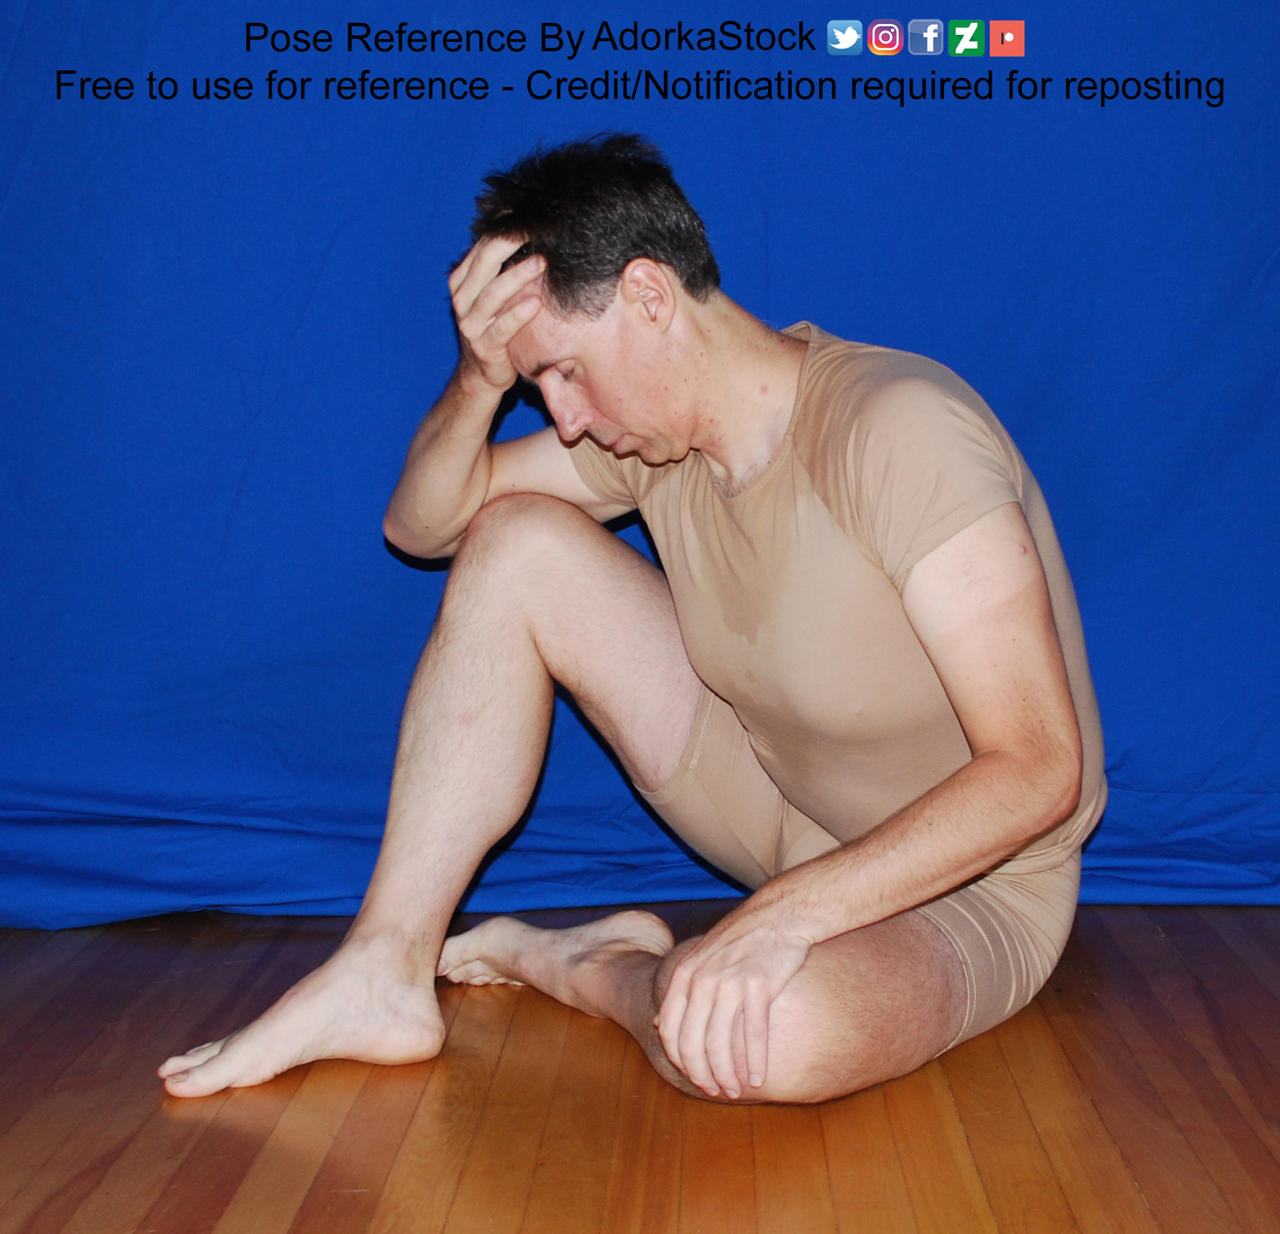
Fig 15.2 Sad pose reference Source: https://www.deviantart.com/adorkastock/art/My-only-regret-was-that-I-didn-t-eat-the-WHOLE-box-899903687 |

|
|
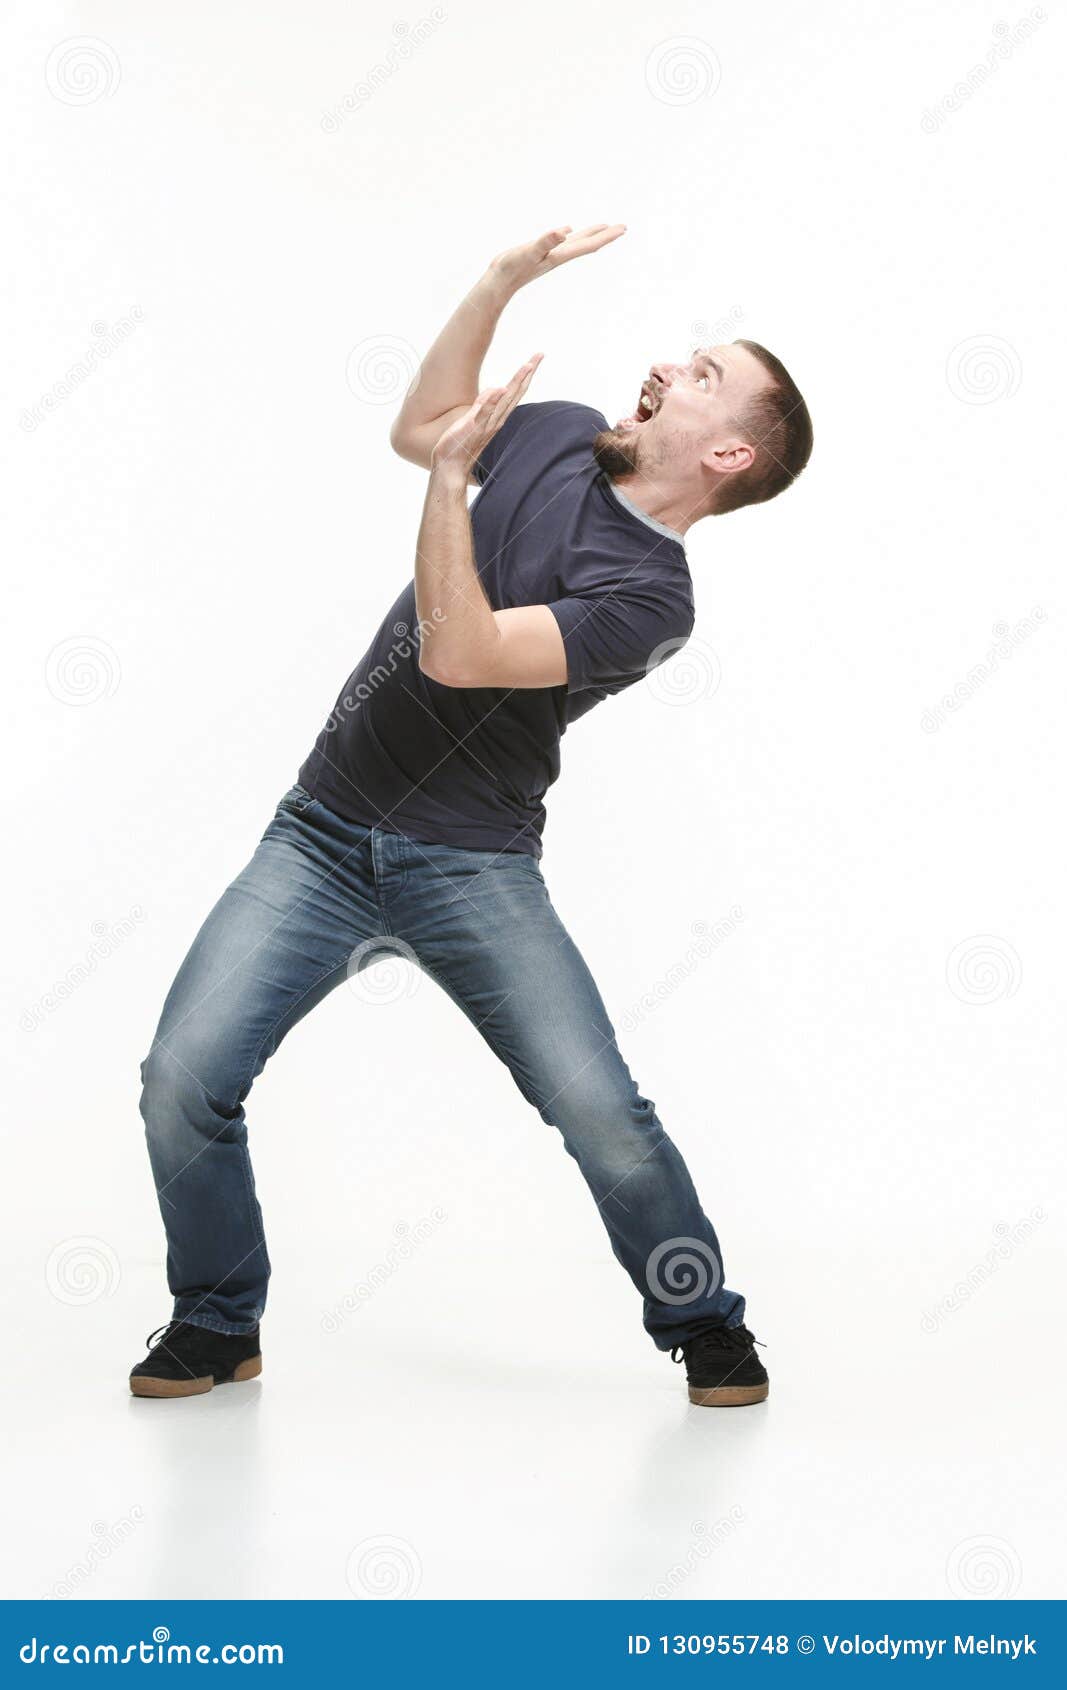
Fig 15.3 Angry pose reference Source: https://www.istockphoto.com/photo/man-stepping-on-to-forward-jump-stomping-on-something-gm1019223564-273925010 |
|
|
Fig 15.4 Scared pose reference Source: https://images.app.goo.gl/tjcHUoGbCEWvKBax9 |
I first went on Google image to search for suitable poses for this exercise. I
look at mostly stock photos as they have more variety and shows facial
expressions clearly. I also made sure to avoid choosing poses that are
twinning.
Poses study

|
| Fig 16.1 Line of action and structure study in Krita |

|
| Fig 16.2 Silhouette study in Photoshop |
I started with studying the line of action and structure of each poses. I drew
over the reference on Krita to understand how each part bends and angles, and
to understand the contrapposto of each pose by drawing a line on top of the
shoulders and hips. Then, I moved to Photoshop to create the silhouette of
each pose by selecting the subject and painting black over it.
Manipulating the Blender character rig

|
| Fig 17.1 Posing the character using IK controllers and the animation library |

|
| Fig 17.2 Posing the character using some FK controller |
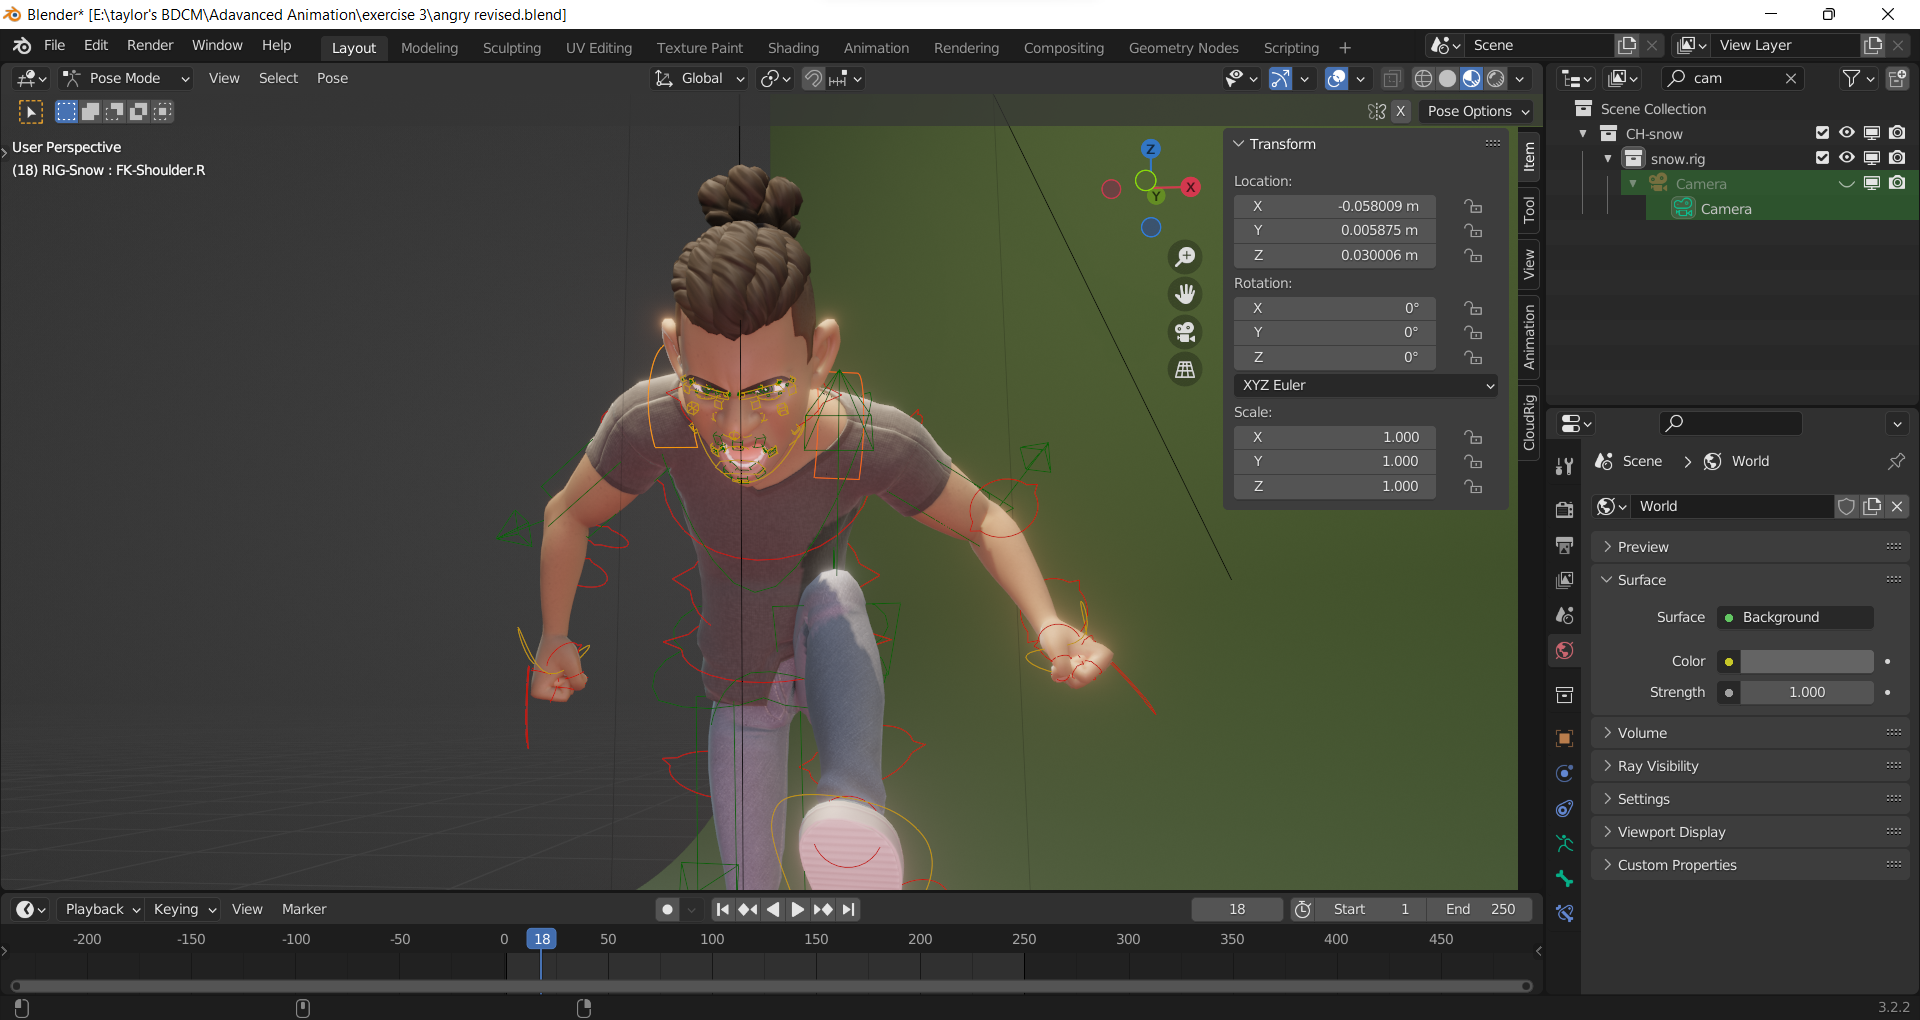
I chose the character Snow to use for the posing. I use mainly IK controllers to create the poses according to the references, but for the scared pose, I used the FK controllers on the spine so that I could bend the character more at certain section of the spine. I also used the animation library to help me pose the hand and facial expression, and then adjust the pose further using the FK controllers on the fingers and IK controllers on the face.
Layout and lighting for rendering
Fig 18.1 Studio backdrop tutorial

|
| Fig 18.2 Creating the backdrop using bevel edges |

|
| Fig 18.3 Lighting and camera layout for the poses |
To create a seamless background, I went to YouTube to search for a studio
backdrop tutorial on Blender. I followed the tutorial to create the backdrop
for each four poses and coloured the backdrop dark green. Then, I used the
four lightings provided in the character file and adjusted them to create the
lighting that I wanted. I used mostly area lights as the key lights, while
spotlights and sun are used as backlighting or secondary lights. To match the
emotion of the pose, I used purple and blue lighting for the key lights in
scared and sad pose.

|
| Fig 18.4 Angry pose with green background |

|
| Fig 18.5 Happy pose with green background |

|
| Fig 18.6 Changing the happy pose background colour in Photoshop |

|
| Fig 18.7 Changing the angry pose background colour in Photoshop |
Since the background for the scared and sad pose has obvious purple and blue
colours, I changed the background colour for the happy and angry pose in
Photoshop by selecting the green background with magic wand tool, changing the
colour using the replace colour option and adjusting more using brightness and
contrast.
Further refinements of emotional poses

|
| Fig 19.1 Adjustment of wrist IK controller for happy pose |
|
| Fig 19.2 Adjustment of shoulder heights for angry pose |
After receiving feedback from Mr. Kamal, I made a bit of changes on the happy and angry pose. I bent the right elbow more in the happy pose by adjusting the position of the wrist IK controller, and I adjusted the height of the shoulders in the angry pose, where the right is higher than the left, so that the pose resembles more closely to the reference. I also rotated the thumbs to be more inward into the palm. For the background colour, I changed the green backdrop in Blender to yellow for the happy pose, but still edited the red colour for the angry pose in Photoshop since I can't get a more darker red in Blender, possibly due to the lighting.
Final Emotion Pose
Fig 20.1 Final emotion pose presentation slides
Feedbacks
Week 3 - Exercise 1
The background is good. The spinning animation of the soccer ball is good, but
be careful that it doesn't spin too fast. The ping pong ball would need to be
scaled down smaller and it should have a higher bounce. The bowling ball and
the beach ball is good, there's a bit of sliding of the beach ball at the end
of the animation but it's ok.
Week 7 - Exercise 3
The way the happy pose is render is nice, maybe a bit more curve at the
elbow for the left arm. The way the sad pose is render is also good. Put the
reference side by side with the study and render in the slides. The angry
pose is ok but can play with more on the shoulder, since it's lower on the
left and higher on the right, and for the fist, rotate the thumb to be more
inward. Scared pose is ok.
Reflection
Doing these exercises, for me, really helped me in getting familiar with Blender and how rig controllers work. The bouncing ball I think is a good introduction to animation rigs, as well as the pendulum having different appendages (although I did struggle to exaggerate the animation to be more cartoony without loosing flexibility). And when it came to controlling a character rig in exercise 3, controlling the IK controllers were fine but it has its limits on the poses it can make, but the FK controllers were hard to get used to. Nonetheless, it does give me a chance to play around with it and understand how it works later on, and exercise 3 helps me familiarize myself with character rigs. Though, the part I enjoyed the most was creating the scenes in each exercise and playing around with the lighting. All in all, these exercises were great as a warm up to the following projects.
Comments
Post a Comment