1.9.2022 - 5.10.2022 (Week 1 - Week 6)
Chung Yi Ki / 0345014 / BDCM
Animation
Fundamentals
Exercises
Quick links
Lecture
Week 2 / Fluidity in animation
Frame rate
Before animating, decide on the size (resolution and aspect ratio) of the
video first, as well as the frame rate.
Resolution of an animation depends on where the video is going to be
distributed, whether it's going to be uploaded online in a digital format,
or broadcasted to digital or analogue tv or film. Usually, for digital
content, the resolution is usually 16:9, as for analogue TV, the resolution
is either PAL or NTSC.
Frame rate determines the ideal number of images to be displayed in one
second of a video. Typically, 24fps is used for film, while 25fps is used
for videos (both digital and analogue) which is the PAL format. Sometimes,
30fps is used as well for videos, which is the NTSC format. 60fps is often
used for slow motion videos.
Method of animation
Animate on ‘1’ - every frame has a drawing
Animate on ‘2’ - one drawing hold for 2 frames, i.e: only 12 drawings are
needed in 1 second for an animation on 24fps
The best system is to animate on 2, as the action would be faster and more
cartoony. Animating on 1 would lead to jerkiness or a more classical look,
which is fluid and smooth animation. (do take note that sometimes an
animation that looks too fluid is not appealing)
Timing

|
|
Fig 1.1 Different timing in relation to amount of drawings Source: Lecture slides |
The number of drawings used in any movement determines the amount of time
that action will take to complete on screen. More drawing will result in
slow timing while less drawing will result in fast timing. How heavy the
object is will affect its timing as well.
Spacing
The distance from a drawing of a key extreme (keyframe) to another key
extreme. In other words, the spacing for the in-between drawings. If there's
even spacing between key drawings, or in other words, even timing, the
animated outcome will have a constant speed which would look stiff. Thus,
acceleration (slow out) and deceleration (slow in) should be utilised in the
spacing of an animation.
More spacing between key drawings at the start will result in a slow out or
acceleration speed. This would result in a gradual change of distance
between two key drawings and would look smoother, thus less jerky. Slow in
or deceleration is the opposite of slow out.
Timing chart

|
|
Fig 1.3 Different examples of timing chart Source: http://www.brianlemay.com/Pages/animationschool/animation/lipsyncbook/timingcharts.html |

|
|
Fig 1.4 Timing chart in action Source: https://animationdesk.tumblr.com/post/137162607227/art-of-in-betweening-animation-timing-charts |
In a timing chart, the circled numbers are hte key extreme drawings. The
"slurs" are subdivision of the timing between the key drawings, each
subdivision is the half of the previous number (or timing).
Arc

|
|
Fig 1.5 Examples of arc Source: https://www.animationmentor.com/blog/arc-the-12-basic-principles-of-animation/ |
Position of key poses are based on the arc of the motion. The arc is a curve
line showing the arching motion of a movement.
Week 3 / Elasticity & Flexibility in Animation
Animation style

|
|
Fig 2.1 Different art styles in animation Source: Lecture slides |
Animation style can be divided into 3 categories, which are realistic,
semi-realistic and cartoony. Cartoony applies the principle squash and
stretch while realistic style has an issue of having the uncanny valley
effect.
|
|
Fig 2.2 Rotoscoped animation Source: https://hellobrittm.com/animation |
There's also a method of animating called rotoscoping where a video
reference is traced frame by frame. But just by rotoscoping itself isn't
enough, animation principles need to be applied to give it life.
Squash and stretch

|
| Fig 2.3 Maintaining volume when squashing |
Squash and stretch gives the illusion of elasticity of the
object/material, flexibility of the motion and this result in the
illustion of life which makes the character feels alive. A rule when
applying squash and stretch is to maintain the object/character volume
when applying squash and stretch.
Drag, follow through and overlapping

|
| Fig 2.4 Follow through and overlapping box with tail explanation |
|
|
Fig 2.5 Follow through example Source: https://www.dsource.in/course/principles-animation/follow-through-and-overlapping-action |
Drag, following through and overlapping gives flexibility to an object.
Using an example of a moving box with a tail, when the box moves forwards,
its tail drags along by starting to move later than the box, when the box
stops, the tail follows through by stopping later than the box.

|
|
Fig 2.6 Offsetting the timing of different section of an appendage to achieve overlapping |
|
|
Fig 2.7 Overlapping example Source: https://www.dsource.in/course/principles-animation/follow-through-and-overlapping-action |
Methods of animating
Pose to pose
Start by first drawing the extremes poses (key poses), then draw the
breakdown (the drawing in between the two extremes), and continue to
adjust spacing by adding drawing in between drawings.
Straight ahead
Not good to use for primary action but it's ideal for secondary action and
overlapping actions. Using the example of a ball with tail, primary action
refers to the movement of the ball and secondary action refers to the
movement of the tail. Animating straight ahead means to draw each frame
one after another without the key poses and breakdown planning in pose to
pose.
Week 4 / Solid drawing
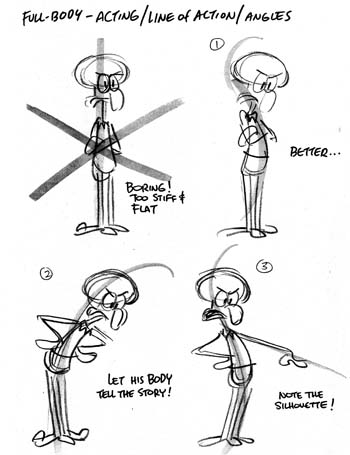
Line of action
An imaginary line that runs through a character that describes the
motion of the body and the leading force of a character's action. A
strong line of action goes through the whole body, illustrate and shows
the character's action clearly.
|
|
Fig 3.1 Example use of line of action Source: https://quotesgram.com/stewie-griffin-fart-quotes/ |
Try to avoid straight lines when using line of action, make sure the
lines are curved. Usually a "S shape" line often shows a stable standing
pose, a "C shape" often shows movement or action.

|
|
Fig 3.2 Contrasting sequence of line of action Source: Lecture slides |
Contrast is a good principle to apply when using line of action as well.
For example in Fig3.2, Sebastian's right claw in the first key pose is
raised high up above his left claw, in the next key pose, his right claw
is down below his left claw.
Structure

|
| Fig 3.3 Structure of pose |
Structure is about applying appropriate weight and balance to a
character pose.
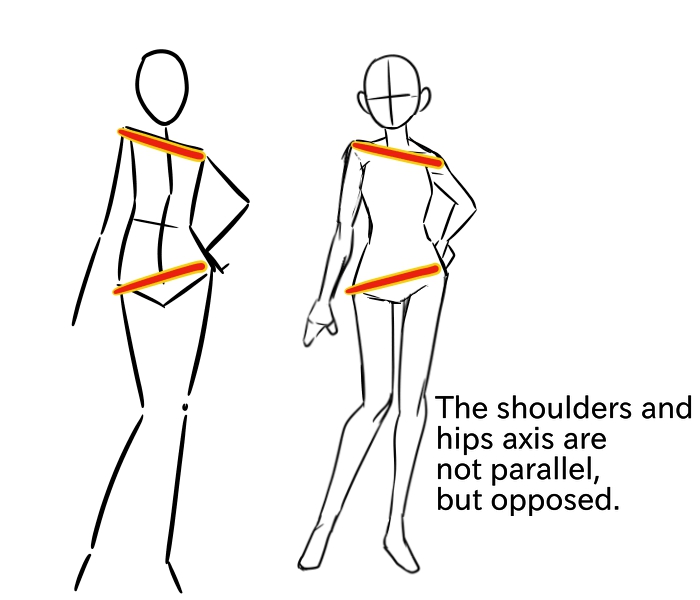
Contrapposto
|
|
Fig 3.4 Usage of contrapposto Source: https://medibangpaint.com/en/use/2020/10/about-posing-basic/ |
One of the ways to make sure a pose is balanced but contrasting enough
to make it interesting is to apply the contrapposto concept. The concept
shows that a body is posed in such a way where weight of the body will
rest on one leg and thus freeing the other. And so, the shoulder and
pelvis will be slanted and shifted. The shoulder will slant towards the
heavier part and the pelvis will slant towards the lighter part.
Poses
There are 4 poses in animation, the key pose, extreme pose, breakdown
pose, and inbetween pose. The key pose is the most important pose as it
is the one that tells the story of the animation.
|
|
Fig 3.5 Different body proportions Source: https://www.drawinghowtodraw.com/drawing-lessons/drawing-faces-lessons/dme-good-human-proportions.html |
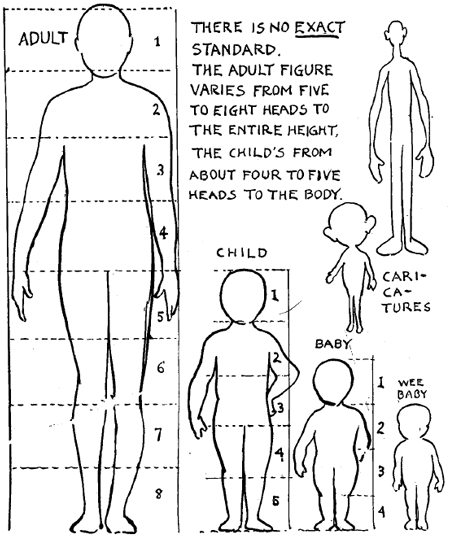
When drawing poses, it's important to understand body proportions to get
a character's proportions right. Usually an adult character has the
height of 8 heads, while a baby or "cute" character has the height of 3
heads. It's also a good idea to start with a simple form (with basic 3D
shapes) of the pose to get the form right before drawing the full
figure.

|
| Fig 3.6 Designing characters using a combination of different shapes |
When designing character, it's a good idea to think of the design in a
combination of simple shapes first which would help you establish the
form and proportion of the character.
Figure drawing can be divided into observational method and constructive
method. Constructive method is suitable for animation as it's able to
produce a guideline for other animators and can be drawn in thumbnail
form as a gesture drawing.
 |
| Fig 3.7 Straight and curves Source: https://www.facebook.com/CharacterDesignReferences/photos/straights-vs-curves-by-rad-sechrist-tutorial-of-the-day-gumroadcomradsechrist-ch/1885749354809790/ |
Using the straight against curves technique can further improve figure
drawing skill as well.
Silhouette

|
|
Fig 3.8 Negative space in character pose Source: Lecture slides |
When drawing character pose, remember to give enough negative space
between the character's body and limbs. Avoid overlapping elements as it
will make the silhouette and in turns the pose unclear.

|
| Fig 3.9 Overlapping lines |
Though, overlapping certain lines when drawing form will give the
drawing a 3D quality.
Twinning pose

|
|
Fig 3.10 Twinning pose vs non-twinning pose Source: https://www.pinterest.com/pin/373939575280725907/ |
Twinning pose is a pose where the left and right side of a character is
symmetrical to each other. Avoid twinning poses as it makes the pose
look boring.
Instructions
Exercise 1: Bouncing Ball Animation
For exercise 1, we are tasked to create a moderate (normal) speed bouncing
ball animation using Adobe Animate. The animation should be animated on '2' in
24fps and should utilize timing, spacing, slow in and slow out, and arc.
Animation Progress

|
| Fig 1.1 First tryout of animation |

|
| Fig 1.2 First tryout of animation with onion skin |
Fig 1.3 First tryout of animated bouncing ball
I started by drawing the background line and the arc using the line tool and
selection tool, and drew the ball using the oval tool. I followed Mr. Kamal's
timing of having a new drawing for every 2 frames and an even slow in and slow
out spacing. I also added a ball rolling motion at the end so that the
animation won't feel like it ended abruptly. Though, I felt like the timing is
a bit mechanical and the arc of the motion is not smooth enough. So, I made
some changes in my second tryout.

|
| Fig 1.4 Second tryout of animation with previous arc guideline |

|
| Fig 1.5 Second tryout of animation without arc guideline |
In my second tryout, I smoothen the motion arc by adjusting the position of
each frame manually. I deviated from the arc guideline I drew previously as I
found that it's more flexible fine tuning adjustment without the guideline. I
also adjusted the height of the arc so the bouncing looks more natural and has
a gradual change to a stop. For the spacing, I gave more slow-out when the
ball is bouncing back up and less slow-in when the ball is coming back down so
that the animation looks more fluid.
After that, I exported the animation as a video for submission.
Final outcome of bouncing ball animation
Fig 2.1 Final bouncing ball animation
Exercise 2: Bouncing Ball with Tail Animation
For exercise 2, we are tasked to apply squash and stretch to a bouncing ball
animation, as well as adding a tail to the bouncing ball and using the drag,
follow through and overlapping principle. We are allowed to use back the
bouncing ball animation that we did for exercise 1.
Animation progress
Squash and stretch and tail animation planning

|
| Fig 3.1 Tail animation planning and squash and stretch of ball |

|
|
Fig 3.2 Tail animation planning and squash and stretch of ball with arc guidelines |
Fig 3.3 Tail animation planning with squashed and stretched ball
I used back my bouncing ball animation that I did for exercise 1 and added
squash and stretch to it by resizing the ball when it's falling and bouncing
back using the free transform tool. After that, I planned out the tail
animation using the brush tool by following Mr Kamal's demonstration of it. I
then added a circular shape at the tip of my tail sketch so that it's easier
for me to plan out where to use follow through and overlay for the tip of the
tail.
Tail animation clean up

|
| Fig 3.4 Clean up tail animation with one colour |

|
|
Fig 3.5 Clean up tail animation with white tip |
I used pen tool to clean up my tail sketch and tried to make it to look like
a thick fox tail. The white colour at the tip of the tail is added using
lasso tool when the first clean up is done. Some frames, especially when the
ball is squashed and bouncing back, is a bit different than what was
sketched in the animation planning. Since the clean up tail is thicker, it
wouldn't bend as much like what was sketched out previously. When the ball
is rolling and comes to a stop, I animated the tail to slowly fall down
until it's flat on the ground following the follow through principle. I also
changed the single line background to 3 rectangles to make the scene a bit
more interesting.
Fig 3.6 Bouncing ball with tail animation - First attempt

|
| Fig 3.7 Editing the bottom line of the tail to make sure its smooth |
After receiving feedbacks from Mr. Kamal, I edited the lines of the tail to
make sure it's smooth and not wavy or sharp.
Final outcome of bouncing ball with tail animation
Fig 4.1 Final bouncing ball with tail animation
Exercise 3: Emotion Poses
For this exercise, we are assigned one emotion from a list of four emotions:
happy, sad, angry and scared. We are required to find an image of a pose
that best describes the emotion we are assigned to and draw on the existing
image to show line of action, structure and proportion, silhouette and basic
form of the pose. The drawing should be done in Adobe Animate at 24fps , in
1280 x 720 resolution and each drawing should be labelled accordingly.
Silhouette of the pose can be done in software other than Adobe
Animate.

|
|
Fig 5.1 Selected happy pose Source: https://www.dreamstime.com/stock-image-happy-jumping-woman-image16816861 |

|
| Fig 5.2 Line of action of pose |

|
| Fig 5.3 Structure and proportion of pose |

|
|
Fig 5.4 Drawing basic form using brush and line tool |

|
| Fig 5.5 Solid shapes of basic form drawing using rectangle tool |
The emotion that I'm assigned to is happy. I pasted the picture in adobe
animate and resize it so that it would fill up the canvas. Line of action of
the pose is drawn using line tool and structure and proportion of the pose is
drawn using the brush tool. For basic form, the shapes of the form is first
drawn out using a combination of brush tool and line tool (Fig 5.4). Then, I
used the rectangle tool to make the shapes more visible and add some shading
to it (Fig 5.5). A white tint is also added in the original picture layer when
showing the drawings over it so that the drawings are more visible.

|
| Fig 5.6 Creating silhouette in Photoshop |
For the silhouette of the pose, it was done in Adobe Photoshop by first selecting the subject and the selection is then brushed over using a brush tool in black colour. Some fine tuning of the silhouette of the hair strands are later drawn over manually using the brush tool. The image is then brought into Adobe Animate to be arranged in the video.
Final outcome of emotion poses
Fig 6.1 Final emotion poses video
Exercise 4: Turnaround animation
For this exercise, we were tasked to select a character and find reference
images of that character to create a turnaround animation. The character
must have a head, body, arm and leg, but the character's body and head can
be a combined shape (like Spongebob). For the animation, the character
needs to be drawn in a neutral standing pose in 8 angles:
Front view, ¾ front view left, side view left, ¾ rear view left, rear view,
¾ rear view right, side view right, ¾ front view right.
Construction drawing (sketch/rough) needs to be shown with the clean-up
drawing on top. The animation should be animated on 2 and looped for 3 turn
cycles. The angles can be mirrored instead of drawing all 8.
Visual reference

|
|
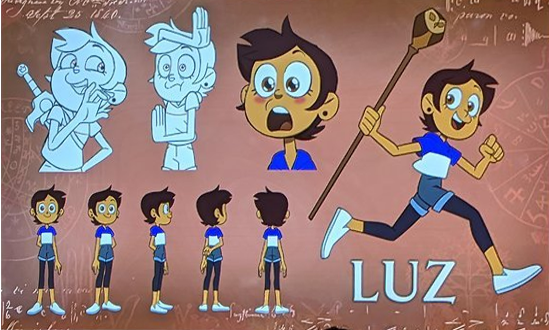
Fig 7.1 Luz character sheet Source: https://66.media.tumblr.com/5762d6248e81d8ba044da3bc31faffd9/tumblr_pywmqt4G0W1xa35vmo6_640.png |
For this exercise, I decided to choose a character called "Luz" from the animated series "The Owl House". I found a character sheet of Luz for me to reference on for her different angles, though I'll be changing the pose to a standing pose where both arms are let down rather than with one arm behind the back.
Character sketch

|
| Fig 8.1 Character angle sketch with construction drawing |

|
| Fig 8.2 Character angle sketch without construction drawing |
Animation process

|
| Fig 9.1 Front view clean up process |

|
|
Fig 9.2 3/4 front view right clean up process (traced following the sketch and mirrored) |

|
| Fig 9.3 Side view clean up process |

|
| Fig 9.4 3/4 rear view right clean up process |

|
| Fig 9.5 Rear view clean up process |
After that, I pasted the sketches in Adobe Animate and used pen tool and
line tool to trace over the sketches, with some adjustments here and there
to make the each drawing more refined and line up with the other
drawings.

|
| Fig 9.6 Further clean up drawings - All 8 angles |
Fig 9.7 Cleaned up drawings turnaround animation
I then cleaned up the drawings further by removing the excess overlapping
lines by using eraser, redrawing some crooked hands and adjusting the height
and length of some parts to make them line up with the other angles. I added
another small circle to the character's eyes for the eyes highlight as seen in
the reference image (Fig 7.1). I also added a small circular platform under
the character to make it look like a turntable. The first row in Fig 9.6 are
the main drawings while the second row are mirrored drawings, flipped
horizontally.

|
| Fig 9.8 Including the sketch image in the animation for export |
Then, I included the picture of the sketches which shows the construction
drawing in the animation for submission. The frames are copied and pasted to
reach 3 turn cycles in the animation.
Fig 9.9 Turnaround animation - First attempt

|
| Fig 9.10 Increasing the frames by 1 frame |
After receiving feedbacks from Mr. Kamal, I increased the frames of the
animation so I'm animating on 3's to make it slower but not too slow.
Final turnaround animation
Fig 10.1 Final turnaround animation
Feedbacks
Week 11
Exercise 1
Looks good. looks ok.
Exercise 2
The tail seems to be too thick, hard for him to read the animation. But at some part, the shape of the tail seems to not flow nicely enough. (as in the lines have to flow nicely instead of wavy, jagged lines, smooth and fluid lines). Find the 3 sections of the tail and see how to connect them better. (i.e: not like one part seems disjointed from the other part). But the flexibility is there.
Exercise 3
No problem .
Exercise 4
Normally, at front view, the feet is pointing forward not outwards, but you can have it bent, but the front part should be larger than the back part. The timing feels too fast, maybe try 6 frames per drawing, make it slower but not too slow.
Reflection
The exercises definitely helped me in getting familiar with the workflow of Adobe Animate and the usage of the 12 animation principles, especially with exercise 2 and 4. They are great introductory practices to make for quicker workflow in the proceeding projects.
Comments
Post a Comment