8.4.2022 - 13.5.2022 (Week 2 - Week 7)
Chung Yi Ki / 0345014 / BDCM
Video
and Sound Production
Project 2: Shooting Practise & Editing
Quick Links
Lecture
Week 2 / Framing and Storyboard
Earliest cinema
When the motion picture camera was first invented, filmmakers used dramatic
presentation, where the camera is positioned as if its a member of the
audience for storytelling purpose even though the shots were simple and
straightforward.
They later noticed that, whatever they filmed, while 3-dimensional in
reality, becomes flat on screen. And so, they decided to breakup their idea
into scenes and arrange them in particular order to create a sense of
3D.
Cinematography
- Shot - A continuous recording by one camera without interruption.
- Sequence - A series of scenes and shots edited together. It defines the place or setting of a particular narrative and it may depict a continuous event happening in the story
Motion picture/film/video is made up of many shots and cinematography is
about how to position the camera in a way that helps drive the narrative
forward.
Shot size

|
|
Fig 1.1 Different shot sizes Source: https://www.reddit.com/r/TheHandmaidsTale/comments/civlk6/no_spoilers_a_guide_to_shot_sizes_feat_shots_from/ |
Wide shot (WS)
Shows the whole body of the subject and important objects in its
surroundings. If it is used at the beginning of a scene, it's called an
"establish shot".

|
|
Fig 1.2 Example of EWS Source: https://www.bhphotovideo.com/explora/video/tips-and-solutions/filmmaking-101-camera-shot-types |
Extreme wide shot (EWS)
Shots the broad view of the environment that the subject is in. Conveys
geographical location and scale.
Medium shot (MS)
Shows the subject from waist up, focuses on the gesture and expression of
the subject.
Medium close-up shot (MCU)
Shows the subject about midway between waist and shoulders to above the
head. (i,e: shoulders to forehead of subject). Used when further emphasis on
expression is needed. Background should be blurred.
Medium wide shot (MWS)
Shows the subject from around the knees up, has headroom above the subject.
Wide enough to show the venue of the scene.
Close-up shot (CU)
Used to isolate the most important part of the subject. It usually shows the
head, hands or small objects. It emphasizes on facial expression and details
of objects. Close up shot only shows the head where the forehead and chin
are cut off.
Extreme close-up shot (ECU)
Show only a portion of a subject. It is used to magnify a certain part of a
detail so as to increase drama or impact or to show a significant part of a
picture more clearly.
|
|
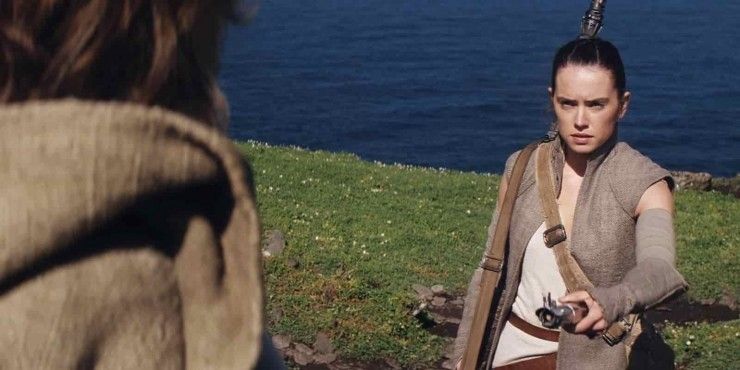
Fig 1.3 Example of OS Source: https://nofilmschool.com/over-the-shoulder-shot-examples-definition |
Over the shoulder shot (OS)
Shows the subject from behind the shoulder of another person or from the
person itself. Used as a kind of point of view shot to show the audience
what the other person is looking at.
Composition
Rules of thirds
|
|
Fig 1.4 Rule of thirds in cinematography Source: https://taketones.com/blog/rule-of-thirds-in-filmmaking |
A 3x3 grid where subjects should be positioned on the intersection points as
it's aesthetically pleasing and creates focus.
Facial modelling

|
|
Fig 1.5 3/4 angle with proper lighting Source: Lecture slides |
Best when subject is turned 45 degree (3/4 angle) and proper lighting can
show the roundness of the face and gives full display of the eyes.

|
|
Fig 1.6 3-Dimensional solidity Source: Lecture slides |
3-Dimensional solidity
Can be achieved most clearly when 2 or more surfaces are photographed. Angle
the camera around the subject in a way where two sides of an object are
viewed.
Parallel lines
|
|
Fig 1.7 Lines guiding the eyes and creating distance Source: https://learn.zoner.com/composition-light-7-things-you-can-learn-from-the-movies/ |
Angle the camera so parallel lines in a scene converge at a distance,
preferably toward the right. Used to make sure the viewer's eyes are brought
into a distance.
Subject height

|
|
Fig 1.8 Shot angles Source: http://faculty.salisbury.edu/~axsharma/mywebs/efp/gramtv.html |
Eye level shot
Shot from the eye level of the viewer or from the subject's eye level.
Low angle shot
Soft from the bottom of the subject with the camera tilted upward. Used to
make the subject look bigger and strong, or more noble, and gives an
impression of height.
High angle
Camera position above the character and tilted downward to view the subject.
Used to make the subject look more vulnerable as the subject look more
smaller, or younger.
Screen-direction

|
|
Fig 1.9 Dynamic screen direction of camera placement Source: Lecture slides |
Dynamic screen direction
Camera placement where it shows the sequence of one continuous motion in
different shots. The subject should move in the same direction throughout
the whole shooting to show consistency in each shot. Cameras should all be
placed at one side of the character for the same reason.
Static screen direction

|
|
Fig 1.10 180 degree rule Source: https://blog.assemble.tv/what-is-screen-direction-in-filmmaking |
180 degree rule
Used when multiple angle shot are used to film two people being still facing
each other. Cameras should not cross the horizontal axis of the two person
to avoid disorientation and to keep the direction constant.
Week 3 / Storytelling in Film
3-act story structure
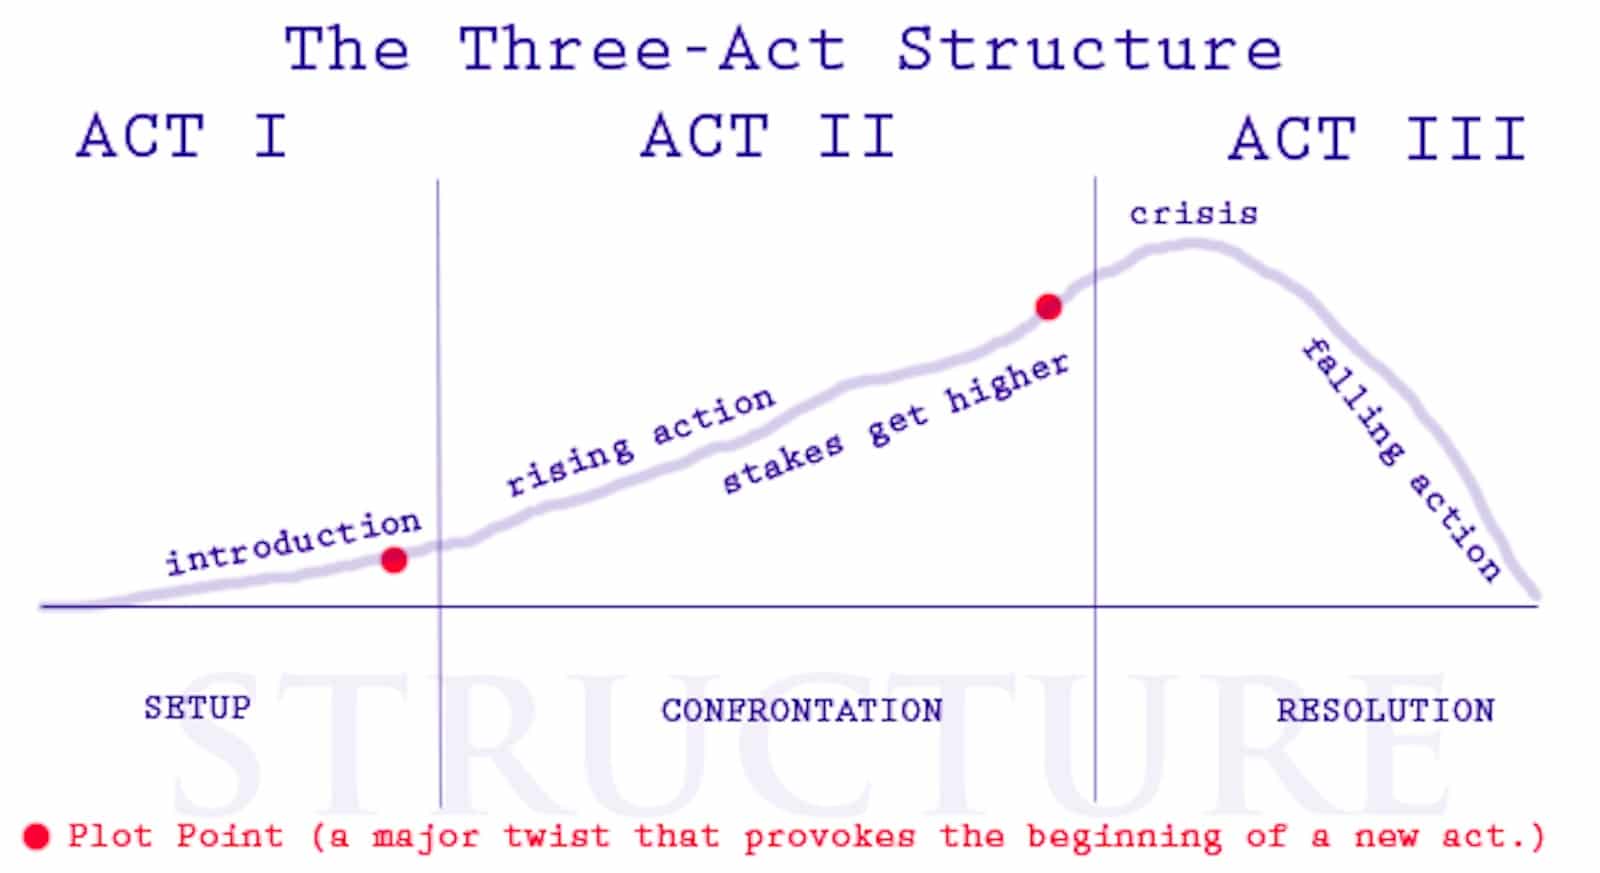
|
|
Fig 2.1 3 acts structure diagram Source: https://www.studiobinder.com/blog/three-act-structure/ |
Act 1: Beginning
Setup/introduction of the story. Introduce the main character, his
background and his goal.
Act 2: Middle
Also known as "Rising Action", set up confrontation for a
problem. Develop obstacles or complications which leads to the climax
of the story.
Act 3: End
Ending of the climax and provide resolution to the problems in act
2. Tying loose ends in the story.
Plot point 1: "The plot thickens"
An incident that turns the story in a new direction. Set up the story for
act 2 and reminds the audience there's another possible outcome for the
story.
Plot point 2: "The longest mile"
Also known as the "Climactic turning point". Set up the story for the
climax by creating a cliffhanger in the story.
Week 4 / Intro to Production Team
Production Team
Producer
The person who initiates the project, involved throughout the entire
filming process, from start to finish
Screenwriter
Responsible for the story of the film, making sure it follows the 3 act
sequence and let the story unfold smoothly
Director
Responsible for overseeing the creative aspect during the film
production, controlling the content and flow of the film's plot, working
with the camera and sound department
Assistant director
Assists the production manager and director, take note of the filming
schedule, equipment, script, set, and keeps the crew focus in their
work
DOP/cinematographer
Head of camera and lighting department, makes decision in framing and
lighting together with the director
Gaffer
Head of the lighting crew
Sound recordist
Head of the sound department, responsible for recording all sound during
filming
Production designer
Responsible for creating the physical and visual aspects of the film,
props, actor's makeup etc.
Film editor
Combining the various shots taken during production shooting to form a coherent film, works closely with the director
Combining the various shots taken during production shooting to form a coherent film, works closely with the director
Visual effects artist
Responsible of compositing videos and images from different sources, which includes videos and films taken, 3D CGI imagery, 2D animations, matte paintings and text
Responsible of compositing videos and images from different sources, which includes videos and films taken, 3D CGI imagery, 2D animations, matte paintings and text
Sound designer
In charge of designing and editing the sound for the film in
post-production
Film Production
Development
The creating, writing and planning stage of filming
Pre-production
The planning stage of the filming, where scripting, casting, location
scouting takes place
Production
The stage where the actual filming starts, bringing the crew and needed
props and equipment on set
Post-production
The stage where footage is edited, sound and soundtrack are mixed and
composed, visual effects
and title is created
Distribution
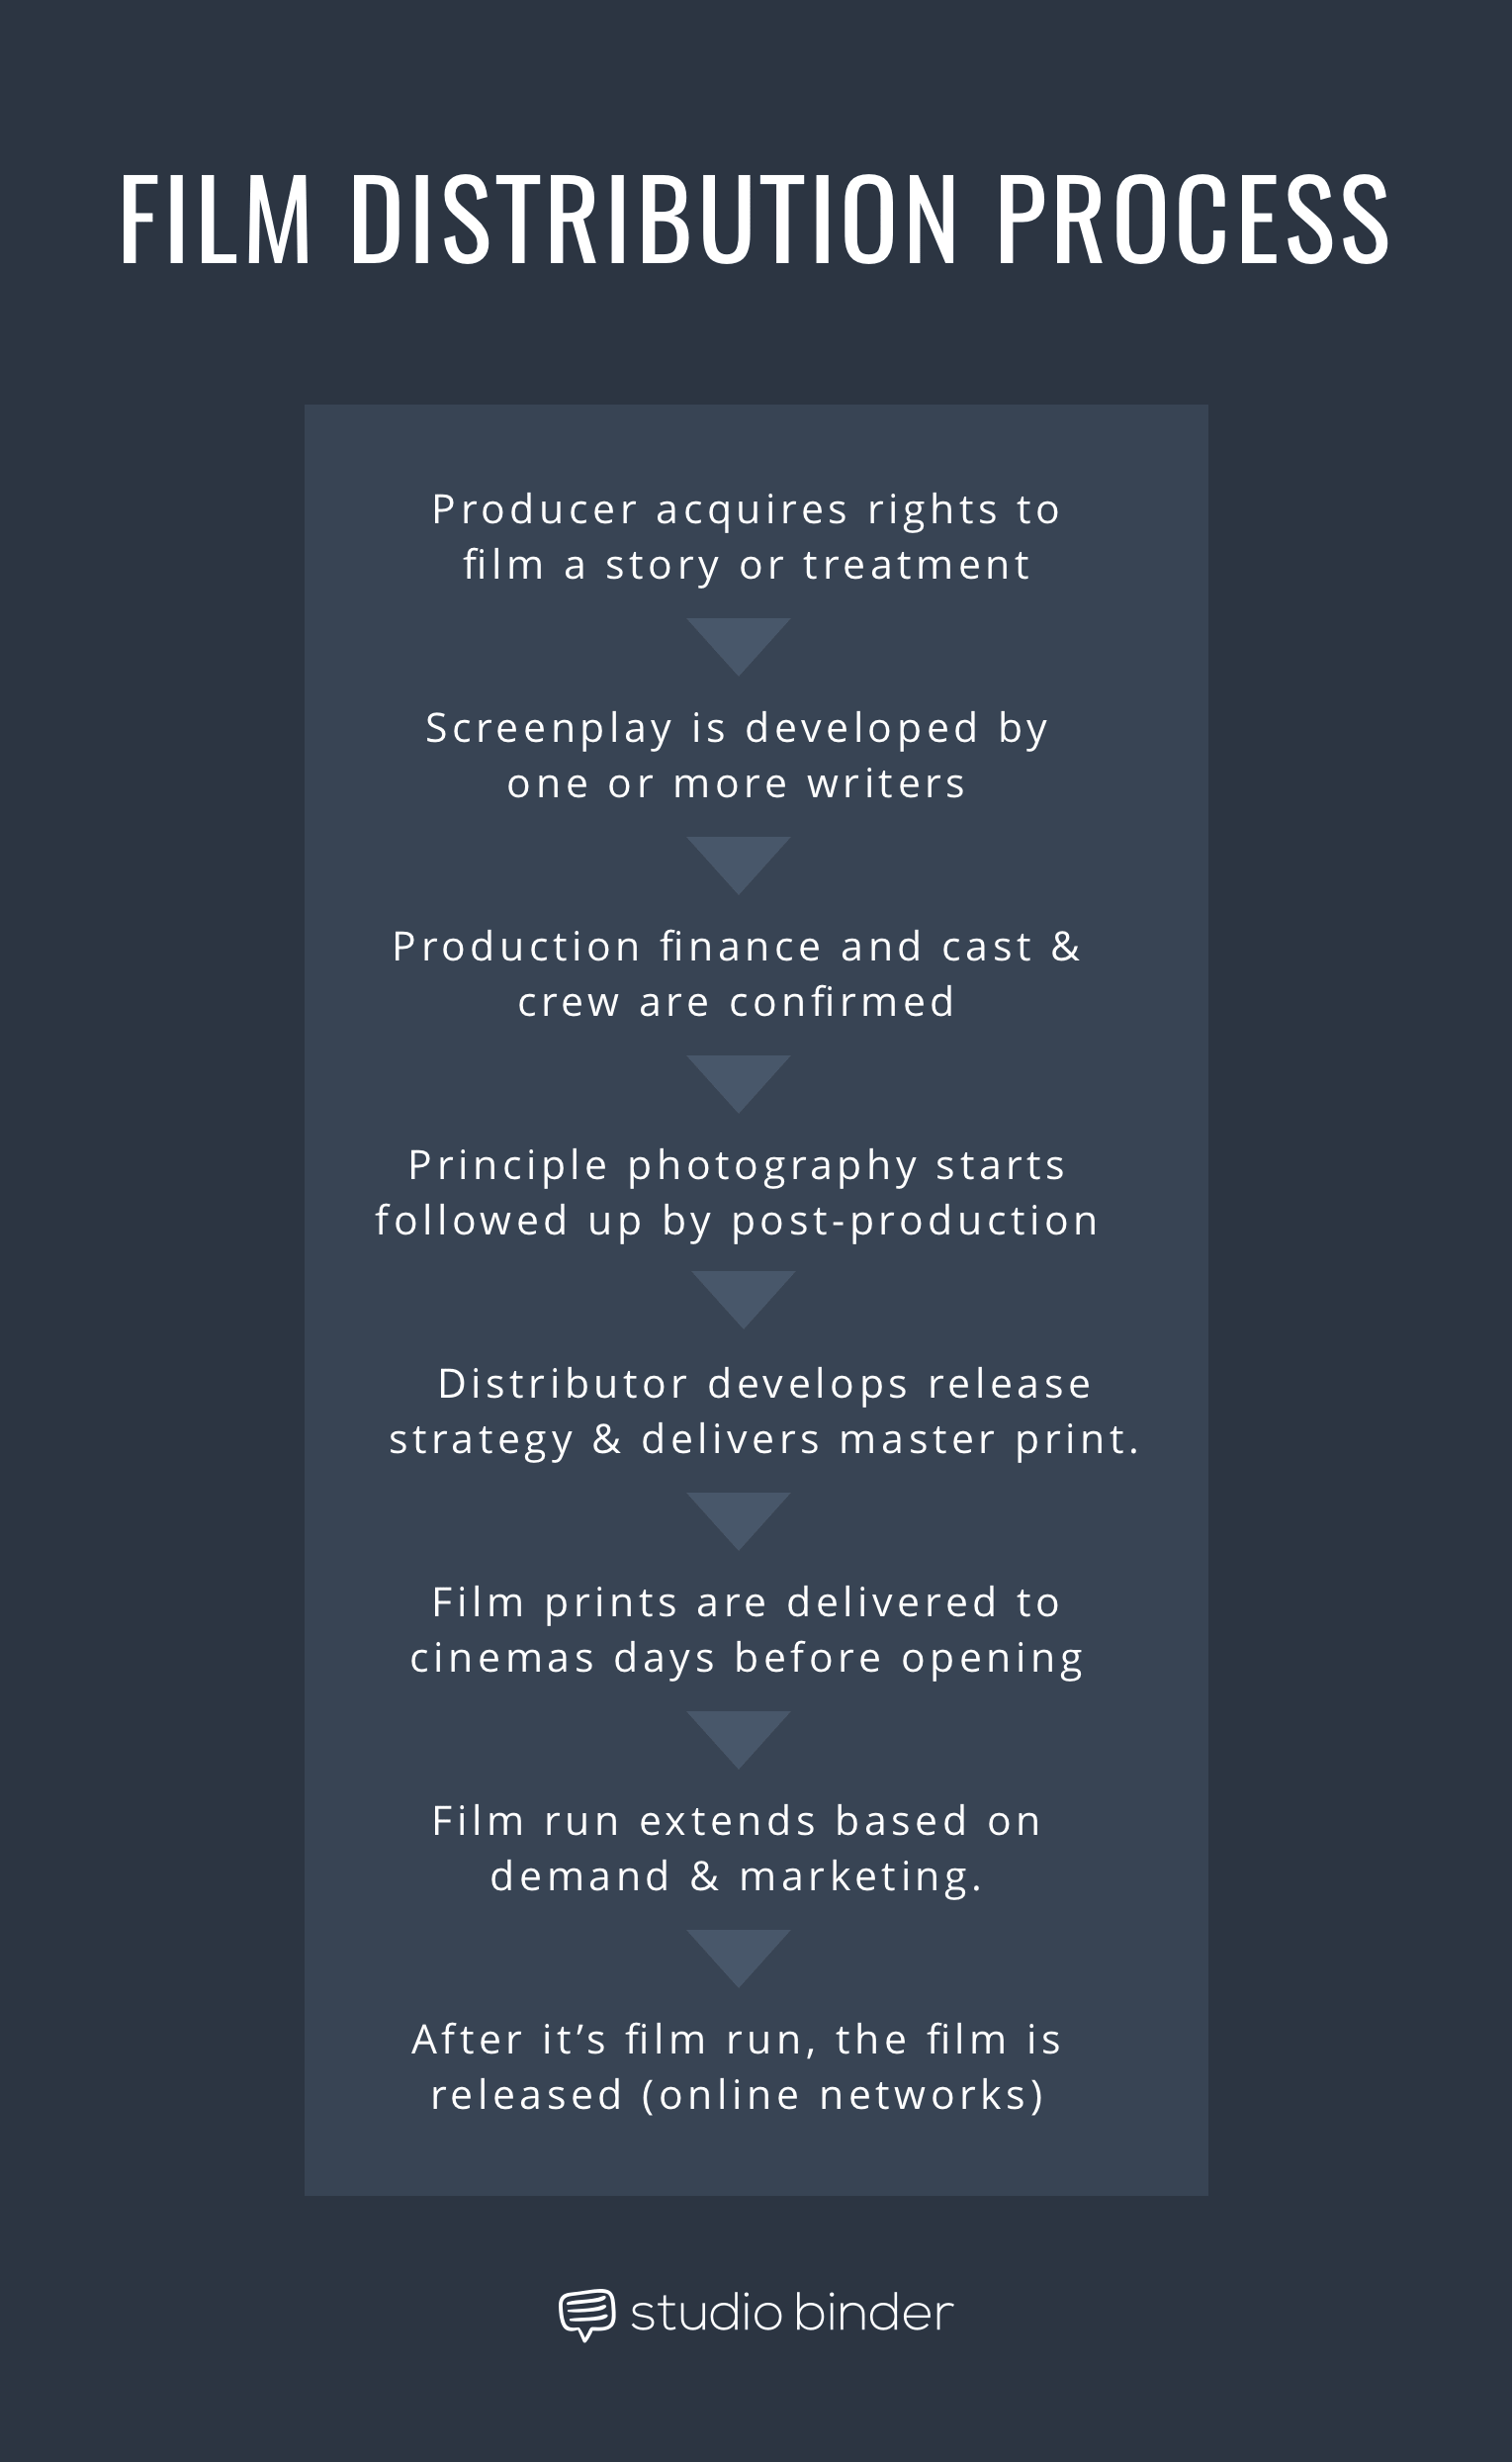
|
|
Fig 3.1 Process of film distribution Source: https://www.studiobinder.com/blog/film-distribution-guide/ |
Film distribution is the process where a movie is made available for
viewing by audience.
Week 7 / Intro to Premiere Pro
Media info
Media info for the usual video format
frame size/resolution: 1920px x 1080px
aspect ratio: 16:9
pixel aspect ratio: sqaure pixel (1.0)
fields: progressive scan
display format: 25fps
channel format: stereo
audio: 48000Hz
The higher the number of pixels, the better the quality.
Aspect ratio
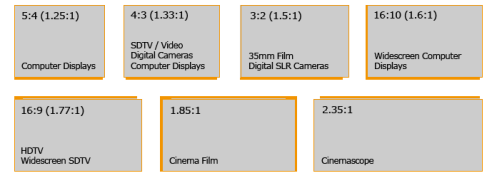
|
|
Fig 4.1 Different types of aspect ratio Source: https://www.videoconverterfactory.com/glossary/aspect-ratio.html |
The ratio of a frame width to its height. The default aspect ratio in
DSLR is 3:2, it can be changed to 16:9
Pixel aspect ratio

|
|
Fig 4.2 Pixel aspect ratio Source: Lecture slides |
Ratio of the width to height of a single pixel in a frame.
Fields
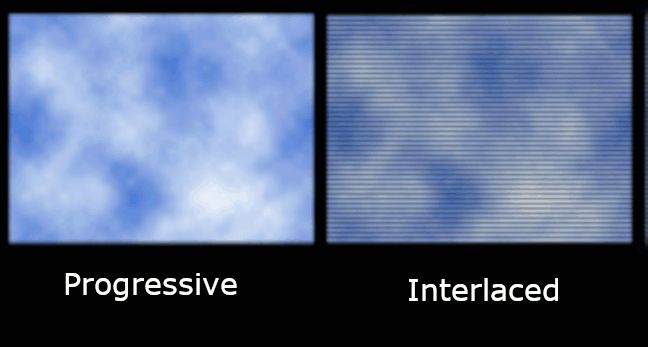
|
|
Fig 4.3 Progressive vs Interlaced scanning Source: https://mymusing.co/interlaced-vs-progressive-scanning/ |
Older generation uses interlaced scanning, while modern television
uses progressive scanning. All horizontal scan lines are transmitted
to the display screen together in progressive scanning. While in
interlaced scanning, only the odd or even lines are transmitted over
the broadcast network.
Frame rate

|
| Fig 4.4 Different formats used throughout the world |
Number of frames that are displayed per second. Different world region
uses different frame rates
Audio
The standard studio channel is stereo, usual frequency range is
48000Hz
Adding title
Rolling credit

|
| Fig 4.5 Creating a rolling credit in Premiere Pro |
Choose the suitable fonts, size and position the text. Enable roll
toggle in the graphic panel.
Tools panel (toolbox) in Premiere Pro
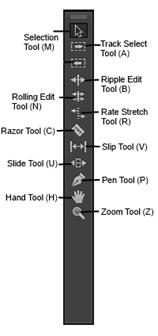
|
|
Fig 4.6 Tools panel in Premiere Pro Source: https://www.universalclass.com/articles/computers/adobe/premiere/how-to-use-the-timeline-effectively.htm |
Often used tools:
- Selection tool: The default tool, used to select clips in the timeline
- Track select tool: Select all clips or multiple clips from a given point
- Ripple edit tool: Adjust the start or end point of a clip and move the other clips to compensate for the adjusted timing
- Rate stretch tool: To adjust the speed of a video clip
Effect control
Audio volume

|
| Fig 4.7 Volume level for different sound |
When editing, make sure the volume doesn't excess 0dB as that will
be too loud.
Instructions
Tasks
Week 2 (8/4/2022)
Shooting Exercise: Framing
In this week, we are given a shooting exercise where we needed to take 8
shots in different framing sizes. The shot sizes that are assigned to us are
low angle wide shot, frontal medium close-up (MCU), front medium shot (MS),
extreme close-up shot, side angle MS, ¾ angling MCU shot, close-up shot and
eye-level medium-wide shot. We also needed to have a soft background for
frontal MCU, frontal MS and side angle MS, while a blurry/soft foreground
for ¾ angling MCU. Each shoot needed to last 5 seconds and then later
compiled together as one video with captions labelling them.

|
| Fig 1.1 Files of multiple shots |
There were no requirements on how we should do the shots so, to make things
less awkward and more fun for myself during the shooting process, I decided
to have a small situation scene in my video. I asked my cousin to be my
actor and the video will show a situation of him arriving at a place to read
a book. We planned to shoot at a park but since it was closed, we decided to
do the shooting outside his house. I also did some shot multiple times as I
want to see which works best during editing.
I used a Nikon D3400 for my shootings as my phone can’t achieve the soft
background produced by a DSLR. The battery of the camera got flat mid-way
shooting so we took a break and my cousin changed shirt when we did the ¾
angling MCU shot haha.

|
| Fig 1.2 Editing timeline in Adobe Premiere Pro |

|
| Fig 1.3 Brightness and contrast adjustment for the first shot |
After shooting, I imported the video files to Adobe Premiere Pro to cut and
trim unnecessary parts of each shot and compile them together while also
adding captions for each of them. I adjusted the brightness and contrast for
the low angle wide shot as it originally looked too dark compared to the
other shots.
Final Shooting Exercise: Framing
Fig 2.1 Final edited shooting exercise video
Premiere Pro Editing Exercise
Other than that, we are also tasked with an editing exercise using Adobe
Premiere Pro. Mr. Martin provided us a pre-recorded demonstration video for
us to watch before beginning the exercise, and also the storyboards and
video files to use in the exercise.

|
|
Fig 3.1 Given video files Source: https://drive.google.com/drive/folders/1LGt1c2xPYia6gzLQGG_IuLnXgLvQnJvu |

|
| Fig 3.2 Editing timeline in Adobe Premiere Pro |
After following Mr. Martin’s demonstration, I further trimmed some parts of
the clips to make sure the timing between each scene isn’t too abrupt or
dragged on too long, so that the cut to each shots feel natural. Dip to
black transition is added to the start and end of the video and a cross fade
transition is added between scene 1 shot 6A and 6B for the disappearing
effect of the male main character.
Final Premiere Pro editing exercise
Fig 4.1 Final edited editing exercise video
Week 3 (15/4/2022)
Shooting exercise: Music Video Filming
To further do practice on framing camera shots, we are tasked to create a
minimum 30 seconds music video using a song and choreography of our choice.
We are required to form a group where each of us are to produce a full body
dancing shot and later edit them together in Adobe Premiere Pro. We are also
required to produce 6 more other individual shots which are high angle wide
shot, medium shot, medium close-up shot, close-up shot, extreme close-up
shot and low angle wide shot.
Fig 5.1 Out of Time music video
Fig 5.2 Out of Time dance video by Soula
My group chose the song “Out of time” by The Weeknd and pick one part of the
choreography (0:58) in a dance video by Soula to later tweak it to suit our
own moves.
Since I’m admittedly bad at dancing, I decided to come up with a little
storyline and a karaoke situation for my induvial part in the music video,
since I thought it suits the song too. Basically, the storyline shows a
character coming back home frustrated, decides to drown it in a drink and
ends up venting out through singing alone.

|
| Fig 5.3 Files of multiple acting shots |

|
| Fig 5.4 Files of multiple singing shots |

|
| Fig 5.5 Premiere Pro timeline |
I took several shots for some scenes and picked the usable ones to edit, I
filmed the acting part and dancing part in daylight while the singing part
in a dark room with a ring light as the only light source. I positioned the
ring light at a side so that it would produce a long shadow on the wall. All
the shots were done using my phone camera and a tripod. I changed the
singing parts to black and white and added grain filter on it so that it
would look somewhat old and differentiate from the other scenes. I also
adjusted the brightness, contrast and saturation for the 3 full body shots
so the colour correction of our videos would look similar.
Final music video editing
Fig 6.1 Final edited music video
3 acts structure and "Munich" analysis
Other than that, we are also tasked with writing down the 3 acts structure
from analysing 3 short films: Burrow, Guang and Lalin. We also need to
analyse and further discuss the 3 acts structure, story outline, the main
character and his goals and obstacles in the movie “Munich”.
3 acts structure
Burrow
Fig 7.1 Burrow part 1
Fig 7.2 Burrow part 2
Fig 7.3 Burrow part 3
Bunny and her blueprint. Introduction that she wants to build a house.
Plot point 1
Mole and rat appeared and disrupted her plan to build her home alone. They
offer to help but she refuses.
Act 2
She starts digging deeper but can't find a place for her to build her home
in peace
Plot point 2
Accidentally causes flooding when digging further away.
Climax
Bunny tries to escape the flood and gets help from others to direct the
flood away.
Act 3
They solved the issue of the flood and bunny gets help from others to build
her home.
Fig 7.4 Guang full short film
Man ask the main character to introduce himself in a job interview.
Plot point 1
The main character hears the sound of glass produced by stirring and didn’t
get hired.
Act 2
The main character's brother gets an interview for him. He searches for the
glass he wants.
Plot point 2
The main character found the glass he wants but he forgot to attend the
interview.
Climax
Climax
An argument is started between his brother and him because he missed the
interview.
Act 3
The main character's brother sees main character performing music with wine
glasses, understands that he was wrong to insult him and judge him.
Lalin
Fig 7.5 Lalin full short film
Act 1
Introduce the main character’s name and shows her personal life.
Plot point 1
A boy messaged her asking her to translate his book for him.
A boy messaged her asking her to translate his book for him.
Act 2
The main character befriends the boy through chatting online.
Plot point 2
The boy arrives to Sapporo to meet the main character. The main character
doesn’t want to meet the boy and tells him to leave.
Climax
The boy is about to leave on the train platform and the main character runs to
try and catch up with him after reading his book and finding out he was her
classmate when they were kids.
Act 3
She starts to accept herself more and decides not to hide behind a fake
appearance.
"Munich" movie analysis
Fig 7.6 Munich movie trailer
(the full movie was watched before writing this analysis)
3 acts structure
Act 1
A group of Palestinian terrorists murdered 11 Israeli athletes in their
dorms during the Munich Olympics. Avner is asked by the Israeli government
to help them assassinate 11 Palestinians who are part of the terrorist
group. He accepts the offer and is joined by 4 other men, in which he
is the team leader. He also has a handler to brief and look over his
progress in the mission. Avner and his group went to do their mission,
where they had help from Louis, a French informant. They tracked down the
Palestinians terrorist one by one and assassinated them.
Plot point 1
In one of their mission, the explosive that Louis provided for them are not
the one that they ordered. This endangered Avner's and a few innocent
lives.
Act 2
Avner's team starts to doubt Louis, thinking he's untrustworthy and told
Avner to no longer trust him. But Avner continues to get intel from him
anyway. Avner and his group decided to go to Beriut to join a raid, where
they are given orders beforehand to not engage in anything in Beriut. He
asked Louis for a safehouse and Louis put his team together with
Palestinians terrorists in a safehouse he assigned.
Plot point 2
During their mission, Avner and Carl, one of his team members, met a Dutch
woman in a hotel bar. In the next morning, Avner found Carl dead in the
woman’s hotel room.
Climax
Avner later found out from Louis that the woman was a hired killer and there
are other people who are hunting them down. Avner and two of his team
members went to kill the woman for revenge. Later, one of his team members
was killed by an unknown person while his other team member died in a bomb
making accident.
Act 3
Avner and Steve, his remaining team member, went to kill their last target
but failed. Even then, he went back to Israel and was hailed as a hero,
though he wouldn’t let his handler know about what he had learnt. He then
lives with his family in the USA but suffers from PTSD, he wanted to make
peace with his handler by inviting him over to his house, but his handler
refuses.
Story outline
Following the 3 acts structure, the story starts with a Palestinian
terrorist group killing 11 Israeli athletes in the middle of the night in
their dorms during the Munich Olympic. The news quickly became widespread in
the country and an agent called Avner Kaufman was then asked by the Israeli
government to help in their mission to defeat the Palestinian terrorist
group. They want him to help track down 11 Palestinian and assassinate them
as a response to the Munich Olympic incident. He accepted the offer from his
handler and was joined by other 4 men, Steve, Carl, Robert, and Hans, each
with their own strengths to help in the mission. He became the team leader
of the group and had help from a French informant, Louis, to help track down
the terrorists and assassinate them one by one. During their mission, Carl
was found killed by a woman who he spent the night in the day before, the
group went to seek revenge, but Hans was later also killed by an unknown
hired killer. Robert didn’t join their revenge mission and instead died in a
bomb making accident. Avner and Steve failed in assassinating their last
target, but Avner was praised when he went back home, but refuse to give
intel to his handler. He then suffers from PTSD and lives with his family in
the USA, he wanted to make peace with his handler by inviting him over to
his house, but his handler refuses and leaves.
Description of main character
The main character’s name is Avner Kaufman. He works for the Israel
government as an agent and has a wife and a child, who was born later as the
storyline progresses in the movie. He is patriotic towards his country so as
to why he accepted the offer to assassinate the Palestinian terrorists, but
this later change when 3 out of 4 of his team members died during their
mission together. His love to protect his loved ones is his biggest value in
life, and this leads him to leave his home country and live in the USA with
his family instead, where the Palestinian terrorists agreed to not cause
trouble in. Although he agreed to take on an assassination job, he has a
gentle heart where he would cook for his team members when they were
together and choose to talk and try to understand his enemy’s perspective
instead of killing him at first sight, he resorts to killing when there are
no other reasonable ways, or when his emotion took the best of him. He lets
his emotion drives most of his decision making most of the time. This is
apparent when he decided to lead his team to assassinate the newly appoint
terrorist leader when they are told beforehand to only stick with the
targets given to them. And is also apparent when he agrees on taking revenge
on the woman who killed Carl.
Main character’s goal
Avner’s goals always are to protecting the ones he loves. He loves his home
country, so he agreed on an assassination job and did his best effort on it.
He loves his family so he made sure to see his first child when she was born
and planned for his family to live in the USA so they would be safe from the
terrorist attacks. He loves his team members, so he made sure to keep
harmony in the group and made sure they are okay to his best effort.
Obstacles faced by the main character
Avner faced multiple obstacles throughout the storyline. When undertaking
the mission, he had an argument with his team on the morality of their
mission, whether they would harm innocent lives or not since none of them
had proper tactical training. He also had paranoia, worrying that someone
would kill him or his family members. He also had an argument with his team
member on whether Louis is trustworthy or not since they were given the
wrong bombs in one of their mission.
Week 5 (27/4/2022)
Group shooting
In this week, we did a group shooting as a part of our project 2. Mr. Martin
gave us a selection of clips from the k-drama “Happiness” trailer and we are
tasked to remake the shots. We filmed the shots in campus using professional
tools. We also divide ourselves into different roles for the shooting and I
chose the role of director of photography.
Behind the scenes pictures

|
| Fig 8.1 Behind the scene picture #1 |

|
| Fig 8.2 Behind the scene picture #2 |

|
| Fig 8.3 Behind the scene picture #3 |

|
| Fig 8.4 Behind the scene picture #4 |

|
| Fig 8.5 Group picture of all the crew members |
Each of us adhered to our roles during the shooting and worked together well
to get the shooting done in time. The rooftop scene was filmed by Li Wei as
he was the one who knows how to climb on a ledge and film it far away from
the actor at a top angle.
Shots and sound files

|
|
Fig 9.1 Screenshot of google drive folder for video files Google drive link: https://drive.google.com/drive/folders/1SVVR7hm5XPpx_DHCkZM-vFWogCdUMpHd?usp=sharing |

|
|
Fig 9.2 Screenshot of google drive folder for sound files Google drive link: https://drive.google.com/drive/folders/1OL3VEIzssEehSaGFPskr0iXuH_ub2vGH?usp=sharing |
After we’ve finished filming, we uploaded the shots taken and recorded sound
to separate Google Drive folders and share it with our crew members. We took
some extra shots while we’re shooting for any extra uses that we want to do
later in our editing process.
Week 6 (6/5/2022)
Video editing of group shooting
For this week, we are tasked to use the shots that we’ve taken in our last
week group shooting and edit them while also syncing the externally recorded
sound with the video clips.
Fig 10.1 Screenshots of Adobe Premiere Pro workspace
I manually synced the audio with the video clips so that I can get an
accurate match between each of them. I applied the DeNoise effect on one
of the audio clip to reduce the background noise and adjusted the
brightness and contrast on some video clips. After editing the videos
according to the scene and shot order by Mr. Martin, I went to edit a
movie-trailer-esque video with a dramatic music that I downloaded from Freesound. I left some video clips muted and only included the audio
recordings for shots that need it. I also used some extra shots that we’ve
taken last week in the edit and apply the warp stabalizer effect on it
since the original video was very shaky.
Final outcome of group shooting
Fig 11.1 Final edited video with audio syncing only
Fig 11.2 Final edited video with music
Feedbacks
Week 7 - Shooting exercise: Music Video Filming
The opening scene of the music video is good, and it's good that it's plan
ahead too. Though, the high angle shot should show the full body. But overall,
the video is nice.
Reflection
The exercises in project 2 were really fun to do as I personally enjoy video
editing and always wanted to try out filming a live-action video. Besides
learning about camera shot sizes, I got to put them to use through doing the
exercises which I think helped a lot in understanding how to use them. While
it is fun, it does take a lot of time to shoot multiple scenes, especially
when it’s done by only yourself. I had to do a lot of takes when filming for
the second exercise as I needed to make sure the shots are the sizes I want
while also being in the scene myself. I also can’t use my phone front camera
as manual mode is only doable on my phone’s rear camera. This shows that
shooting is best done as a group where someone can be the in front of the
camera and the other behind it, especially when the shot calls for hard to
reach angles like a very low angle shot.
Other than that, I found that shot sizes can also make a seemingly boring
video to something interesting as different sizes can convey different
feelings, adding some drama to the scenes. I also noticed that using a
proper DSLR camera is always better than a smartphone camera, as DSLR is
able to give a clear and crisp quality video with a larger range of depth of
field.
Comments
Post a Comment