29.3.2022 - 10.5.2022 (Week 1 - Week 7)
Chung Yi Ki / 0345014 / BDCM
Interactive
Design
Task 1 / Exercises
Lecture
Week 1 / What is a website
Website
A website is a web document in the Internet with an intended purpose to its
creation. A full website has more than one page and a one-page website is
called a “microsite”.
Types of websites:
9 types of websites are discussed in this week’s lecture, which are:
- Informational website (e.g: Wikipedia, IMDB)
- Corporate website (e.g: Petronas, Maxis)
- Brochure website
- Entertainment website (e.g: Astro, Youtube, Netflix [Netflix is also a dynamic website, because the contents are personalized to the user's interest according to their algorithm])
- Portfolio website (portfolio website is a static website, because it's not updated regularly)
- Personal website (e.g: celebrities' websites)
- Educational website
- E-commerce website
- Non-profit website
Week 2 / The Web
Web standards
The most used web standards are HTML and CSS. It’s important to know and
learn so all developers know how to read the code that’s used for a website
and the appearance of the website can stay constant throughout devices
without needing to rewrite the code.
How the web work
- Connect to the web vis ISP and enter the domain
- Computer contacts with DNS servers and tells your computer the IP address of that web
- Computer connects to web server through the IP address
- Web server sends the webpage you requested back to your web browser
Structure
When creating a webpage, creating the structure of it (layout etc.) is
important as it helps the readers to understand the information being
presented and make the webpage more easy to navigate.
One way to create structure is by using headings and subheadings as they
create hierarchy. Creating structure on a webpage is similar to creating
structure in word documents but in webpage, we need to add HTML codes to
give styles to the text appearing on the browser.
HTML elements give font styles to the text, elements are usually made up of
2 tags: an opening tag and a closing tag with the text typed between them
e.g: “<element>browser</element>”
Attributes
Attributes provide additional information about the contents of an element
enclosed in a tag. Attributes are made up of two parts, a name and a value
separated by an equal sign e:g:
<p lang="eng-us">Paragraph in English</p>
There can be two attributes in a html tag, they just have to separated with
a space, e.g:
<a href=”https://www.triathlon.org/” title=”World Triathlon”>
All letters in a HTML tag need to be in lowercase and in American English
spelling. It's good to have spacings between different HTML tags to make it
easier to read.
Explanation for some HTML tags:
|
|
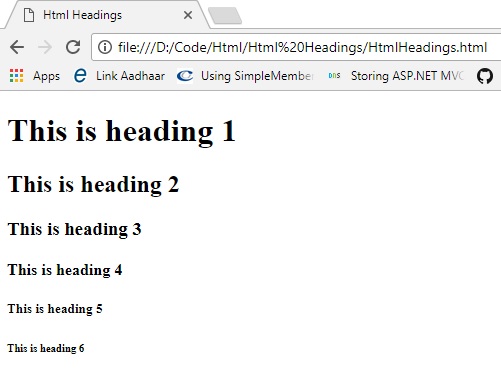
Fig 1.1 Heading sizes Source: http://www.ncodeclass.com/html-headings/ |
- <body> - everything in this html tag appear in the browser.
- <head> - contain information about the page. <title> often appears here. Comes first before <body> tag.
- <title> - the contents shown in the top of the browser (tab bar).
- <meta> - how search engine finds your website through a web browser, includes specific word tags that people might search on search engine.
- <h1> <h2> <h3> <h4> <h5> <h6> - 6 levels of headings, from biggest to smallest
Lists

|
|
Fig 1.2 Ordered list (top) and Unordered list (bottom) Source: http://blog.thejaytray.com/html-basics-of-lists/ |
- Ordered list <ol> - numbered list
- Unordered list <ul> - List that uses bullet points only
- <li> tag has to be included within both ordered and unordered list, e.g:
- <ol><li>first point</li><li>second point</li></ol>
Links
Allows the user to be redirected from one page to another, one website to
another or from one part of the web page to another part of the same
webpage. To insert hyperlink in a text, use the <a> tag with "href"
attribute, e.g:
<a href="https://www.triathlon.org/">Triathlon</a>
Put "title" attribute within the <a> tag to give a pop-up title when
the mouse cursor hovers over the hyperlink. "alt" (alternate text) attribute
within the <a> tag to give keyword search for the hyperlink, e.g:
<a href=“https://www.triathlon.org/” title=“World Triathlon”
alt=“Triathlon”>Triathlon</a>
To comply with the HTML standard, <!doctype html> tag is added at the
beginning of a HTML document and the <html> tag after it.
Week 3 / Extra Markup
Adding image in HTML
<img> - used to add an image in HTML, does not need a closing tag.
Include "src" attribute to link to an image , e.g:
<img src="img_flower.jpeg"> [file from computer]
<img src="(picture link)"> [file from a link]
"alt" attribute is used to specify the image and “width” and “height”
attributes are used to determine the size the image is shown in the web,
e.g:
<img src=“img_flower.jpeg” alt=“Flowers in Denmark” width=“500”
height=“350”>
Image format for web
The three common image formats for web are JPEG, GIF and PNG.
|
|
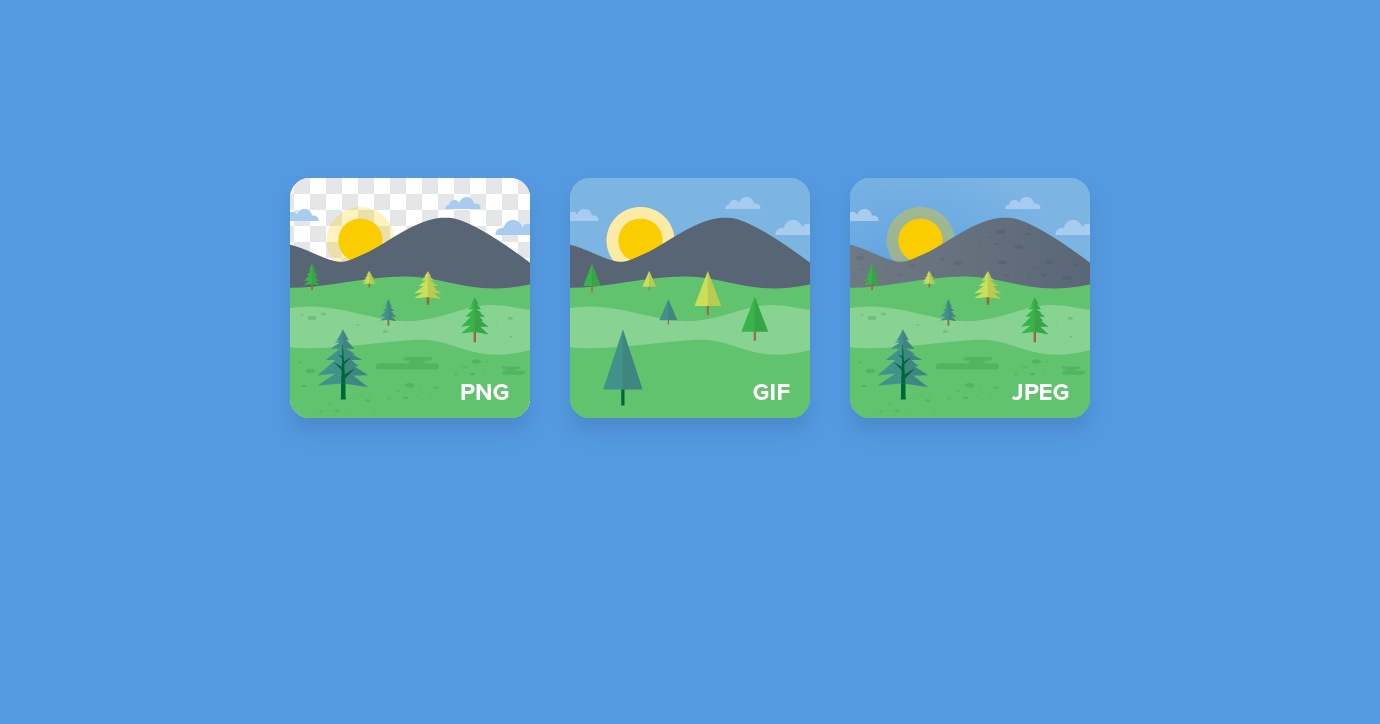
Fig 2.1 JPEG, GIF and PNG comparison Source: https://www.litmus.com/blog/png-gif-or-jpeg-which-ones-should-you-use-in-email/ |
JPEG
The most common image formatted used in the web and is highly compatible,
small size and has very little loss of quality. It is usually saved in lossy
compression and usually use for photos on web
GIF
Uses lossless compression, and the file can be saved over and over again
without loss in data. It features animated image. Excellent choice for logo
and images that has limited colour and need to be in small size.
PNG
Contains bitmap of indexed colours and also uses lossless compression. Uses
full range of colour with loose compression and supports transparency. Most
used format on the web.
Normally, image resolution should be 72dpi for web.
ID and Class attribute
ID attribute
Every html element can include an ID attribute, it is used to identify a
specific HTML element different from other of the same html element. Though,
it's important that no two elements have the same ID attribute or the
identity is no longer unique.
Class attribute
Every HTML element can also include a class attribute, used to give a unique
identity to several elements. Unlike ID attribute, class attributes can be
the same value or name.
Using the ID and class attribute does not affect how an element is
presented, their appearance will only changed when a CSS rule is
added.
Block elements
Elements that appears to start on a new line in a browser window. Example:
<h1>, <p>, <li>
Inline elements
Elements that can appear within a tag or in the same line of an element.
Example: <b>, <i>
Additional information: smooth scrolling for anchor links
Since we're creating anchor links, Mr. Shamsul taught us a CSS code that is
used to create an automatic smooth scrolling when the anchor link is
clicked:
<style type="text/css">
html{
scroll-behavior: smooth;
}
CSS codes need to be within the <head> tag for it to work.
Week 4 / UI vs UX, Introduction to CSS
UI vs UX

|
|
Fig 3.1 UX vs UI Source: https://louelledesignstudio.com/ux-vs-ui-design-whats-the-difference/ |
UX Designer
Focuses on the structure, layout, navigation, and how users interact with
the content. The things they produce includes site-maps, user flows,
prototypes and wireframes. They are more focused on the underlying structure
and purpose of the software or webpage. Visual appearance does not have
impacts on UX design, instead it is only applied at the next stage after UX
design.
UI Designer
Focuses on anticipating what users might need to do when using a software or
webpage and ensure there are elements ready for them to have ease of usage.
Focus on how the functions of a webpage or software are displayed and the
details on how users interact with the interface. They produce the visual
comps and functioning front-end code (HTML, CSS). Brings concepts from
interaction design, visual design and information architecture. UI design is
about the polished final production and quality outputs stage
User interface design
Some interface elements includes:
- Input controls: button, text fields, checkboxes, dropdown lists, toggles, radio buttons, list boxes, date field
- Navigational components: breadcrumb, slider, search field, slider, tags, icons, pagination
- Informational components: icons, progress bar, notifications, tooltips, message boxes, modal windows
- Containers: accordion
Knowing what interface elements most users are familiar with would help in
creating an effective and satisfactory interface as the interface should be
predictable for the users.
Common characteristics of an effective design
First thing to consider is determining who the user is. The design must be
as broad or as narrow as possible to serve the intended user. Listen to what
your users need and observe them interacting with your design, it is through
this that the end product of the design can actually be functionable and
meet the user's need.
Golden rules of interface design
- Ease of learning
- Efficiency of use
- Memorability
- Minimize errors
- Satisfy the users
Introduction to CSS
CSS (Cascading Style Sheet)
|
|
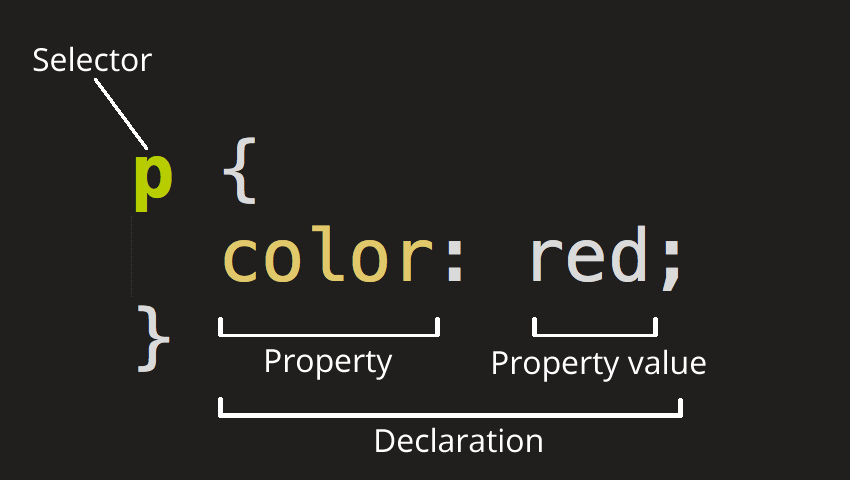
Fig 3.2 CSS rule structure Source: https://mockframeworks.com/css-classes-the-basics/ |
Used to specify how the content of an element appear in the interface by
creating rules. CSS works by associating its rules with HTML elements. It
contains a selector and a declaration.
Selectors: indicate the element you want to apply specific appearance
on. There can be more than one element as the selector.
Declaration: indicate how the elements in the selectors should be
styled. It is separated into two parts, a property and a value, and are
separated by a colon.
Property indicates the aspects that you want to change, and value indicated
the specific characteristic you want to apply to that aspect. Declarations
should also be in curly brackets. e.g:
p, h1, h2, h3 {
font-family:Arial;
color: yellow;
Method to employ CSS
Using external CSS
A <link> element can be used to tell a browser where to find the
external CSS file to be used to style the webpage. It should also be in the
<head> element. It contains three attributes which are "href", "type",
"rel". e.g:
<link href="style.css" type="text/css" rel="stylesheet">
href-specify source path
type-specify the type of document, in this case, it should be
"text/css"
rel-specify the relationship between the source file and the HTML
file, in this case, it should be "stylesheet"
A HTML page can have more than one CSS style sheet, just include multiple
<link> element to link the external CSS files.
Using internal CSS
Embedded style
Use <style> element to employ CSS codes within a HTML document. It
should also be within the <head> element. The attribute "text/css"
should also be included to specify that the styles are in CSS.
Inline style
Internal CSS can also be used in line with HTML element by using "style" as
an attribute. e,g:
<li style="color: aqua"> blue </li>
A browser will read the inline style, and then the embedded style, and
finally the external CSS style sheet.
External CSS should be used when building a sire with more than one page,
this is because it allows all pages to use the same style rules and allows
you to change the content of the page without interfering with the CSS rules
and without having to edit the CSS in each individual pages.
Week 5 and Week 7 / CSS
Text style
font-weight
Allows you to control the weight of a text. Text appears in normal weight
when "normal" value is used, and bold when "bold" value is used.
font-style
Allows you to control the style of a text. Values include normal-text,
italic, oblique
text-transform
Used to change the case of a text. Values include uppercase, lowercase,
capitalise. The capitalise value only capitalise the first letter of each
word.
text-decoration
Adds additional formatting to the text. Values include none (removes any
decoration already applied to the text), underline, overline (adds a line
over the top of the text), line-through (strikethrough).
text-indent
Creates indent to the first line of text within an element. It allows you to
control the amount of indentation by pixels or em, it can also have negative
values.
text-shadow
Used to create a drop shadow to a text. It has 4 values: x, y, blur and
colour
x
Controls how far the drop shadow it from the text
y
Controls the position of the shadow in the y-axis
blur
Controls the amont of blur of the drop shadow
color
Controls the colour of the drop shadow
text-align
Changes the alignment of a text. Values include right, left, center,
justify, inherit
CSS boxes model
CSS treats each HTML element as if they're in a box, and so, the border,
colour etc. of the box can be changed.
Box dimension – Width, Height
The dimension of the box can be adjusted by using width and height
properties, the widely most unit measurement are pixels or percentage.
Limiting width and height
min-width, max-width, min-height, and max-height property can be included to
determine the minimum or maximum width or height of a box. The minimum
property limits the minimum size the box can be when the window is narrow
and the maximum property limits the maximum size the box can be when the
window is wide.
Overflowing content
The overflow property controls how the content in a box appears when there
is not enough space in the box for the content. The overflow property can
have the value of either hidden or scroll.
Hidden - hides any extra content that does not fit the box
Scroll - adds a scrollbar to the box so that users can scroll to see
the missing content
Border, margin and padding

|
|
Fig 4.1 Border, margin and padding in a CSS box Source: Lecture slides |
Border, margin and padding of a box can also be adjusted in CSS. Border
indicates the edge of a box, while margin indicates the gap between the edge
of one box and the edge of the other. Padding indicates the space between
the border of the box and the content inside the box. Adding padding can
improve the readability of the content in the box.
The Display Property
Every element in CSS has a default display value depending on its type of
element. The default property is often block or inline.
Block-level element
The standard block-level element is <div>. This type of element starts
on a new line and stretches out to the left or right as far as it can. Other
common block-level elements are p, form , header, section etc.
Inline element
<span> is the standard inline element. An inline element can wrap text
within a paragraph by using "<span></span>" without destructing
the flow of the paragraph. Common inline element is <a>
The default display type can always be overridden for customization
purposes, for example, customizing the <li> tag to look like a
navigation bar.
Week 7 tutorial and practical class activity
During week 7 class, we followed along Mr. Shamsul to create a basic webpage
layout using CSS. Here are some of the extra notes taken during class:
- <--word--> - used to add a comment in HTML script
- /*word*/ - used to add a comment in CSS script
- <nav> - add navigation
- Block element appearance on a site follows chronological order on how it appears in the HTML document
- When creating a responsive website, the value used must be relative, i.e: the unit needs to be in percentage.
- To select a class element from a HTML document in a CSS document, add "." in front of the class name.
- Refrain from using too much background colours when designing a website.
Fig 4.2 HTML and CSS codes for week 7 in-class activity
Week 7 class activity Netlify link: https://week-7-class-activity.netlify.app/
Instructions
Exercise 1: HTML document
For exercise 1, we are tasked to turn a word document to a web document
using the codes we learnt in week 2 lecture. We were given the word document
to convert and were also required to type out the codes in Notepad.
Fig 1.1 Given word document
Fig 1.2 Final HTML codes for exercise 1
I separated the lines of codes in their respective groupings so it would be
easier for me to read later. After I finished typing out the codes, I
uploaded the file to Netlify for submission.
Final Exercise 1 webpage
Netlify link: https://exericse-1-chungyiki.netlify.app/
Exercise 2: HTML document and images
For this exercise, we are tasked to also convert a word document to a web
document but with additions of anchor links and images. The word document
and images are also provided to us and we are free to either type out the
codes in Notepad, Adobe Dreamweaver or Microsoft Visual Code.
Fig 2.1 Given word document

|
| Fig 2.2 Given images (the image of Matt Jennings is excluded from the exercise) |
Fig 2.2 Final HTML codes for exercise 2
I used Adobe Dreamweaver to type out the codes since it’s more convenient
and the software’s automatic colour coding for different tags and attributes
make it easier for me to read the codes. I resized the image of the speakers
since they were originally very large, and I also added the CSS codes for
smooth scrolling that Mr. Shamsul thought us in week 3 lecture for anchor
links. After finishing typing out the codes, I uploaded the web document to
Netlify.
Exercise 3: Layout exercise
For this exercise, we are tasked to create a layout using HTML and CSS by
following the reference given to us. The needed pictures were provided to us
as well.
Fig 3.1 Provided layout reference

|
| Fig 3.2 Provided images |
Fig 3.3 Final HTML and CSS codes for exercise 3
The same as before, I used Adobe Dreamweaver to type out the codes. I used the
techniques that Mr. Shamsul taught in class for the CSS layout by treating the
“screen layout, relationship, navigability” section as columns in the codes
and the pink box section by treating the left and right contents as left and
right boxes. Though, I faced an issue where the pink box section can be seen
having different widths as it moves down when the browser window resizes, so I
added another div box to make sure the background in that section is always
pink in full width no matter the browser window size. I also added a lot of
media query codes in my CSS to adjust the contents for different screen size
and when the browser window resize.
After completing the exercise, I uploaded my webpage file to Netlify for
submission.
Final Exercise 3 webpage
Netlify link: https://layoutexercise3-chungyiki.netlify.app/
Feedbacks
No feedbacks were given
Reflection
The 3 coding exercises done definitely helped me to familiarize myself with HTML and CSS. Though, as I had learnt some HTML basics before this module, coding might have been a bit easier for me. For those who are new to HTML and CSS, I felt that exercise 3 might have progressed a bit too fast from the previous 2 exercises, as we had to submit the exercise on the same week we had a lecture about creating a layout using CSS. But all in all, the exercises were a good introduction and a great refresher for me on coding.
Comments
Post a Comment