23.8.2021 - 20.9.2021 (Week 1 - Week 5)
Chung Yi Ki / 0345014 / BDCM
Digital
Photography and Imaging
Project 1
Quick links
Lecture
Week 1 / Introduction and briefing
This week was an introductory week to the module. Mr. Martin provided an
introduction on Photoshop and the things that we can do with it which
includes graphic designing, photo editing and photo manipulations, which are
all essential for graphic designers and photographers. Other than that, we
were also given some tips on how to be a successful graphic designer. These
tips include having good organization of own works, study from others and
practice our own skills, and joining online galleries and design
competitions.
Week 2 / Introduction to composition
1. Introduction to basic composition
- A good composition has a strong focal point.
- Using scale and hierarchy to create focal points: The bigger the scale, the more attention it draws. Elements that are at the front has a higher hierarchy.
- In asymmetrical balance composition, it is helpful to think of the "weights" of each element and balance them equally. (e.g: 1 heavy element vs 2 light elements)
- White spaces can help to create strong focal points and make a design look clean.
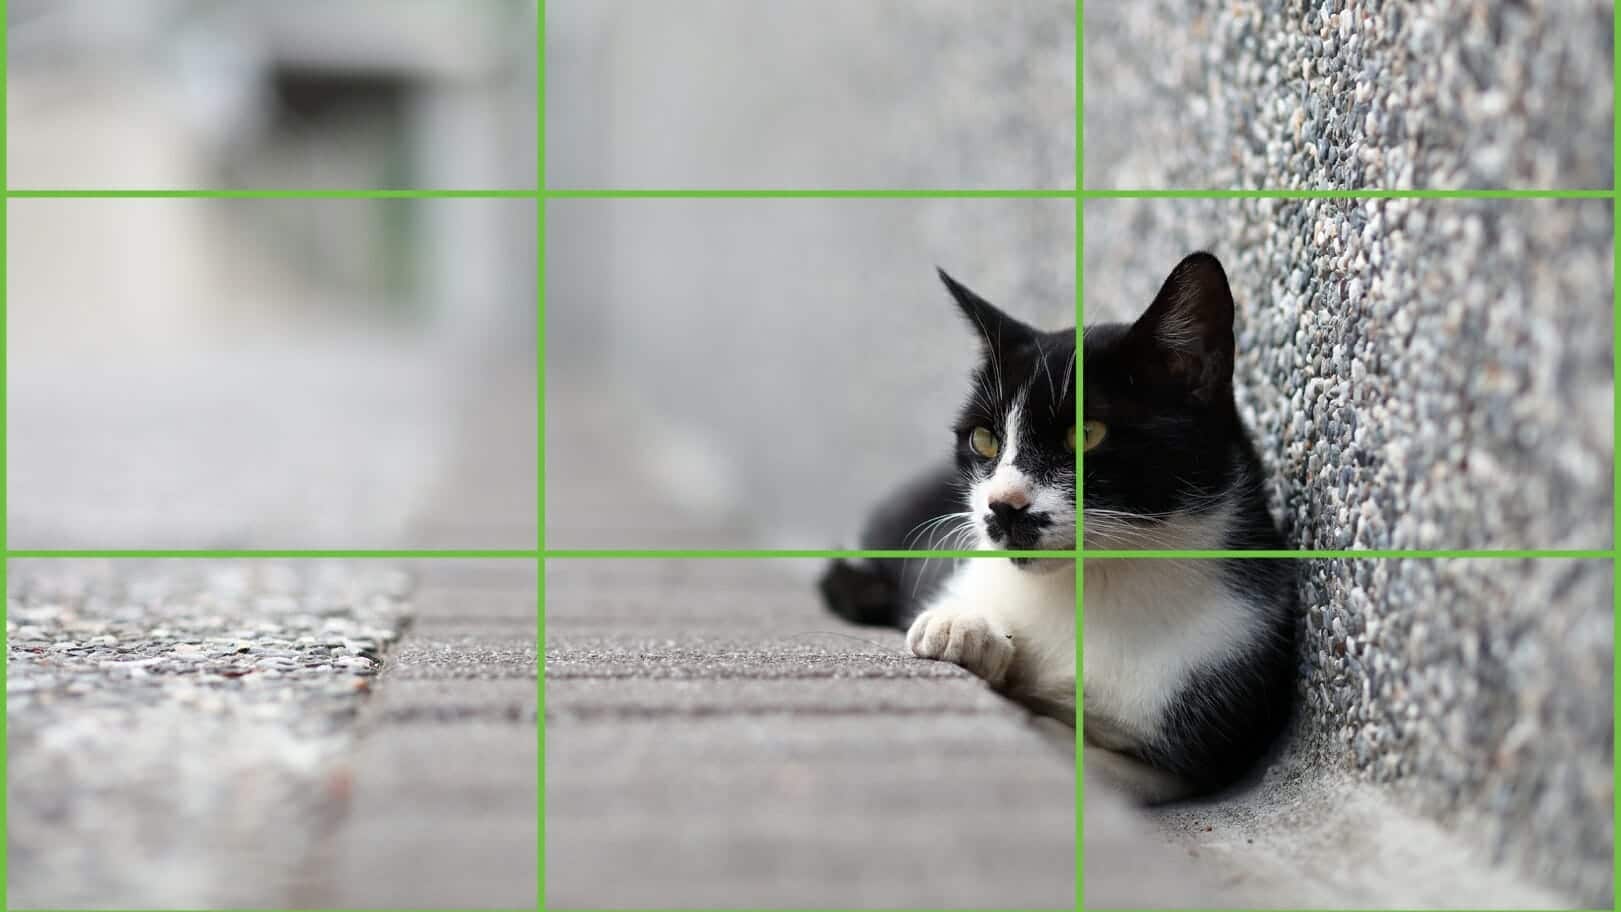
2. Rule of Thirds

|
|
Fig 1.1 Rule of Thirds grid in graphic layout Source: https://artplusmarketing.com/winning-composition-using-the-rule-of-thirds-in-desin-41bb6d48b409 |
|
|
Fig 1.2 Rule of Thirds grid in photography Source: https://blog.westerndigital.com/improve-your-photos-with-the-rule-of-thirds/ |
- Position the most important element at one of the intersection points of the grid to achieve a more natural look and also helps to draw in focus to the subject.
- It is recommended to have the horizon line at either the bottom or top of the grid.
- Rule of Thirds helps to creatively utilize the negative space in a composition.
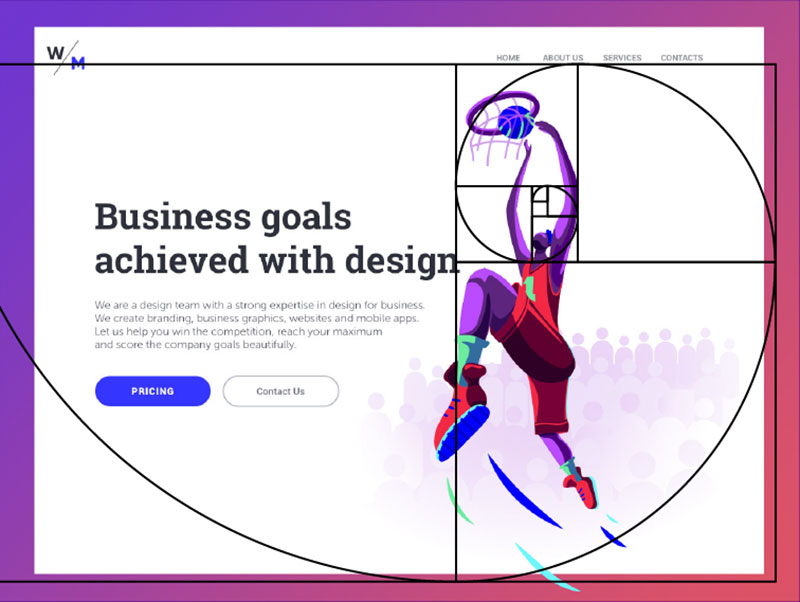
|
|
Fig 2.1 Golden Ratio spiral in graphic layout Source: https://wpamelia.com/golden-ratio/ |
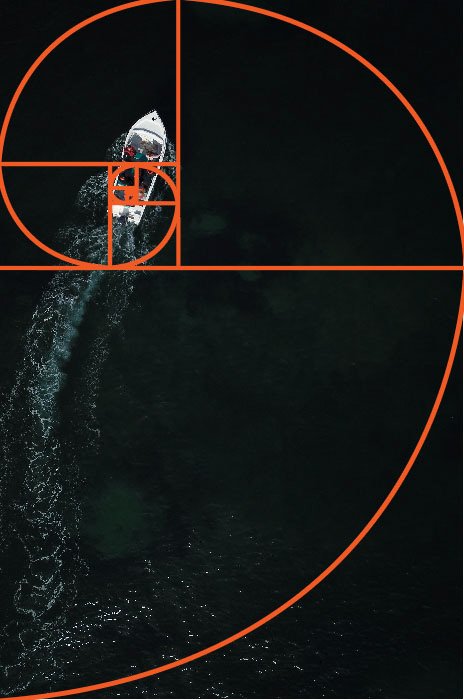
|
|
Fig 2.2 Golden Ratio spiral in photography Source: https://expertphotography.com/golden-ratio-vs-rule-of-thirds/ |
- A mathematical concept. When applied in design, in can create an organic and natural-looking composition.
- A guideline on how to arrange multiple elements.
1.Single shot: one character alone in a frame
- clean single: no other characters are in the frame
- dirty single: limited appearance of other characters
2. Two shot: two characters, both faces must be visible
- used to create relationship between two characters
- the terminology changes according to the amount of characters (e.g: three shot, four shot, crowd shot)
3. Over the shoulder: hybrid between single and two shot
- Used to create focus on a character but also communicate the relationship with the other character at the same time
4. Point of view (POV) shot: used to show the perspective of a character
5. Insert shot: close up of objects, to convey important information
Week 3 / Introduction to Photoshop 2
In this week's lecture, we were introduced to layering and making selections
using the pen tool and lasso tool in Adobe Photoshop.
Lasso tool
Regular lasso tool: Used to make freeform selections
Polygonal lasso tool: Similar to regular lasso tool but this tool uses straight lines instead. Good for making geometrical selections
Magnetic lasso tool: Using the software to detect boundaries of an object to make selection
Polygonal lasso tool: Similar to regular lasso tool but this tool uses straight lines instead. Good for making geometrical selections
Magnetic lasso tool: Using the software to detect boundaries of an object to make selection
Pen tool
Useful in making precise selections by creating paths

|
|
Fig 3.1 Pen tool technique Source: https://marekszkudlarek.wordpress.com/2015/09/21/what-is-a-path-what-is-an-anchor-point/ |
Layers
Layers act like different sheets of papers. It can be used to layer
different images on top or below an image and it is used for a
non-destructive workflow.
Tutorial work
In this week's tutorial class, we've tried out the different selection tools
and layering through making collages. For our first activity, we focused on
the methods of removing backgrounds in a picture and putting the isolated
objects in a background.

|
|
Fig 4.1 Isolating objects from their backgrounds using wand tool/pen tool/polygonal lasso tool |

|
| Fig 4.2 Provided background |

|
| Fig 4.3 Isolated objects inserted into the background |
For our second activity, we tried out on making a digital collage and
focused more on layering, resizing, layer blending modes and
composition. We used the images that were given to us for our digital
collage exercise in this in-class activity.

|
| Fig 4.4 All the given images |

|
| Fig 4.5 Collage done in class with Mr. Martin |
Week 4 / Introduction to Photoshop 3
In this week's lecture, we were introduced to the use of adjustment layers
and filters in Adobe Photoshop.
Adjustment layers
Adjustment layers provide a non-destructive method to edit images in
Photoshop. Since they are shown as a layer in the layer panel, it can be
changed or removed anytime without affecting the original picture. But
knowledge about masking and the brush tool is needed for selective editing
using these layers.
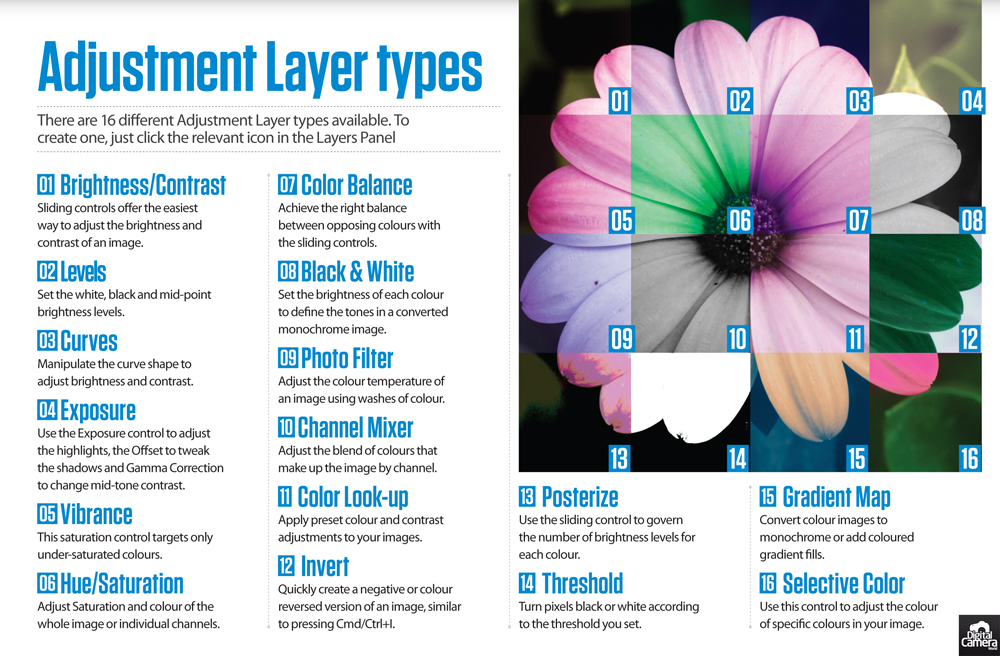
|
|
Fig 5.1 A summary of the types of adjustment layers Source: https://www.thephoblographer.com/2020/01/30/photography-cheat-sheet-adjustment-layer-types-101/ |
Few extra notes on adjustment layer types:-
Levels
The histogram in the property menu shows the luminance value of the image. In other words, it shows how dark and how bright each pixels are. Editing the slider below the histogram will result in different shades of tint to the photo.
Vibrance
A more subtle property compared to saturation. It has less noticeable effect
on skin tones.
Exposure
Exposure adjust the highights, offset adjust the midtones and gamma adjust the dark tones.
Exposure adjust the highights, offset adjust the midtones and gamma adjust the dark tones.
Filters
Photoshop provides a variety of filters that can be used to apply
distortion, stylization, or texture to an image. It can also be used to
correct an image by sharpening, blurring or changing the colour of a
photograph.
Tutorial work
For this week's tutorial activity, we've tried out the different adjustment
layer types with Mr. Martin by using them to edit a photograph provided to
us.

|
| Fig 5.2 Provided photograph |
Fig 5.3 Screen recording showing the editing done in-class
Tasks
Week 2 (30/8/2021): Physical collage
In our practical class, we were given 2 hours to create 3 physical
pre-composition collage using found materials (magazines, books, newspapers
etc.). Printed materials were allowed too. The elements in each collage can
be the same elements or different elements.

|
| Fig 1.1 Material cutouts used for the physical collages |

|
| Fig 1.2 First collage pre-composition |
For my first collage pre-composition, I tried to follow the golden ratio rule to create a flow of elements starting from the bottom to the top. I wanted to show the concept of exploration and traveling and hence "origin" and "enter the earth" is positioned below which leads to the airplane and phoenix above behind a starry background.

|
| Fig 1.3 Second collage pre-composition |
In my second pre-composition, I used the same concept in my first composition
but through a different arrangement of elements. I followed the rule of thirds
grid and put the subjects of focus on each intersection points. But it turns
out to look rather empty and rigid.
In my third pre-composition, I tried out a different approach in which I included pattern cutouts and used them for texture in the background. I added two large quotes to balance out the composition more and positioned the human model on one of the intersection points in the rule of thirds grid. The concept in this collage is to show the excitement of wanting to do everything that we're interested in although not having enough time, whether it be traveling, sightseeing, making music or other hobbies.

|
| Fig 1.4 Third collage pre-composition |
In my third pre-composition, I tried out a different approach in which I included pattern cutouts and used them for texture in the background. I added two large quotes to balance out the composition more and positioned the human model on one of the intersection points in the rule of thirds grid. The concept in this collage is to show the excitement of wanting to do everything that we're interested in although not having enough time, whether it be traveling, sightseeing, making music or other hobbies.
Week 3 (6/9/2021): Digital collage
For our practical class activity this week, we were tasked to make 3
different digital collage compositions in Adobe Photoshop using only the
images that were given to us. (Fig 4.4 in Week 3 lecture)

|
| Fig 2.1 First digital collage composition |
In my first composition, I followed the rule of thirds in positioning the building and the dark grey "join operation" paragraph cutout on the intersection points of the grid. I then positioned the fish at the middle of the composition because I want it to grab the attention of the viewers first. I also applied different blending modes to each of the elements used to create a "translucent" effect on the collage, and also to add a subtle texture to the background so it wouldn't look plain. There wasn't an exact concept in my mind when I'm making this collage but I wanted to include the theme of news documenting our everyday lives, no matter how mundane it is.

|
|
Fig 2.2 Inspiration for second digital collage Source: https://www.instagram.com/p/CRB5D91MAgn/ |

|
| Fig 2.3 Second digital collage composition |
For my second composition, I was inspired by a collage done by Graham
Tolbert (Fig 2.2). I really like the overlay layering effect in the
collage so I wanted to try incorporating that idea in my second digital
collage composition. I used 2 pictures from the 10 given to us and applied
different blending modes while stacking them on top of each other to
create a "glass paper" effect. I didn't want the background to look too
chaotic so I left the top right section to look more plain than the part
below. The theme I was going for in this collage is man-made vs nature, so
I wanted to contrast those two subject matter by focusing on using and
merging nature and man-made elements.

|
| Fig 2.3 Third digital collage composition |
In my third composition, I wanted to show the concept of opposite sides. So I used pictures of the old projector, liquid texture and typewriter to create an axis in the composition. I then mirror the two building image across the axis and changed the blending mode for the one at the top. The two collaged words are to give a bit of narrative for the two sides of the mirror image. The black and white circles and rectangles are to balance out the composition. A section from a newspaper image is at low opacity to add texture to the background.
Week 4 (13/9/2021): Adjustment on first digital collage

|
| Fig 2.4 Adjusted version of first digital collage composition |
After receiving feedback from Mr. Martin, I went to adjust the position
of the two word element by rotation so that the composition will look
more interesting. But I think it made the composition somewhat off
balance and a bit too all over the place.
Final outcome
Physical collage
After receiving feedback from Mr. Martin, my third pre-composition (Fig
1.3) is chosen for my final physical collage submission as the
composition in there is better than the other 2, which I thought so
too.
Fig 3.1 Final physical collage composition
Digital collage
After making comparison between my second composition and the adjusted version of my first composition, I've decided to choose my second composition as my final outcome as I think it's more interesting and the composition is better.
After making comparison between my second composition and the adjusted version of my first composition, I've decided to choose my second composition as my final outcome as I think it's more interesting and the composition is better.
Fig 3.2 Final digital collage composition
Fig 3.3 Process of final digital collage composition
Feedback
Week 3 (6/9/2021) - Physical Collage
The first pre-composition is too messy as the elements are too clustered
together. The elements are arranged better in the second pre-composition
than the first one but the squarish composition makes the collage loose
visual interest. The overall composition in the third pre-composition is
better than the first 2, the arrangement of the elements are not too
sparse or cluttered.
Week 4 (13/9/2021) - Digital Collage
The two rectangular word elements on opposite corners made the
composition look predictable, rotate them to see if it'll add interest
to the composition. As for the second composition, a lot of layering
work can be seen in the composition, which adds to a collage nature of
the outcome. The third composition overall looks very clean but not as
strong as the first two. Choose between the first and second composition
after making adjustment to the first one.
Reflection
This project was enjoyable because it was fun creating collages without a
set limitation, which means there are endless possibilities in what we can
create. I found that rules and guidelines, such as rules of third and
golden ratio are helpful in creating our composition but we don't
necessarily have to follow them strictly. We could deviate a bit and add
our own twist to it to create a more interesting outcome. I also learnt
that collage is abstract and chaotic by nature, a clean composition may be
pleasing to the eyes but it often doesn't give the feeling of spontaneity
that collages hold. To me, making collages is like finding order through
chaos.
Other than that, I also found Photoshop to be very fun to learn too. It is
a very powerful software and with the right understanding of its function,
we can create edits and manipulations that are interesting and in a much
more faster way than done physically.
Comments
Post a Comment